Zabbix安装途径
官网下载地址:
https://www.zabbix.com/download?zabbix=3.4&os_distribution=rhel&os_version=6&db=MySQL
https://www.zabbix.com/download_sources
四种途径:
rpm
源码
容器
下载虚拟应用
安装要求
Zabbix同时需要物理内存和磁盘空间。刚开始使用Zabbix,建议128MB物理内存和256MB可用磁盘空间。然而, 具体需要的内存大小和磁盘空间要根据主机数量和监控参数而定。如果你计划对监控的参数进行长期保存,你应该考虑至少在数据库中预留几个GB的空间,以用来保留历史数据。 每个Zabbix的守护进程需要与数据库服务器建立多个连接。分配给连接的内存数量,取决于数据库引擎的配置。
你使用的内存越多,你的数据库(也包括Zabbix)工作得越快!
根据监控参数及选择的数据库引擎,Zabbix,特别是Zabbix数据库,可能需要大量的CPU资源
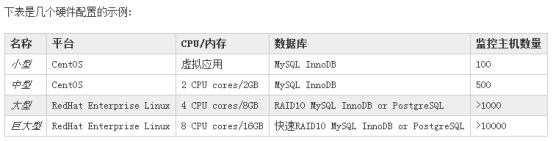
具体的配置极其依赖于Active Item数量和轮询频率。如需要进行大规模部署,强烈建议将数据库进行独立部署。
经测试,Zabbix可运行在下列平台:
Linux IBM AIX FreeBSD NetBSD
OpenBSD HP-UX Mac OS X Solaris
Windows: Windows 2000以后的所有桌面和服务器版本 (只可运行Zabbix agent)
Zabbix安装文档
官方文档安装地址:
rpm:https://www.zabbix.com/documentation/3.4/zh/manual/installation/install_from_packages
源码: https://www.zabbix.com/documentation/3.4/zh/manual/installation/install
容器: https://www.zabbix.com/documentation/3.4/zh/manual/installation/containers
安装步骤
配置基础环境
安装zabbix服务端
安装LAMP
源码安装zabbix server
配置zabbix web页面
在zabbix服务端安装agent端
在另一台Linux上安装agent端
一、配置基础环境
1.规划好IP地址
zabbix-server: 仅主机:172.16.50.50
zabbix-agent: 仅主机:172.16.50.50
2.配置hosts文件
3.关闭防火墙iptables和selinux
4.配置好本地yum
5.建立一个快照
二、安装zabbix 服务端(zabbix-server)
需要软件:
zabbix-3.4.3编译源码包
Mysql-5.7.17-glibc
系统自带Apache(1.3.12或以上)
php-5.6.30(要求5.4.0或以上)
libmcrypt-2.5.8
libevent-2.1.8
pcre-8.01
三、LAMP的安装
什么叫LAMP: Linux apache mysql php/perl/
还有LNMP nginx
安装Apache:
yum -y install httpd httpd-devel
安装mysql-5.7.17-glibc:
#useradd mysql
#tar xf mysql-5.7.17-linux-glibc2.5-x86_64.tar.gz -C /usr/local/
#cd /usr/local/
#mv mysql-5.7.17-linux-glibc2.5-x86_64/ mysql
#chown -R mysql:mysql mysql/
#cd mysql/bin
#./mysqld --initialize --datadir=/data
#vim /root/.bash_profile
PATH=$PATH:/usr/local/mysql/bin
#source /root/.bash_profile
#./mysqld_safe --skip-grant-tables &
mysql>flush privileges;
mysql>alter user root@localhost identified by ‘123’;
mysql>flush privileges;
四、配置文件 my.cnf内容
[root@mysql-tar ~]# cat /etc/my.cnf
[mysqld]
datadir=/data
socket=/tmp/mysql.sock
user=mysql
symbolic-links=0
log-error=/data/mysqld.log
pid-file=/data/mysqld.pid
lower_case_table_names=1
[mysql]
socket=/tmp/mysql.sock
五、编译安装PHP-5.6.30
1、添加依赖包:
# yum install -y gcc gcc-c++ autoconf libjpeg libjpeg-devel libpng libpng-devel freetype freetype-devel libpng libpng-devel libxml2 libxml2-devel zlib zlib-devel glibc glibc-devel glib2 glib2-devel bzip2 bzip2-devel ncurses curl openssl-devel db4-devel libXpm-devel libX11-devel gmp-devel readline-devel libxslt-devel expat-devel xmlrpc-c libcurl libcurl-devel
2、安装加密扩展库:libmcrypt
[root@zabbix-server ~]# tar xf libmcrypt-2.5.8.tar.gz
[root@zabbix-server ~]# cd libmcrypt-2.5.8
[root@zabbix-server libmcrypt-2.5.8]# ./configure && make && make install
3、安装php:
[root@zabbix-server ~]# tar xf php-5.6.30.tar.gz
[root@zabbix-server ~]# cd php-5.6.30
[root@zabbix-server php-5.6.30]# ./configure --prefix=/usr/local/php --with-config-file-path=/etc --with-apxs2=/usr/sbin/apxs --with-mysql=/usr/local/mysql --with-mysqli=/usr/local/mysql/bin/mysql_config --enable-inline-optimization --enable-fpm --enable-soap --with-libxml-dir --with-xmlrpc --with-openssl --with-mcrypt --with-mhash --with-pcre-regex --with-sqlite3 --with-zlib --enable-bcmath --with-iconv --with-bz2 --enable-calendar --with-curl --with-cdb --enable-dom --enable-exif --enable-fileinfo --enable-filter --with-pcre-dir --enable-ftp --with-gd --with-openssl-dir --with-jpeg-dir --with-png-dir --with-zlib-dir --with-freetype-dir --enable-gd-native-ttf --with-gettext --with-gmp --with-mhash --enable-json --enable-mbstring --disable-mbregex --disable-mbregex-backtrack --with-libmbfl --with-onig --enable-pdo --with-pdo-mysql --with-zlib-dir --with-pdo-sqlite --with-readline --enable-session --enable-shmop --enable-simplexml --enable-sockets --enable-sysvmsg --enable-sysvsem --enable-sysvshm --enable-wddx --with-libxml-dir --with-xsl --enable-zip --enable-mysqlnd-compression-support --with-pear
[root@zabbix-server php-5.6.30]# make && make install
六、配置PHP
1、拷贝php.ini和php-fpm.conf:
[root@zabbix-server php-5.6.30]# cp php.ini-production /etc/php.ini
[root@zabbix-server php-5.6.30]# cp /usr/local/php/etc/php-fpm.conf.default /usr/local/php/etc/php-fpm.conf
[root@zabbix-server php-5.6.30]# cp sapi/fpm/init.d.php-fpm /etc/init.d/php-fpm
[root@zabbix-server php-5.6.30]# chmod +x /etc/init.d/php-fpm
2、fpm测试php配置:
[root@zabbix-server php-5.6.30]# /usr/local/php/sbin/php-fpm -t
[25-Dec-2017 12:47:10] NOTICE: configuration file /usr/local/php/etc/php-fpm.conf test is successful
[root@zabbix-server php-5.6.30]#
3、添加到server里管理启动:
[root@zabbix-server php-5.6.30]# chkconfig --add php-fpm
[root@zabbix-server php-5.6.30]# chkconfig php-fpm on
[root@zabbix-server php-5.6.30]# service php-fpm start
Starting php-fpm done
4、修改PHP默认端口:
[root@zabbix-server php-5.6.30]# vim /usr/local/php/etc/php-fpm.conf
将这个值修改为----》listen = 127.0.0.1:8000
5、重启生效:
[root@zabbix-server zabbix-3.4.3]# service php-fpm restart
Gracefully shutting down php-fpm . done
Starting php-fpm done
[root@zabbix-server zabbix-3.4.3]# netstat -tnulp|grep fpm
tcp 0 0 127.0.0.1:8000 0.0.0.0:* LISTEN 73066/php-fpm
[root@zabbix-server zabbix-3.4.3]#
七、配置Apache访问PHP
配置httpd.conf让Apache支持PHP:
# vim /etc/httpd/conf/httpd.conf
在AddType application/x-gzip .gz .tgz下面添加如下内容:
AddType application/x-httpd-php .php
AddType application/x-httpd-php-source .phps
修改主页位置:
DirectoryIndex index.php index.html index.html.var
添加加载模块:(执行完上面后,该行已经存在在配置文件中,无需重复加载)
LoadModule php5_module /usr/lib64/httpd/modules/libphp5.so
八、安装zabbix server源码包
安装zabbix server所需的包:
[root@zabbix-server ~]# yum -y install curl libcurl-devel net-snmp net-snmp-devel perl-DBI libdbi-dbd-mysql mysql-devel gcc gcc-c++ make libxml2 libxml2-devel
解压源码包
[root@zabbix-server ~]# tar xf zabbix-3.4.3.tar.gz
创建zabbix用户组和用户:
[root@zabbix-server ~]# groupadd zabbix
[root@zabbix-server ~]# useradd -g zabbix zabbix
先安装libevent:
[root@zabbix-server ~]# tar xf libevent-2.1.8-stable.tar.gz
[root@zabbix-server ~]# cd libevent-2.1.8-stable
[root@zabbix-server libevent-2.1.8-stable]# ./configure && make && make install
再安装pcre:
[root@zabbix-server ~]# tar xf pcre-8.01.tar.gz
[root@zabbix-server ~]# cd pcre-8.01
[root@zabbix-server pcre-8.01]# ./configure && make && make install
(可选)再安装net-snmp:
[root@zabbix-server ~]# yum install net-snmp -y
(可选)再安装odbc支持组件:
[root@zabbix-server ~]# yum -y install unixODBC unixODBC-devel
[root@zabbix-server ~]# yum install mysql-connector-odbc -y
(可选)再安装libssh2支持组件:
[root@management_platform zabbix_soft]# tar xf libssh2-1.8.0.tar.gz
[root@management_platform zabbix_soft]# cd libssh2-1.8.0
[root@management_platform libssh2-1.8.0]# ./configure && make && make install
安装zabbix-server:不要忘了加snmp和odbc和ssh2支持选项
[root@zabbix-server ~]# tar xf zabbix-3.4.3.tar.gz
[root@zabbix-server ~]# cd zabbix-3.4.3
[root@zabbix-server zabbix-3.4.3]# ./configure --prefix=/usr/local/zabbix-server --enable-server --with-mysql --with-net-snmp --with-unixodbc --with-libcurl --with-libxml2 --enable-agent --enable-ipv6 --enable-proxy --with-ssh2 && make install
[root@zabbix-server zabbix-3.4.3]#
九、配置zabbix server的数据库
创建数据库和zabbix用户并授权:
mysql> create database zabbix charset utf8;
mysql> grant all on zabbix.* to zabbix@localhost identified by '123';
mysql> flush privileges;
导入zabbix数据:
[root@zabbix-server zabbix-3.4.3]# mysql -uzabbix -p123 zabbix < database/mysql/schema.sql
[root@zabbix-server zabbix-3.4.3]# mysql -uzabbix -p123 zabbix < database/mysql/images.sql
[root@zabbix-server zabbix-3.4.3]# mysql -uzabbix -p123 zabbix < database/mysql/data.sql
十、配置zabbix server
复制web目录:
[root@zabbix-server zabbix-3.4.3]# cp -R frontends/php /var/www/zabbix/
[root@zabbix-server zabbix-3.4.3]# mkdir php
[root@zabbix-server zabbix-3.4.3]# mv ./* php/
[root@zabbix-server zabbix-3.4.3]# chmod 777 /var/www/zabbix/php/conf
创建zabbix日志目录并给目录授权:
[root@zabbix-server ~]# mkdir /var/log/zabbix
[root@zabbix-server ~]# chown -R zabbix:zabbix /var/log/zabbix/
修改zabbix server配置文件:
[root@zabbix-server etc]# cp /usr/local/zabbix-server/etc/zabbix_server.conf /usr/local/zabbix-server/etc/zabbix_server.conf.bak 最好备份一下
[root@zabbix-server etc]# vim /usr/local/zabbix-server/etc/zabbix_server.conf
LogFile=/var/log/zabbix/zabbix_server.log
DBHost=localhost(IP地址)
DBName=zabbix
DBUser=zabbix
DBPassword=123
DBSocket= /data/mysql.sock 根据实际情况指定
DBPort = 3306
Timeout=4
LogSlowQueries=3000
十一、启动zabbix服务并配置环境变量
添加服务以及服务自启动:
[root@zabbix-server zabbix-3.4.3]# cd /root/server/zabbix-3.4.3
[root@zabbix-server zabbix-3.4.3]# cp misc/init.d/fedora/core/zabbix_server /etc/init.d/
[root@zabbix-server zabbix-3.4.3]# chkconfig --add zabbix_server
[root@zabbix-server zabbix-3.4.3]# chkconfig zabbix_server on
[root@zabbix-server zabbix-3.4.3]# ln -s /usr/local/zabbix-server/bin /usr/bin/
[root@zabbix-server zabbix-3.4.3]# cp /usr/local/zabbix-server/sbin/zabbix_server /usr/local/sbin/
[root@zabbix-server zabbix-3.4.3]# ln -s /usr/local/lib/libevent-2.1.so.6 /usr/lib64/
[root@zabbix-server zabbix-3.4.3]# service zabbix_server start
Starting zabbix_server: [ OK ]
[root@zabbix-server zabbix-3.4.3]#
配置zabbix环境变量:
#vim /root/.bash_profile
PATH=$PATH:$HOME/bin:/usr/local/mysql/bin:/usr/local/zabbix-server/bin
# source /root/.bash_profile
十二、配置zabbix web页面
编辑zabbix前端的配置文件:vim /etc/httpd/conf.d/zabbix.conf
# Zabbix monitoring system php web frontend
Alias /zabbix /var/www/zabbix/php
<Directory "/var/www/zabbix/php">
Options FollowSymLinks
AllowOverride None
Order allow,deny
Allow from all
#Require all granted
<IfModule mod_php5.c>
php_value max_execution_time 300
php_value memory_limit 128M
php_value post_max_size 16M
php_value upload_max_filesize 2M
php_value max_input_time 300
php_value always_populate_raw_post_data -1
# php_value date.timezone Europe/Riga
php_value date.timezone Asia/Shanghai
</IfModule>
</Directory>
修改httpd配置文件中servername:
# vim /etc/httpd/conf/httpd.conf
ServerName localhost:80
重启httpd服务并添加服务及开机自启:
[root@zabbix-server conf]# service httpd start
Starting httpd: [ OK ]
[root@zabbix-server ~]# chkconfig --add httpd
[root@zabbix-server ~]# chkconfig httpd on
重启zabbix_server:
[root@zabbix-server conf]# service zabbix_server restart
Shutting down zabbix_server: [ OK ]
Starting zabbix_server: [ OK ]
十三、网页访问进行安装
在浏览器中访问zabbix server:http://192.168.120.23/zabbix
Zabbix服务器端也开启agent代理
添加agentd服务及自启动:
[root@zabbix-server etc]# cp /root/server/zabbix-3.4.3/misc/init.d/fedora/core/zabbix_agentd /etc/init.d/
[root@zabbix-server etc]# chkconfig --add zabbix_agentd
[root@zabbix-server etc]# chkconfig zabbix_agentd on
编辑agentd配置文件:
[root@zabbix-server etc]# cat /usr/local/zabbix-server/etc/zabbix_agentd.conf
LogFile=/var/log/zabbix/zabbix_agentd.log
Server=172.16.120.23(本机IP地址)
ServerActive=172.16.120.23(本机IP地址)
Hostname=mysql-tar
UnsafeUserParameters=1
启动agentd:
[root@zabbix-server etc]# ln -s /usr/local/zabbix-server/sbin/zabbix_agentd /usr/local/sbin/
[root@zabbix-server etc]# service zabbix_agentd start
Starting zabbix_agentd: [ OK ]
Linux端安装及配置zabbix agent
所需软件:
Zabbix-3.4.3编译源码包
Pcre-8.01
创建zabbix用户组和用户:
[root@rhat-6-zabbix-agent ~]# groupadd zabbix
[root@rhat-6-zabbix-agent ~]# useradd -g zabbix zabbix
安装依赖包pcre:
先安装好编译工具:
[root@rhat-6-zabbix-agent ~]# yum install gcc-c++ -y
安装pcre:
[root@rhat-6-zabbix-agent ~]# tar xf pcre-8.01.tar.gz
[root@rhat-6-zabbix-agent ~]# cd pcre-8.01
[root@rhat-6-zabbix-agent pcre-8.01]# ./configure && make && make install
编译安装zabbix agent:
[root@rhat-6-zabbix-agent ~]# tar xf zabbix-3.4.3.tar.gz
[root@rhat-6-zabbix-agent ~]# cd zabbix-3.4.3
[root@rhat-6-zabbix-agent zabbix-3.4.3]# ./configure --prefix=/usr/local/zabbix-agent --enable-agent && make install
创建日志目录并授权:
[root@rhat-6-zabbix-agent fedora]# mkdir /var/log/zabbix
[root@rhat-6-zabbix-agent fedora]# chown -R zabbix:zabbix /var/log/zabbix/
修改agent配置文件:
[root@rhat-6-zabbix-agent zabbix-agent]# vim /usr/local/zabbix-agent/etc/zabbix_agentd.conf
LogFile=/var/log/zabbix/zabbix_agentd.log
Server=172.16.50.50(本机IP地址)
ServerActive=172.16.50.50(本机IP地址)
Hostname=mysql-rpm
UnsafeUserParameters=1
Timeout=8
添加服务方式启动以及开机自启动:
[root@rhat-6-zabbix-agent fedora]# cp /root/agent/zabbix-3.4.3/misc/init.d/fedora/core/zabbix_agentd /etc/init.d/
[root@rhat-6-zabbix-agent fedora]# chkconfig --add zabbix_agentd
[root@rhat-6-zabbix-agent fedora]# chkconfig zabbix_agentd on
[root@rhat-6-zabbix-agent fedora]# ln -s /usr/local/zabbix-agent/sbin/zabbix_agentd /usr/local/sbin/
[root@rhat-6-zabbix-agent fedora]# service zabbix_agentd start
Starting zabbix_agentd: [ OK ]
将软件中默认配置文件拷贝到agent下:
# cp /root/agent/zabbix-3.4.3/conf/zabbix_agentd/userparameter_examples.conf /usr/local/zabbix-agent/etc/zabbix_agentd.conf.d/
# cp /root/agent/zabbix-3.4.3/conf/zabbix_agentd/userparameter_mysql.conf /usr/local/zabbix-agent/etc/zabbix_agentd.conf.d/
添加zabbix环境变量:vim /root/.bash_profile
在PATH后面添加zabbix bin位置:PATH=$PATH:$HOME/bin:/usr/local/zabbix-agent/bin
执行生效:# source /root/.bash_profile
添加主机名
[root@zabbix-server bin]# cat /etc/hosts
127.0.0.1 localhost localhost.localdomain localhost4 localhost4.localdomain4
::1 localhost localhost.localdomain localhost6 localhost6.localdomain6
172.16.20.2 rh-mysql-2
172.16.20.1 rh-mysql-1
172.16.50.50 zabbix-server

网页上zabbix时红色的,需要等待几分钟,怎么快速判断连接没有问题,已经可用?
可以通过一个键值(agent.ping),在zabbix-server端执行:
# zabbix_get -sserver -p10050 -k agent.ping----返回值为1,则是可用的。
# zabbix_get -szbx-agent -sserver -p10050 -k agent.ping ----返回值为1,则是可用的。
创建一个超级管理用户
修改:
用户显示语言
刷新频率
主题
密码等
Zabbix web中添加主机监控
给主机添加一个模板(查看模板监控项中的图形)