简介
当我们的业务系统越来越庞大复杂的时候,各种配置就会层出不群。一旦配置修改了,那么我们就是必须修改后停服务,然后再上线,如果服务少,我们可以手动来操作,如果是成千上百的服务,如果是手动操作,肯定就不合适宜了,然后SpringCloudConfig就出来了,就是我们通常意义上的配置中心,把应用原本放在本地文件的配置抽取出来放在中心服务器,从而能够提供更好的管理、发布能力。
SpringCloudConfig分服务端和客户端,服务端负责将git(svn或本地文件系统)中存储的配置文件发布成REST接口,客户端可以从服务端REST接口获取配置。但客户端并不能主动感知到配置的变化,从而主动去获取新的配置,这需要每个客户端通过POST方法触发各自的/refresh。
SpringCloudBus通过一个轻量级消息代理连接分布式系统的节点。这可以用于广播状态更改(如配置更改)或其他管理指令。SpringCloudBus提供了通过POST方法访问的endpoint/bus/refresh,这个接口通常由git的webhook功能调用,用以通知各个SpringCloudConfig的客户端去服务端更新配置,本节就讲怎么搭建一套自动刷新的spring cloud config
一、创建模块
模块结构如下:

二、maven聚合模块microservice-config的pom.xml文件
<?xml version="1.0" encoding="UTF-8"?>
<project xmlns="http://maven.apache.org/POM/4.0.0"
         xmlns:xsi="http://www.w3.org/2001/XMLSchema-instance"
         xsi:schemaLocation="http://maven.apache.org/POM/4.0.0 http://maven.apache.org/xsd/maven-4.0.0.xsd">
    <parent>
        <groupId>org.springframework.boot</groupId>
        <artifactId>spring-boot-starter-parent</artifactId>
        <version>1.4.5.RELEASE</version>
    </parent>
    <modelVersion>4.0.0</modelVersion>
    <groupId>com.jacky</groupId>
    <artifactId>miroservice-config</artifactId>
    <packaging>pom</packaging>
    <version>1.0-SNAPSHOT</version>
    <modules>
        <module>microservice-config-server</module>
        <module>microservice-config-eureka</module>
        <module>microservice-config-client</module>
    </modules>

    <properties>
        <project.build.sourceEncoding>UTF-8</project.build.sourceEncoding>
        <project.reporting.outputEncoding>UTF-8</project.reporting.outputEncoding>
        <java.version>1.8</java.version>
        <docker.image.prefix>jacky</docker.image.prefix><!--配置镜像仓库的属性-->
        <docker.repostory>192.168.6.132:5000</docker.repostory><!--配置镜像仓库的对应的地址与端口-->
    </properties>

    <dependencyManagement>
        <dependencies>
            <dependency>
                <groupId>org.springframework.cloud</groupId>
                <artifactId>spring-cloud-dependencies</artifactId>
                <version>Camden.SR7</version>
                <type>pom</type>
                <scope>import</scope>
            </dependency>
        </dependencies>
    </dependencyManagement>

    <build>
        <plugins>
            <plugin>
                <groupId>org.springframework.boot</groupId>
                <artifactId>spring-boot-maven-plugin</artifactId>
            </plugin>
        </plugins>
        <!--添加利用maven插件构建docker镜像的插件依赖-->
        <pluginManagement>
            <plugins>
                <plugin>
                    <groupId>com.spotify</groupId>
                    <artifactId>docker-maven-plugin</artifactId>
                    <version>0.4.13</version>
                </plugin>
            </plugins>
        </pluginManagement>
    </build>

</project>
三、配置中心模块(microservice-config-eureka)
3.1、pom.xml
<?xml version="1.0" encoding="UTF-8"?>
<project xmlns="http://maven.apache.org/POM/4.0.0"
         xmlns:xsi="http://www.w3.org/2001/XMLSchema-instance"
         xsi:schemaLocation="http://maven.apache.org/POM/4.0.0 http://maven.apache.org/xsd/maven-4.0.0.xsd">
    <parent>
        <artifactId>miroservice-config</artifactId>
        <groupId>com.jacky</groupId>
        <version>1.0-SNAPSHOT</version>
    </parent>
    <modelVersion>4.0.0</modelVersion>

    <artifactId>microservice-config-eureka</artifactId>
    <packaging>jar</packaging>
    <properties>
        <project.build.sourceEncoding>UTF-8</project.build.sourceEncoding>
    </properties>

    <dependencies>
        <dependency>
            <groupId>org.springframework.cloud</groupId>
            <artifactId>spring-cloud-starter-eureka-server</artifactId>
        </dependency>
        <dependency>
            <groupId>org.springframework.boot</groupId>
            <artifactId>spring-boot-starter-security</artifactId>
        </dependency>
    </dependencies>

    <build>
        <plugins>
            <plugin>
                <groupId>com.spotify</groupId>
                <artifactId>docker-maven-plugin</artifactId>
                <executions>
                    <!--设置在执行maven 的install时构建镜像-->
                    <execution>
                        <id>build-image</id>
                        <phase>install</phase>
                        <goals>
                            <goal>build</goal>
                        </goals>
                    </execution>
                </executions>
                <configuration>
                    <!--安装了docker的主机,并且打开了api remote接口设置-->
                    <dockerHost>http://192.168.6.130:5678</dockerHost>
                    <pushImage>true</pushImage><!--设置上传镜像到私有仓库,需要docker设置指定私有仓库地址-->
                    <!--镜像名称-->
                    <imageName>${docker.repostory}/${docker.image.prefix}/${project.artifactId}:${project.version}</imageName>
                    <!--镜像的基础版本-->
                    <baseImage>java:openjdk-8-jdk-alpine</baseImage>
                    <!--镜像启动参数-->
                    <entryPoint>["java", "-jar", "/${project.build.finalName}.jar"]</entryPoint>
                    <resources>
                        <resource>
                            <targetPath>/</targetPath>
                            <directory>${project.build.directory}</directory>
                            <include>${project.build.finalName}.jar</include>
                        </resource>
                    </resources>
                </configuration>
            </plugin>
        </plugins>
    </build>
</project>
3.2、application.yml
spring:
  application:
    name: microservice-config-server
security:
  basic:
    enabled: true
  user:
    name: jacky
    password: admin
server:
  port: 9511
eureka:
  client:
    register-with-eureka: false
    fetch-registry: false
    service-url:
      defaultZone: http://jacky:admin@localhost:9511/eureka
3.3、启动类EurekaApplication.java
package com.jacky.cloud;

import org.springframework.boot.SpringApplication;
import org.springframework.boot.autoconfigure.SpringBootApplication;
import org.springframework.cloud.netflix.eureka.server.EnableEurekaServer;

@SpringBootApplication
@EnableEurekaServer
public class EurekaApplication {

  public static void main(String[] args) {
    SpringApplication.run(EurekaApplication.class, args);
  }

}
四、配置中心服务端(microservice-config-server)
4.1、pom.xml文件
<?xml version="1.0" encoding="UTF-8"?>
<project xmlns="http://maven.apache.org/POM/4.0.0"
         xmlns:xsi="http://www.w3.org/2001/XMLSchema-instance"
         xsi:schemaLocation="http://maven.apache.org/POM/4.0.0 http://maven.apache.org/xsd/maven-4.0.0.xsd">
    <parent>
        <artifactId>miroservice-config</artifactId>
        <groupId>com.jacky</groupId>
        <version>1.0-SNAPSHOT</version>
    </parent>
    <modelVersion>4.0.0</modelVersion>

    <artifactId>microservice-config-server</artifactId>
    <packaging>jar</packaging>

    <properties>
        <project.build.sourceEncoding>UTF-8</project.build.sourceEncoding>
    </properties>

    <dependencies>
        <dependency>
            <groupId>org.springframework.cloud</groupId>
            <artifactId>spring-cloud-config-server</artifactId>
        </dependency>
        <dependency>
            <groupId>org.springframework.cloud</groupId>
            <artifactId>spring-cloud-starter-eureka</artifactId>
        </dependency>
        <dependency>
            <groupId>org.springframework.cloud</groupId>
            <artifactId>spring-cloud-starter-bus-amqp</artifactId>
        </dependency>
        <!--配置认证所需要的包-->
        <dependency>
            <groupId>org.springframework.boot</groupId>
            <artifactId>spring-boot-starter-security</artifactId>
        </dependency>
        <dependency>
            <groupId>org.springframework.boot</groupId>
            <artifactId>spring-boot-starter-actuator</artifactId>
        </dependency>
    </dependencies>

    <build>
        <plugins>
            <plugin>
                <groupId>com.spotify</groupId>
                <artifactId>docker-maven-plugin</artifactId>
                <executions>
                    <!--设置在执行maven 的install时构建镜像-->
                    <execution>
                        <id>build-image</id>
                        <phase>install</phase>
                        <goals>
                            <goal>build</goal>
                        </goals>
                    </execution>
                </executions>
                <configuration>
                    <!--安装了docker的主机,并且打开了api remote接口设置-->
                    <dockerHost>http://192.168.6.130:5678</dockerHost>
                    <pushImage>true</pushImage><!--设置上传镜像到私有仓库,需要docker设置指定私有仓库地址-->
                    <!--镜像名称-->
                    <imageName>${docker.repostory}/${docker.image.prefix}/${project.artifactId}:${project.version}</imageName>
                    <!--镜像的基础版本-->
                    <baseImage>java:openjdk-8-jdk-alpine</baseImage>
                    <!--镜像启动参数-->
                    <entryPoint>["java", "-jar", "/${project.build.finalName}.jar"]</entryPoint>
                    <resources>
                        <resource>
                            <targetPath>/</targetPath>
                            <directory>${project.build.directory}</directory>
                            <include>${project.build.finalName}.jar</include>
                        </resource>
                    </resources>
                </configuration>
            </plugin>
        </plugins>
    </build>

</project>
4.2、application.yml文件
server:
  port: 9518
eureka:
  instance:
    prefer-ip-address: true                   # 开启健康检查(需要spring-boot-starter-actuator依赖)
    lease-expiration-duration-in-seconds: 90  #续约到期时间(单位 S)默认是90S
    lease-renewal-interval-in-seconds: 30     # 续约更新时间间隔(默认30秒)
    instance-id: ${spring.application.name}:${spring.cloud.client.ipAddress}:${spring.application.instance_id:${server.port}}
  client:
    serviceUrl:
     defaultZone: http://jacky:admin@localhost:9511/eureka/ #把configservice注册到eureka上,以便于客户端通过eureka上注册的信息找到configservice
#实现的基本的 HttpBasic 的认证
security:
  basic:
    enabled: true     # 开启基于HTTP basic的认证
  user:
    name: jacky123      # 配置登录的账号
    password: admin123   # 配置登录的密码
#
spring:
  application:
    name: microservice-config-service
  cloud:
    config:
      server:
        git:
          uri: http://git.oschina.net/jacky-lulu/microservice-config-repo  #配置git仓库位置
          clone-on-start: true #在启动的时候克隆仓库
          search-paths: '{application}' #配置仓库路径下的相对搜索位置,可以配置多个
          username: myuser   #填写git仓库的用户名
          password: mypass   #填写git仓库的密码
  rabbitmq:
    host: 192.168.6.130
    port: 5672
    username: myuser
    password: mypass
4.3、启动类ConfigServerApplication.java
package com.jacky.cloud;

import org.springframework.boot.SpringApplication;
import org.springframework.boot.autoconfigure.SpringBootApplication;
import org.springframework.cloud.client.discovery.EnableDiscoveryClient;
import org.springframework.cloud.config.server.EnableConfigServer;

@SpringBootApplication
@EnableDiscoveryClient
@EnableConfigServer
public class ConfigServerApplication {
  public static void main(String[] args) {
    SpringApplication.run(ConfigServerApplication.class, args);
  }
}
五、客户端(microservice-config-client)
5.1、pom.xml配置文件
<?xml version="1.0" encoding="UTF-8"?>
<project xmlns="http://maven.apache.org/POM/4.0.0"
         xmlns:xsi="http://www.w3.org/2001/XMLSchema-instance"
         xsi:schemaLocation="http://maven.apache.org/POM/4.0.0 http://maven.apache.org/xsd/maven-4.0.0.xsd">
    <parent>
        <artifactId>miroservice-config</artifactId>
        <groupId>com.jacky</groupId>
        <version>1.0-SNAPSHOT</version>
    </parent>
    <modelVersion>4.0.0</modelVersion>

    <artifactId>microservice-config-client</artifactId>
    <packaging>jar</packaging>

    <properties>
        <project.build.sourceEncoding>UTF-8</project.build.sourceEncoding>
    </properties>

    <dependencies>
        <dependency>
            <groupId>org.springframework.cloud</groupId>
            <artifactId>spring-cloud-starter-config</artifactId>
        </dependency>
        <dependency>
            <groupId>org.springframework.boot</groupId>
            <artifactId>spring-boot-starter-web</artifactId>
        </dependency>

        <dependency>
            <groupId>org.springframework.cloud</groupId>
            <artifactId>spring-cloud-starter-eureka</artifactId>
        </dependency>

        <dependency>
            <groupId>org.springframework.boot</groupId>
            <artifactId>spring-boot-starter-actuator</artifactId>
        </dependency>
        <dependency>
            <groupId>org.springframework.cloud</groupId>
            <artifactId>spring-cloud-starter-bus-amqp</artifactId>
        </dependency>
    </dependencies>

    <build>
        <plugins>
            <plugin>
                <groupId>com.spotify</groupId>
                <artifactId>docker-maven-plugin</artifactId>
                <executions>
                    <!--设置在执行maven 的install时构建镜像-->
                    <execution>
                        <id>build-image</id>
                        <phase>install</phase>
                        <goals>
                            <goal>build</goal>
                        </goals>
                    </execution>
                </executions>
                <configuration>
                    <!--安装了docker的主机,并且打开了api remote接口设置-->
                    <dockerHost>http://192.168.6.130:5678</dockerHost>
                    <pushImage>true</pushImage><!--设置上传镜像到私有仓库,需要docker设置指定私有仓库地址-->
                    <!--镜像名称-->
                    <imageName>${docker.repostory}/${docker.image.prefix}/${project.artifactId}:${project.version}</imageName>
                    <!--镜像的基础版本-->
                    <baseImage>java:openjdk-8-jdk-alpine</baseImage>
                    <!--镜像启动参数-->
                    <entryPoint>["java", "-jar", "/${project.build.finalName}.jar"]</entryPoint>
                    <resources>
                        <resource>
                            <targetPath>/</targetPath>
                            <directory>${project.build.directory}</directory>
                            <include>${project.build.finalName}.jar</include>
                        </resource>
                    </resources>
                </configuration>
            </plugin>
        </plugins>
    </build>


</project>
5.2、application.yml文件
server:
  port: 8081
5.3、bootstrap.yml文件
spring:
  cloud:
    config:
      username: jacky123  #configservice认证的用户名
      password: admin123   #认证密码
      label: master   # 仓库的分支节点
      discovery:
        enabled: true
        service-id: microservice-config-service
      profile: dev   #仓库中对应文件的环境,如dev、prod、test等
      fail-fast: true
    bus:
      trace:
        enabled: true  #开启消息跟踪
  application:
    name: microservice-config-client
  rabbitmq:
    host: 192.168.6.130
    port: 5672
    username: myuser
    password: mypass
eureka:
  client:
    serviceUrl:
      defaultZone: http://jacky:admin@localhost:9511/eureka
  instance:
    prefer-ip-address: true
management:
  security:
    enabled: false    #刷新时关闭安全认证
注意:
上面这些属性必须配置在bootstrap.yml,服务端的配置内容才能正确加载。因为通过bootstrap.yml的加载优先级比配置中心的服务端的高,服务端加载优先于application.yml,所以如果你把上面的配置写在application.yml中,相当于默认不是从配置中心的服务端中读取的配置信息,而是spring boot的默认加载。启动的时候就会看到加载的配置,不是配置中心得配置内容,而是默认的本地的
5.4、启动类(ConfigClientApplication.java)
package com.jacky.cloud;

import org.springframework.boot.SpringApplication;
import org.springframework.boot.autoconfigure.SpringBootApplication;
import org.springframework.cloud.client.discovery.EnableDiscoveryClient;

@SpringBootApplication
@EnableDiscoveryClient
public class ConfigClientApplication {
  public static void main(String[] args) {
    SpringApplication.run(ConfigClientApplication.class, args);
  }
}
5.5、控制层类(ConfigClientController.java)
package com.jacky.cloud.controller;

import org.springframework.beans.factory.annotation.Value;
import org.springframework.cloud.context.config.annotation.RefreshScope;
import org.springframework.web.bind.annotation.GetMapping;
import org.springframework.web.bind.annotation.RestController;

@RefreshScope
@RestController
public class ConfigClientController {

  @Value("${profile}")
  private String profile;

  @GetMapping("/profile")
  public String getProfile() {
    return this.profile;
  }
}
六、在码云创建git项目,放置配置文件
地址:https://gitee.com/jacky-lulu/microservice-config-repo
七、测试
7.1、http://localhost:9511/

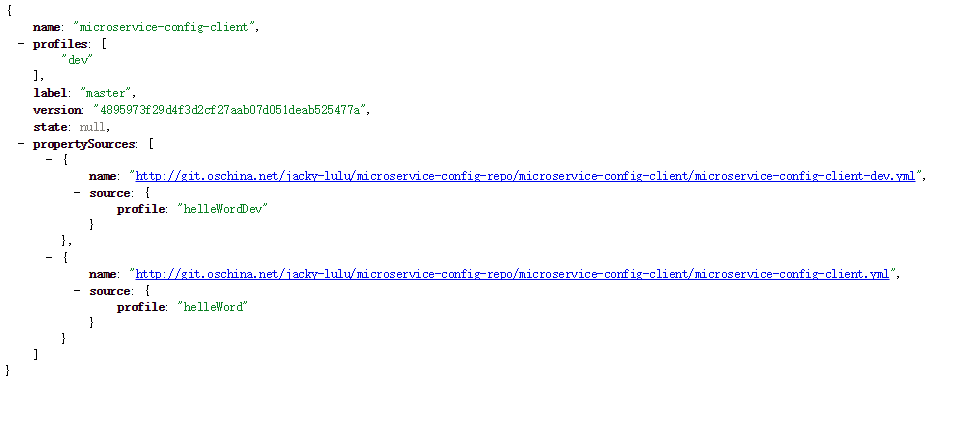
7.2、http://localhost:9518/microservice-config-client/dev
7.3、http://localhost:8081/profile

现在把码云上的配置文件 microservice-config-client-dev.yml 改为
profile : helleWordDevUpdate
然后发送post请求到配置中心服务端 http://localhost:9518/bus/refresh
再次访问客户端
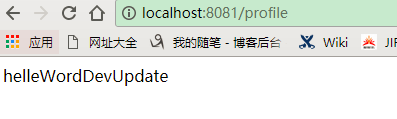
可以看到自动刷新成功