【本实验内容】
1.GUI、PyQT5介绍
2.实现此次实验效果
2.实现此次实验效果
【一 GUI、PyQt5介绍】
1.Python简介
2.GUI介绍
几个常用的Python GUI库:
(1)wxPython
(2)tkinter
(3)PyQt5
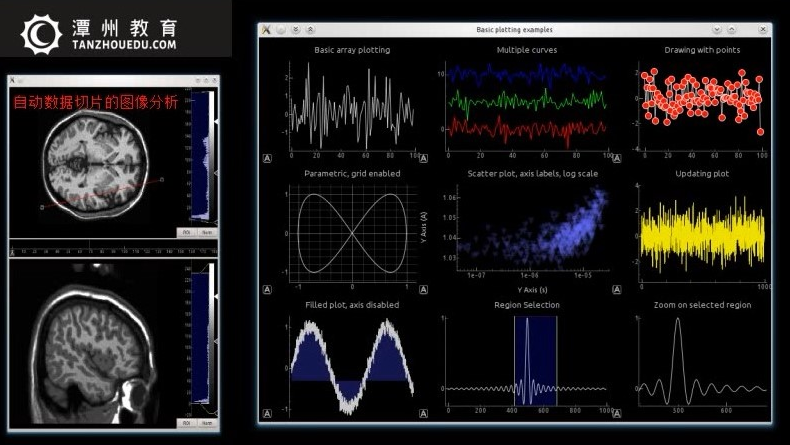
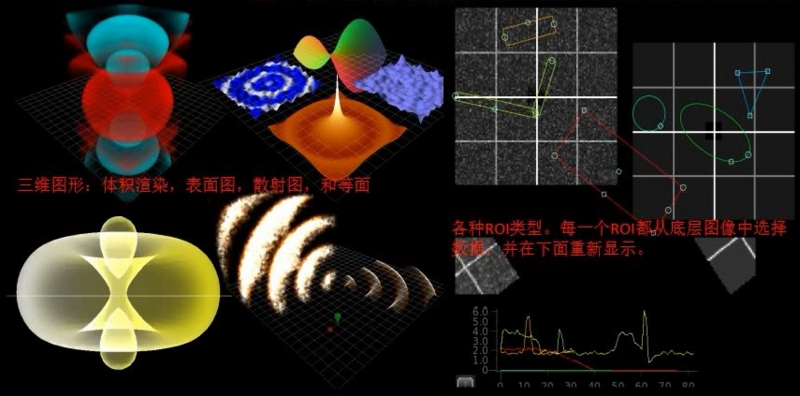
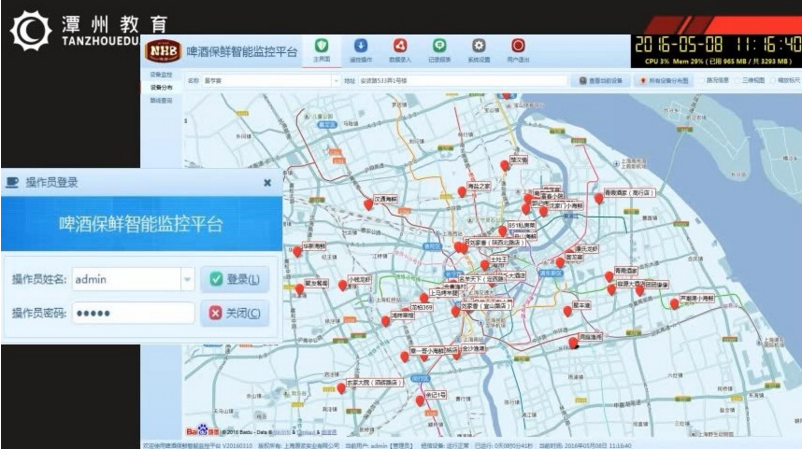
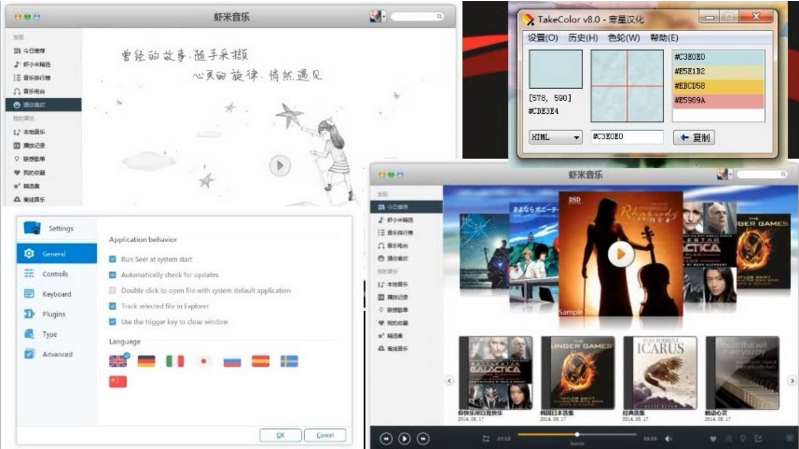
利用PyQt完成的项目效果展示:
【二 实现此次项目效果】
注意:后面代码都是在前面的基础上添加的;
>>>导入模块:
1 from PyQt5.QtGui import *  # QtGui:对系统及窗口的操作
2 from PyQt5.QtCore import *  # QtCore:包含一些核心的应用,例如时间模块等;
3 # QDesktopWidget:包含了屏幕的尺寸
4 from PyQt5.QtWidgets import QWidget,QDesktopWidget,QLCDNumber,QVBoxLayout,QApplication
5 import sys
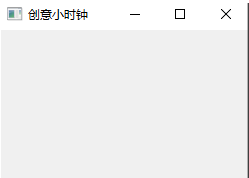
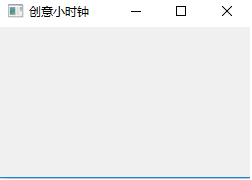
>>>先编写一个闹钟程序的主窗口:
 1 #  “ADD1”
 2 class MyTime(QWidget):
 3     """
 4     面向对象的特点:封装、继承、多态---(类、方法、数据)
 5     __init__是python语言里面的构造方法
 6     """
 7     def __init__(self):
 8         # 用于解决多重继承的问题
 9         super().__init__()
10         self.initUI()
11
12     # 绘制UI界面
13     def initUI(self):
14         # 窗口组件大小 250px像素 150
15         self.resize(250,150)
16         # self.move(300,300)
17         # 窗口标题:
18         self.setWindowTitle("创意小时钟-香")
19         self.show()
20 # “ADD2”
21 if __name__ == '__main__':
22     # 创建一个QT应用对象
23     app = QApplication(sys.argv)
24     m_time = MyTime()
25     sys.exit(app.exec_())
26     # app.exex_()
>>> 此时运行程序就可以初步构建一个轮廓了,效果如下:
>>>附截止目前的完整代码如下:


 1 from PyQt5.QtGui import *  # QtGui:对系统及窗口的操作
 2 from PyQt5.QtCore import *  # QtCore:包含一些核心的应用,例如时间模块等;
 3 # QDesktopWidget:包含了屏幕的尺寸
 4 from PyQt5.QtWidgets import QWidget, QDesktopWidget, QLCDNumber, QVBoxLayout, QApplication
 5 import sys
 6
 7 # “ADD1”
 8 class MyTime(QWidget):
 9     """
10     面向对象的特点:封装、继承、多态---(类、方法、数据)
11     __init__是python语言里面的构造方法
12     """
13
14     def __init__(self):
15         # 用于解决多重继承的问题
16         super().__init__()
17         self.initUI()
18
19         # 绘制UI界面
20
21     def initUI(self):
22         # 窗口组件大小 250px像素 150
23         self.resize(250, 150)
24         # self.move(300,300)
25         # 窗口标题:
26         self.setWindowTitle("创意小时钟-香")
27         self.show()
28
29 # “ADD2”
30 if __name__ == '__main__':
31     # 创建一个QT应用对象
32     app = QApplication(sys.argv)
33     m_time = MyTime()
34     sys.exit(app.exec_())
35     # app.exex_()
窗口名字默认左上角,可以设置的;
>>>此时,时钟程序没有在正中心,因此进行继续编程解决这个问题:
 1         # “ADD2”
 2         # 调用
 3         self.move_center() # 在initUI()方法的self.show()语句前面增加
 4
 5     # “ADD1”
 6     def move_center(self):
 7         # 拿到主窗口的矩形
 8         m_rect = self.frameGeometry()
 9         # 获得整个屏幕的绝对值,从中得到屏幕的中心点
10         w_center_top = QDesktopWidget().availableGeometry().center()
11         m_rect.moveCenter(w_center_top)
12         # 从左向右边移动,直到屏幕中间的位置
13         self.move(m_rect.topLeft())
>>>现在运行,时钟程序窗口居中了:
>>>附截止目前的完整代码如下:
 1 from PyQt5.QtGui import *  # QtGui:对系统及窗口的操作
 2 from PyQt5.QtCore import *  # QtCore:包含一些核心的应用,例如时间模块等;
 3 # QDesktopWidget:包含了屏幕的尺寸
 4 from PyQt5.QtWidgets import QWidget, QDesktopWidget, QLCDNumber, QVBoxLayout, QApplication
 5 import sys, time
 6
 7
 8 class MyTime(QWidget):
 9     """
10     面向对象的特点:封装、继承、多态---(类、方法、数据)
11     __init__是python语言里面的构造方法
12     """
13
14     def __init__(self):
15         # 用于解决多重继承的问题
16         super().__init__()
17         self.initUI()
18         # 绘制UI界面
19
20     def initUI(self):
21         # 窗口组件大小 250px 150
22         self.resize(250, 150)
23         # self.move(300,300)
24         # 窗口标题:
25         self.setWindowTitle("创意小时钟-香")
26         # 调用
27         self.move_center()  # “ADD2”
28         self.show()
29     # “ADD1”
30     def move_center(self):
31         # 拿到主窗口的矩形
32         m_rect = self.frameGeometry()
33         # 获得整个屏幕的绝对值,从中得到屏幕的中心点
34         w_center_top = QDesktopWidget().availableGeometry().center()
35         m_rect.moveCenter(w_center_top)
36         # 从左向右边移动,直到屏幕中间的位置
37
38
39 if __name__ == '__main__':
40     # 创建一个QT应用对象
41     app = QApplication(sys.argv)
42     m_time = MyTime()
43     sys.exit(app.exec_())
44     # app.exex_()
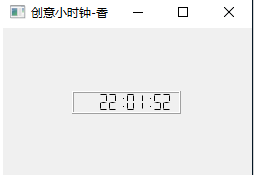
>>>现在编程里面的LED数字时钟:
 1 import time  # “ADD1”:增加时间time模块
 2
 3         # “ADD2 在initUI()方法的self.show()语句后面增加
 4         self.lcd = QLCDNumber()
 5         # 设置显示的个数
 6         self.lcd.setDigitCount(10)
 7         # 设置显示的模式为十进制的
 8         self.lcd.setMode(QLCDNumber.Dec)
 9         # 设置显示的模式为  平面模式
10         self.lcd.setSegmentStyle(QLCDNumber.Flat)
11         # 获取本地时间
12         self.lcd.display(time.strftime("%X", time.localtime()))
13         self.main_layout = QVBoxLayout()
14         # 将显示的组件添加到盒子布局里面
15         self.main_layout.addWidget(self.lcd)
16         # 设置组件在布局的中间位置
17         self.main_layout.setAlignment(Qt.AlignCenter)
18         # 设置给顶层布局
19         self.setLayout(self.main_layout)
>>>附截止目前的完整代码如下:
 1 from PyQt5.QtGui import *  # QtGui:对系统及窗口的操作
 2 from PyQt5.QtCore import *  # QtCore:包含一些核心的应用,例如时间模块等;
 3 # QDesktopWidget:包含了屏幕的尺寸
 4 from PyQt5.QtWidgets import QWidget, QDesktopWidget, QLCDNumber, QVBoxLayout, QApplication
 5 import sys,time  # “ADD1”:增加时间time模块
 6
 7
 8
 9 class MyTime(QWidget):
10     """
11     面向对象的特点:封装、继承、多态---(类、方法、数据)
12     __init__是python语言里面的构造方法
13     """
14
15     def __init__(self):
16         # 用于解决多重继承的问题
17         super().__init__()
18         self.initUI()
19
20         # 绘制UI界面
21
22     def initUI(self):
23         # 窗口组件大小 250px像素 150
24         self.resize(250, 150)
25         # self.move(300,300)
26         # 窗口标题:
27         self.setWindowTitle("创意小时钟-香")
28         # 调用
29         self.move_center()
30         self.show()
31
32         # "ADD2
33         self.lcd = QLCDNumber()
34         # 设置显示的个数
35         self.lcd.setDigitCount(10)
36         # 设置显示的模式为十进制的
37         self.lcd.setMode(QLCDNumber.Dec)
38         # 设置显示的模式为  平面模式
39         self.lcd.setSegmentStyle(QLCDNumber.Flat)
40         # 获取本地时间
41         self.lcd.display(time.strftime("%X", time.localtime()))
42         self.main_layout = QVBoxLayout()
43         # 将显示的组件添加到盒子布局里面
44         self.main_layout.addWidget(self.lcd)
45         # 设置组件在布局的中间位置
46         self.main_layout.setAlignment(Qt.AlignCenter)
47         # 设置给顶层布局
48         self.setLayout(self.main_layout)
49
50     def move_center(self):
51         # 拿到主窗口的矩形
52         m_rect = self.frameGeometry()
53         # 获得整个屏幕的绝对值,从中得到屏幕的中心点
54         w_center_top = QDesktopWidget().availableGeometry().center()
55         m_rect.moveCenter(w_center_top)
56         # 从左向右边移动,直到屏幕中间的位置
57         self.move(m_rect.topLeft())
58
59 if __name__ == '__main__':
60     # 创建一个QT应用对象
61     app = QApplication(sys.argv)
62     m_time = MyTime()
63     sys.exit(app.exec_())
64     # app.exex_()
>>>现在运行一下,查看结果,但是现在的问题是,时钟上是静态的?

现在解决这个时钟实时更新这个问题。
>>>ADD1 写一个有关定时器的“槽与信号”的函数:
1     def init_timer(self):
2         # 提供了定时器信号和单出发定时器
3         self.timer = QTimer()
4         # 每间隔1秒就出发一次 timeout信号
5         self.timer.setInterval(1000)
6         self.timer.start()  # 启动这个定时器
7         self.timer.timeout.connect(self.update_timer)  # 信号和槽函数
>>>ADD2写一个输出本地实时时间的函数:
1     def update_timer(self):
2         # 获取本地时间
3         self.lcd.display(time.strftime("%X", time.localtime()))
注意: 删除原来initUI()函数中的此行
# # 获取本地时间
# self.lcd.display(time.strftime("%X", time.localtime()))
>>>ADD3:调用“信号与槽函数”
1         # ADD3:
2         self.init_timer()
>>>现在运行,结果时钟可以实时更新时间了:
>>>附截止目前的完整代码如下:
 1 from PyQt5.QtGui import *  # QtGui:对系统及窗口的操作
 2 from PyQt5.QtCore import *  # QtCore:包含一些核心的应用,例如时间模块等;
 3 # QDesktopWidget:包含了屏幕的尺寸
 4 from PyQt5.QtWidgets import QWidget, QDesktopWidget, QLCDNumber, QVBoxLayout, QApplication
 5 import sys,time  # “ADD1”
 6
 7
 8
 9 class MyTime(QWidget):
10     """
11     面向对象的特点:封装、继承、多态---(类、方法、数据)
12     __init__是python语言里面的构造方法
13     """
14
15     def __init__(self):
16         # 用于解决多重继承的问题
17         super().__init__()
18         self.initUI()
19         # ADD3:
20         self.init_timer()
21         # 绘制UI界面
22     # ADD1:
23     def init_timer(self):
24         # 提供了定时器信号和单出发定时器
25         self.timer = QTimer()
26         # 每间隔1秒就出发一次 timeout信号
27         self.timer.setInterval(1000)
28         self.timer.start()  # 启动这个定时器
29         self.timer.timeout.connect(self.update_timer)  # 信号和槽函数
30     # ADD2:
31     def update_timer(self):
32         # 获取本地时间
33         self.lcd.display(time.strftime("%X", time.localtime()))
34
35     def initUI(self):
36         # 窗口组件大小 250px像素 150
37         self.resize(250, 150)
38         # self.move(300,300)
39         # 窗口标题:
40         self.setWindowTitle("创意小时钟-香")
41         # 调用
42         self.move_center()
43         self.show()
44
45         self.lcd = QLCDNumber()
46         # 设置显示的个数
47         self.lcd.setDigitCount(10)
48         # 设置显示的模式为十进制的
49         self.lcd.setMode(QLCDNumber.Dec)
50         # 设置显示的模式为  平面模式
51         self.lcd.setSegmentStyle(QLCDNumber.Flat)
52
53         # # 获取本地时间
54         # self.lcd.display(time.strftime("%X", time.localtime()))
55         self.main_layout = QVBoxLayout()
56         # 将显示的组件添加到盒子布局里面
57         self.main_layout.addWidget(self.lcd)
58         # 设置组件在布局的中间位置
59         self.main_layout.setAlignment(Qt.AlignCenter)
60         # 设置给顶层布局
61         self.setLayout(self.main_layout)
62
63     def move_center(self):
64         # 拿到主窗口的矩形
65         m_rect = self.frameGeometry()
66         # 获得整个屏幕的绝对值,从中得到屏幕的中心点
67         w_center_top = QDesktopWidget().availableGeometry().center()
68         m_rect.moveCenter(w_center_top)
69         # 从左向右边移动,直到屏幕中间的位置
70         self.move(m_rect.topLeft())
71
72 if __name__ == '__main__':
73     # 创建一个QT应用对象
74     app = QApplication(sys.argv)
75     m_time = MyTime()
76     sys.exit(app.exec_())
77     # app.exex_()
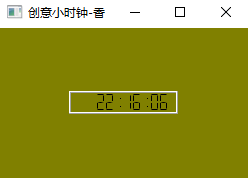
发现,它的背景颜色太单调了,这时PyQt5中有一个“调色板”:
>>>ADD1:实例化一个调色板
1         # 实例化一个调色板
2         self.main_pl = QPalette()
3         # 设置背景颜色为深黄色
4         # self.main_pl.setColor(QPalette.Background,Qt.darkRed)
5         self.main_pl.setColor(QPalette.Background, Qt.darkYellow)
6         # 设置窗体自动填充背景颜色
7         self.setAutoFillBackground(True)
8         self.setPalette(self.main_pl)
>>> 现在运行,查看结果:
>>>附截止目前的完整代码如下:
 1 from PyQt5.QtGui import *  # QtGui:对系统及窗口的操作
 2 from PyQt5.QtCore import *  # QtCore:包含一些核心的应用,例如时间模块等;
 3 # QDesktopWidget:包含了屏幕的尺寸
 4 from PyQt5.QtWidgets import QWidget, QDesktopWidget, QLCDNumber, QVBoxLayout, QApplication
 5 import sys,time  # “ADD1”
 6
 7
 8
 9 class MyTime(QWidget):
10     """
11     面向对象的特点:封装、继承、多态---(类、方法、数据)
12     __init__是python语言里面的构造方法
13     """
14
15     def __init__(self):
16         # 用于解决多重继承的问题
17         super().__init__()
18         self.initUI()
19         self.init_timer()
20         # 绘制UI界面
21
22     def init_timer(self):
23         # 提供了定时器信号和单出发定时器
24         self.timer = QTimer()
25         # 每间隔1秒就出发一次 timeout信号
26         self.timer.setInterval(1000)
27         self.timer.start()  # 启动这个定时器
28         self.timer.timeout.connect(self.update_timer)  # 信号和槽函数
29
30     def update_timer(self):
31         # 获取本地时间
32         self.lcd.display(time.strftime("%X", time.localtime()))
33
34     def initUI(self):
35         # 窗口组件大小 250px像素 150
36         self.resize(250, 150)
37         # self.move(300,300)
38         # 窗口标题:
39         self.setWindowTitle("创意小时钟-香")
40         # 调用
41         self.move_center()
42         # ADD1:实例化一个调色板
43         # 实例化一个调色板
44         self.main_pl = QPalette()
45         # 设置背景颜色为深黄色
46         # self.main_pl.setColor(QPalette.Background,Qt.darkRed)
47         self.main_pl.setColor(QPalette.Background, Qt.darkYellow)
48         # 设置窗体自动填充背景颜色
49         self.setAutoFillBackground(True)
50         self.setPalette(self.main_pl)
51
52         self.show()
53         self.lcd = QLCDNumber()
54         # 设置显示的个数
55         self.lcd.setDigitCount(10)
56         # 设置显示的模式为十进制的
57         self.lcd.setMode(QLCDNumber.Dec)
58         # 设置显示的模式为  平面模式
59         self.lcd.setSegmentStyle(QLCDNumber.Flat)
60
61         # # 获取本地时间
62         # self.lcd.display(time.strftime("%X", time.localtime()))
63         self.main_layout = QVBoxLayout()
64         # 将显示的组件添加到盒子布局里面
65         self.main_layout.addWidget(self.lcd)
66         # 设置组件在布局的中间位置
67         self.main_layout.setAlignment(Qt.AlignCenter)
68         # 设置给顶层布局
69         self.setLayout(self.main_layout)
70
71     def move_center(self):
72         # 拿到主窗口的矩形
73         m_rect = self.frameGeometry()
74         # 获得整个屏幕的绝对值,从中得到屏幕的中心点
75         w_center_top = QDesktopWidget().availableGeometry().center()
76         m_rect.moveCenter(w_center_top)
77         # 从左向右边移动,直到屏幕中间的位置
78         self.move(m_rect.topLeft())
79
80 if __name__ == '__main__':
81     # 创建一个QT应用对象
82     app = QApplication(sys.argv)
83     m_time = MyTime()
84     sys.exit(app.exec_())
85     # app.exex_()
>>>最后此项目的完整代码如下:
 1 from PyQt5.QtGui import *  # QtGui:对系统及窗口的操作
 2 from PyQt5.QtCore import *  # QtCore:包含一些核心的应用,例如时间模块等;
 3 # QDesktopWidget:包含了屏幕的尺寸
 4 from PyQt5.QtWidgets import QWidget,QDesktopWidget,QLCDNumber,QVBoxLayout,QApplication
 5 import sys,time
 6
 7
 8 class MyTime(QWidget):
 9     """
10     面向对象的特点:封装、继承、多态---(类、方法、数据)
11     __init__是python语言里面的构造方法
12     """
13     def __init__(self):  # self指的是类实例对象的本身(PS:不是类本身)
14         # 用于解决多重继承的问题
15         super().__init__()
16         self.initUI()
17         self.init_timer()
18     def init_timer(self):
19         # 提供了定时器信号和单出发定时器
20         self.timer = QTimer()
21         # 每间隔1秒就出发一次 timeout信号
22         self.timer.setInterval(1000)
23         self.timer.start()  # 启动这个定时器
24         self.timer.timeout.connect(self.update_timer)  # 信号和槽函数
25     def update_timer(self):
26         # 获取本地时间
27         self.lcd.display(time.strftime("%X", time.localtime()))
28
29
30
31     # 绘制UI界面
32     def initUI(self):
33         # 窗口组件大小 250px 150
34         self.resize(250,150)
35         # self.move(300,300)
36         # 窗口标题:
37         self.setWindowTitle("创意小时钟-香")
38         # 调用
39         self.move_center()
40
41         # 实例化一个调色板
42         self.main_pl = QPalette()
43         # 设置背景颜色为深黄色
44         # self.main_pl.setColor(QPalette.Background,Qt.darkRed)
45         self.main_pl.setColor(QPalette.Background, Qt.darkYellow)
46         # 设置窗体自动填充背景颜色
47         self.setAutoFillBackground(True)
48         self.setPalette(self.main_pl)
49
50         # 字体颜色的设置:这里有问题:
51         # self.main_pl = QPalette()
52         # self.main_pl.setColor(QPalette.Normal, QPalette.windowText,Qt.darkBlue)
53         # self.setAutoFillBackground(True)
54         # self.setPalette(self.main_pl)
55
56         # 显示布局
57         self.show()
58
59         self.lcd = QLCDNumber()
60         # 设置显示的个数
61         self.lcd.setDigitCount(10)
62         # 设置显示的模式为十进制的
63         self.lcd.setMode(QLCDNumber.Dec)
64         # 设置显示的模式为  平面模式
65         self.lcd.setSegmentStyle(QLCDNumber.Flat)
66         # 实例化盒子布局
67         self.main_layout = QVBoxLayout()
68         # 将显示的组件添加到盒子布局里面
69         self.main_layout.addWidget(self.lcd)
70         # 设置组件在布局的中间位置
71         self.main_layout.setAlignment(Qt.AlignCenter)
72         # 设置给顶层布局
73         self.setLayout(self.main_layout)
74
75     def move_center(self):
76         # 拿到主窗口的矩形
77         m_rect = self.frameGeometry()
78         # 获得整个屏幕的绝对值,从中得到屏幕的中心点
79         w_center_top = QDesktopWidget().availableGeometry().center()
80         m_rect.moveCenter(w_center_top)
81         # 从左向右边移动,直到屏幕中间的位置
82         self.move(m_rect.topLeft())
83 if __name__ == '__main__':
84     # 创建一个QT应用对象
85     app = QApplication(sys.argv)
86     m_time = MyTime()
87     sys.exit(app.exec_())
88     # app.exex_()
The end!
**************************************************************************************************
Good lucky to you
**************************************************************************************************