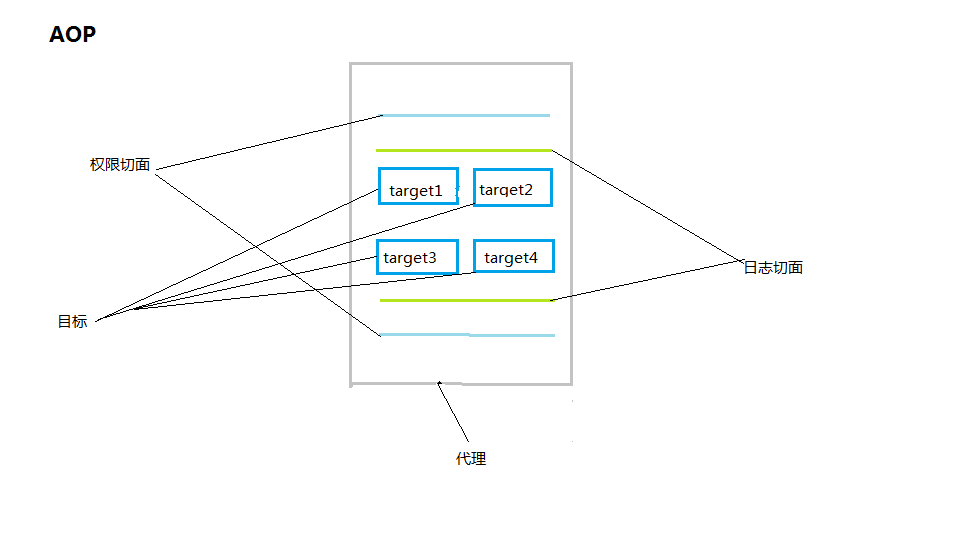
AOP,面向切面编程,它能把与核心业务逻辑无关的散落在各处并且重复的代码给封装起来,降低了模块之间的耦合度,便于维护。具体的应用场景有:日志,权限和事务管理这些方面。可以通过一张图来理解下:
Spring AOP可以通过注解和xml配置的方式来实现,下面我们讲解下这两种不同的用法。
1.注解的方式
定义一个切面Operator


/**
 * 定义一个切面Operator:包含切入点表达式和通知
 */

@Component
@Aspect
public class Operator {

    //定义切入点表达式
    @Pointcut("execution(* com.demo.aop..*.*(..))")
    public void pointCut() {

    };

    //以下都为通知
    //前置通知:在目标方法调用前执行
    @Before("pointCut()")
    public void doBefore(JoinPoint joinPoint) {
        System.out.println("AOP before advice ...");
    }

    //在目标方法正常执行后做增强处理
    @AfterReturning("pointCut()")
    public void doAfterReturn(JoinPoint joinPoint) {
        System.out.println("AOP after return advice ...");
    }

    //环绕通知:在目标方法完成前后做增强处理
    @Around("pointCut()")
    public void around(ProceedingJoinPoint pjp) {
        System.out.println("AOP Around before...");
        try {
            pjp.proceed();
        } catch (Throwable e) {
            e.printStackTrace();
        }
        System.out.println("AOP Aronud after...");
    }

    //在目标方法完成后做增强处理,无论目标方法是否成功完成
    @After("pointCut()")
    public void doAfter(JoinPoint joinPoint) {
        System.out.println("AOP after advice ...");
    }

    //用来处理发生的异常
    @AfterThrowing(pointcut="pointCut()",throwing="error")
    public void afterThrowing(JoinPoint joinPoint,Throwable error){
        System.out.println("AOP AfterThrowing Advice..." + error);
    }


}
定义UserService类
@Service("userService")
public class UserService {

    public void add(){
        System.out.println("UserService add()");
    }

    public boolean delete(){
        System.out.println("UserService delete()");
        return true;
    }

}
执行以下代码:
@Test
    public void testAop(){
        @SuppressWarnings("resource")
        ClassPathXmlApplicationContext applicationContext = new ClassPathXmlApplicationContext("spring-context.xml");//解析注册beanDefinition,然后实例化bean,再初始化bean
        UserService userService = (UserService) applicationContext.getBean("userService");
        userService.add();
    }
输出结果是:
AOP Around before...
AOP before advice ...
UserService add()
AOP Aronud after...
AOP after advice ...
AOP after return advice ...
所以由此,我们可以总结出通知的执行顺序:
无异常情况:around before -->before-->目标方法-->around after-->after-->afterReturn
有异常情况:around before -->before-->目标方法-->around after-->after-->afterThrowing
2.xml配置的方式
xml配置的方式我们以日志为例
在xml中添加配置信息
    <aop:config>
        <aop:aspect id="loggerAspect" ref="logger">
            <aop:around method="record"
                pointcut="(execution(* com.demo.aop..*.add*(..))
                                              or   execution(* com.demo.aop..*.update*(..))
                                              or   execution(* com.demo.aop..*.delete*(..)))
                                            and !bean(logService)" />
        </aop:aspect>
    </aop:config>
新建Log实体类
public class Log {

    private Integer id;

    //操作名称,方法名
    private String operName;

    //操作人
    private String operator;

    //操作参数
    private String operParams;

    //操作结果 成功/失败
    private String operResult;

    //结果消息
    private String resultMsg;

    //操作时间
    private Date operTime = new Date();


    public Integer getId() {
        return id;
    }

    public void setId(Integer id) {
        this.id = id;
    }

    public String getOperName() {
        return operName;
    }

    public void setOperName(String operName) {
        this.operName = operName;
    }

    public String getOperator() {
        return operator;
    }

    public void setOperator(String operator) {
        this.operator = operator;
    }

    public String getOperParams() {
        return operParams;
    }

    public void setOperParams(String operParams) {
        this.operParams = operParams;
    }

    public String getOperResult() {
        return operResult;
    }

    public void setOperResult(String operResult) {
        this.operResult = operResult;
    }

    public String getResultMsg() {
        return resultMsg;
    }

    public void setResultMsg(String resultMsg) {
        this.resultMsg = resultMsg;
    }

    public Date getOperTime() {
        return operTime;
    }

    public void setOperTime(Date operTime) {
        this.operTime = operTime;
    }
创建切面Logger类
@Component("logger")
public class Logger {

    @Autowired
    private LoggerService loggerService;

    //记录操作日志
    public Object record(ProceedingJoinPoint joinPoint) throws Throwable{
        Log log = new Log();

        try {
            String methodName = joinPoint.getSignature().getName(); //目标方法方法名称
            Object[] args = joinPoint.getArgs();
            String argsStr = Arrays.toString(args); //请求参数
            log.setOperator("admin");
            log.setOperName(methodName);
            log.setOperParams(argsStr);
            Object returnObj =  joinPoint.proceed();
            if(null != returnObj){
                log.setOperResult(returnObj.toString());
            }else{
                log.setOperResult(null);
            }
            log.setResultMsg("success");
        } catch (Exception e) {
            log.setResultMsg("fail");
        }finally{
            loggerService.save(log);
        }
        return null;
    }

}
创建保存日志信息的类LoggerService
@Service("loggerService")
public class LoggerService {
    public void save(Log log){
        System.out.println("save log ...");
    }
}
创建UserService类
@Service("userService")
public class UserService {

    public void add(){
        System.out.println("UserService add()");
    }

    public boolean delete(){
        System.out.println("UserService delete()");
        return true;
    }

}
运行以下代码:
@Test
    public void testAopLog(){
        @SuppressWarnings("resource")
        ClassPathXmlApplicationContext applicationContext = new ClassPathXmlApplicationContext("spring-context.xml");//解析注册beanDefinition,然后实例化bean,再初始化bean
        UserService userService = (UserService) applicationContext.getBean("userService");
        userService.add();
    }
输出结果:
UserService add()
save log ...
以上就是AOP注解和xml配置两种不同的用法,我们需要继续了解:AOP有哪些应用场景以及如何使用的,实现原理,和spring AOP源码分析。接下来我将逐个的去介绍这一块。