转载:http://www.cnblogs.com/wang_yb/archive/2013/04/16/3023892.html
http://blog.csdn.net/tigerjibo/article/details/8450995
本文是在以上基础上转载而成,内核基础内容,就不必浪费时间重新写了.
========================================================
内核数据结构贯穿于整个内核代码中,这里介绍4个基本的内核数据结构。
利用这4个基本的数据结构,可以在编写内核代码时节约大量时间。
主要内容:
- 链表
- hash 链表
- 队列
- 映射
- 红黑树
1. 链表
链表是linux内核中最简单,同时也是应用最广泛的数据结构。
内核中定义的是双向链表。
1.1 头文件简介
内核中关于链表定义的代码位于: include/linux/list.h
list.h文件中对每个函数都有注释,这里就不详细说了。
其实刚开始只要先了解一个常用的链表操作(追加,删除,遍历)的实现方法,
其他方法基本都是基于这些常用操作的。
1.2 链表代码的注意点
在阅读list.h文件之前,有一点必须注意:linux内核中的链表使用方法和一般数据结构中定义的链表是有所不同的。
一般的双向链表一般是如下的结构,
- 有个单独的头结点(head)
- 每个节点(node)除了包含必要的数据之外,还有2个指针(pre,next)
- pre指针指向前一个节点(node),next指针指向后一个节点(node)
- 头结点(head)的pre指针指向链表的最后一个节点
- 最后一个节点的next指针指向头结点(head)
具体见下图:
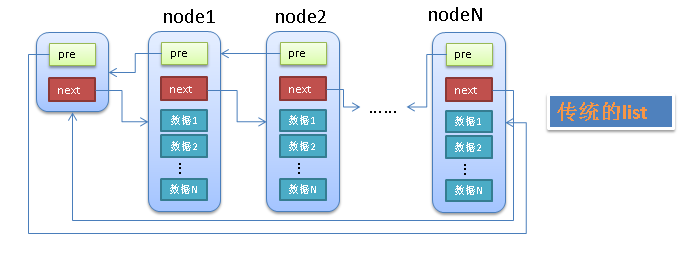
传统的链表有个最大的缺点就是不好共通化,因为每个node中的data1,data2等等都是不确定的(无论是个数还是类型)。
linux中的链表巧妙的解决了这个问题,linux的链表不是将用户数据保存在链表节点中,而是将链表节点保存在用户数据中。
linux的链表节点只有2个指针(pre和next),这样的话,链表的节点将独立于用户数据之外,便于实现链表的共同操作。
具体见下图:

linux链表中的最大问题是怎样通过链表的节点来取得用户数据?
和传统的链表不同,linux的链表节点(node)中没有包含用户的用户data1,data2等。
1.3 使用示例
构造了一个内核模块来实际使用一下内核中的链表,代码在CentOS6.3 x64上运行通过。
C代码:
#include<linux/init.h>

#include<linux/slab.h>

#include<linux/module.h>

#include<linux/kernel.h>

#include<linux/list.h>


MODULE_LICENSE("Dual BSD/GPL");

struct student

{

    int id;

    char* name;

    struct list_head list;

};


void print_student(struct student*);


static int testlist_init(void)

{

    struct student *stu1, *stu2, *stu3, *stu4;

    struct student *stu;


    // init a list head

    LIST_HEAD(stu_head);


    // init four list nodes

    stu1 = kmalloc(sizeof(*stu1), GFP_KERNEL);

    stu1->id = 1;

    stu1->name = "wyb";

    INIT_LIST_HEAD(&stu1->list);


    stu2 = kmalloc(sizeof(*stu2), GFP_KERNEL);

    stu2->id = 2;

    stu2->name = "wyb2";

    INIT_LIST_HEAD(&stu2->list);


    stu3 = kmalloc(sizeof(*stu3), GFP_KERNEL);

    stu3->id = 3;

    stu3->name = "wyb3";

    INIT_LIST_HEAD(&stu3->list);


    stu4 = kmalloc(sizeof(*stu4), GFP_KERNEL);

    stu4->id = 4;

    stu4->name = "wyb4";

    INIT_LIST_HEAD(&stu4->list);


    // add the four nodes to head

    list_add (&stu1->list, &stu_head);

    list_add (&stu2->list, &stu_head);

    list_add (&stu3->list, &stu_head);

    list_add (&stu4->list, &stu_head);


    // print each student from 4 to 1

    list_for_each_entry(stu, &stu_head, list)

    {

        print_student(stu);

    }

    // print each student from 1 to 4

    list_for_each_entry_reverse(stu, &stu_head, list)

    {

        print_student(stu);

    }


    // delete a entry stu2

    list_del(&stu2->list);

    list_for_each_entry(stu, &stu_head, list)

    {

        print_student(stu);

    }


    // replace stu3 with stu2

    list_replace(&stu3->list, &stu2->list);

    list_for_each_entry(stu, &stu_head, list)

    {

        print_student(stu);

    }


    return 0;

}


static void testlist_exit(void)

{

    printk(KERN_ALERT "*************************
");

    printk(KERN_ALERT "testlist is exited!
");

    printk(KERN_ALERT "*************************
");

}


void print_student(struct student *stu)

{

    printk (KERN_ALERT "======================
");

    printk (KERN_ALERT "id  =%d
", stu->id);

    printk (KERN_ALERT "name=%s
", stu->name);

    printk (KERN_ALERT "======================
");

}


module_init(testlist_init);

module_exit(testlist_exit);
Makefile:
obj-m += testlist.o


#generate the path

CURRENT_PATH:=$(shell pwd)

#the current kernel version number

LINUX_KERNEL:=$(shell uname -r)

#the absolute path

LINUX_KERNEL_PATH:=/usr/src/kernels/$(LINUX_KERNEL)

#complie object

all:

    make -C $(LINUX_KERNEL_PATH) M=$(CURRENT_PATH) modules

    rm -rf modules.order Module.symvers .*.cmd *.o *.mod.c .tmp_versions *.unsigned

#clean

clean:

    rm -rf modules.order Module.symvers .*.cmd *.o *.mod.c *.ko .tmp_versions *.unsigned
安装,卸载内核模块以及查看内核模块的运行结果:
insmod testlist.ko
rmmod testlist
dmesg | tail -100
2.hash 链表
hash链表的结构和双链表一样,也是内嵌到需要作为hash链表表元素的结构中。不同的是,双链表的表头和表元素是用相同的结构表示的(struct list_head),hash链表使用了不同的结构.
2.1 hash链表结构
hash链表代码位于include/linux/list.h中,3.0内核中将其数据结构定义放在了include/linux/types.h中
哈希表的数据结构定义如图:

struct hlist_head
{
struct hlist_node *first;
}
struct hlist_node
struct hlist_node *next,**pprev;
}
观察hash链表的组织形式,以及head node 和node定义,其中有两个关注点需要注意.
a. hash表头:struct hlist_head{ struct hlist_node *first;};表头里面只存放一个hlist_node的指针,指向链表。
b. hash节点:struct hlist_node{struct hlist_node *next; struct hlist_node **pprev;};有两个指针,所以链表是双链表。但和一般的双链表又有点不一样,next自然是指向链表的下一个节点,但pprev则不是指向当前节点的前一个节点,而是指向当前节点的前一个节点的next指针。所以ppre是二级指针。
思考:为什么采用单向链表,即头结点中没有prev变量?
散列表的目的是为了方便快速的查找,所以散列表通常是一个比较大的数组,否则“冲突”的概率会非常大,这样就失去了散列表的意义。如何来做到既能维护一张大表,又能不占用过多的内存呢?此时只能对于哈希表的每个entry(表头结点)它的结构体中只能存放一个指针。【简言之,节省空间】
思考:*****为什么要采用pprev,而不采用一级指针?********
由于hlist不是一个完整的循环链表,在list中,表头和结点是同一个数据结构,直接用prev是ok的。在hlist中,表头中没有prev,只有一个first。
1> 为了能统一地修改表头的first指针,即表头的first指针必须修改指向新插入的结点,hlist就设计了pprev. hlist结点的pprev不再是指向前一个结点的指针,而是指向前一个节点(可能是表头)中的next(对于表头则是first)指针,从而在表头插入的操作中可以通过一致的node->pprev访问和修改前结点的next(或first)指针。
2>还解决了数据结构不一致,hlist_node巧妙的将pprev指向上一个节点的next指针的地址,由于hlist_head和hlist_node指向的下一个节点的指针类型相同,就解决了通用性。
2.2 hash链表常用操作
接下来的内容只涉及hash链表的API接口应用,具体实现比较简单,阅读内核代码即可.
l 对哈希表头结点进行初始化
实际上,struct hlist_head只定义了链表结点,并没有专门定义链表头,可以使用如下三个宏
#define HLIST_HEAD_INIT { .first = NULL}
#define HLIST_HEAD(name) struct hlist_head name = {.first = NULL}
#define INIT_HLIST_HEAD(ptr) ((ptr->first)=NULL))
1>name 为结构体 struct
hlist_head{}的一个结构体变量。
2>HLIST_HEAD_INIT 宏只进行初始化
Eg: struct hlist_head my_hlist = HLIST_HEAD_INIT
调用HLIST_HEAD_INIT对my_hlist哈希表头结点只进行初始化,将表头结点的fist指向空。
3>HLIST_HEAD(name)函数宏既进行声明并且进行初始化。
Eg: HLIST_HEAD(my_hlist);
调用HLIST_HEAD函数宏对my_hlist哈希表头结点进行声明并进行初始化。将表头结点的fist指向空。
4>HLIST_HEAD宏在编译时静态初始化,还可以使用INIT_HLIST_HEAD在运行时进行初始化
Eg:
INIT_HLIST_HEAD(&my_hlist);
调用INIT_HLIST_HEAD俩将my_hlist进行初始化,将其first域指向空即可。
l 对哈希表结点进行初始化
1>Linux 对哈希表结点初始化提供了一个接口:
static iniline void INIT_HLIST_NODE(struct hlist_node *h)
(1) h:为哈希表结点
2>实现:
static inline void INIT_HLIST_NODE(struct hlist_node *h)
{
h->next = NULL;
h->pprev = NULL;
}
改内嵌函数实现了对struct hlist_node 结点进行初始化操作,将其next域和pprev都指向空,实现其初始化操作。
l 判断哈希链表是否为空
1>function:函数判断哈希链表是否为空,如果为空则返回1.否则返回0
2>函数接口:
static inline int hlist_empty(const struct hlist_head *h)
h:指向哈希链表的头结点。
3>函数实现:
static inline int hlist_empty(const struct hlist_head *h)
{
return !h->first;
}
通过判断头结点中的first域来判断其是否为空。如果first为空则表示该哈希链表为空。
l 判断节点是否在hash表中
1>function:判断结点是否已经存在hash表中。
2>函数接口:
static inline int hlist_unhashed(const struct hlist_node *h)
h:指向哈希链表的结点
3>函数实现:
static inline int hlist_unhashed(const struct hlist_node *h)
{
return !h->pprev
}
通过判断该结点的pprev是否为空来判断该结点是否在哈希链表中。 h->pprev等价于h节点的前一个节点的next域。如果前一个节点的next域为空,说明 改节点不在哈希链表中。
l 哈希链表的删除操作
1>function:将一个结点从哈希链表中删除。
2>函数接口:
static inline void hlist_del(struct hlist_node *n)
Ø n: 指向hlist的链表结点
static inline void hlist_del_init(struct hlist_node *n)
Ø n: 指向hlist的链表结点
l 添加哈希结点
1>function:将一个结点添加到哈希链表中。
hlist_add_head:将结点n插在头结点h之后。
hlist_add_before:将结点n插在next结点的前面(next在哈希链表中)
hlist_add_after:将结点next插在n之后(n在哈希链表中)
2、linux 内核kfifo
kfifo设计的非常巧妙,代码很精简,对于入队和出对处理的出人意料。首先看一下kfifo的数据结构:
struct kfifo {
    unsigned char *buffer;     /* the buffer holding the data */
    unsigned int size;         /* the size of the allocated buffer */
    unsigned int in;           /* data is added at offset (in % size) */
    unsigned int out;          /* data is extracted from off. (out % size) */
    spinlock_t *lock;          /* protects concurrent modifications */
};
kfifo实现为循环队列,首先,先看看初始化代码.
8 struct kfifo *kfifo_alloc(unsigned int size, gfp_t gfp_mask, spinlock_t *lock)
 69 {
 70         unsigned char *buffer;
 71         struct kfifo *ret;
 72
 73         /*
 74          * round up to the next power of 2, since our 'let the indices
 75          * wrap' technique works only in this case.
 76          */
 77         if (!is_power_of_2(size)) {
 78                 BUG_ON(size > 0x80000000);
 79                 size = roundup_pow_of_two(size);
 80         }
 81
 82         buffer = kmalloc(size, gfp_mask);
 83         if (!buffer)
 84                 return ERR_PTR(-ENOMEM);
 85
 86         ret = kfifo_init(buffer, size, gfp_mask, lock);
 87
 88         if (IS_ERR(ret))
 89                 kfree(buffer);
 90
 91         return ret;
 92 }
 93 EXPORT_SYMBOL(kfifo_alloc);


216 /* is x a power of 2? */
217 #define is_power_of_2(x)        ((x) != 0 && (((x) & ((x) - 1)) == 0))
这里值得一提的是,kfifo->size的值总是在调用者传进来的size参数的基础上向2的幂扩展,这是内核一贯的做法。这样的好处不言而喻--对kfifo->size取模运算可以转化为与运算,如下:
kfifo->in % kfifo->size 可以转化为 kfifo->in & (kfifo->size – 1)
在宏定义is_power_of_2中,使用size & (size – 1)来判断size 是否为2幂,如果条件为真,则表示size不是2的幂,然后调用roundup_pow_of_two将之向上扩展为2的幂。 这些都是很常用的技巧,只不过大家没有将它们结合起来使用而已,下面要分析的__kfifo_put和__kfifo_get则是将kfifo->size的特点发挥到了极致。
__kfifo_put 和 __kfifo_get 函数实现机制是一样的,下面以__kfifo_put函数为例进行分析.
119 unsigned int __kfifo_put(struct kfifo *fifo,
120                         const unsigned char *buffer, unsigned int len)
121 {
122         unsigned int l;
123
124         len = min(len, fifo->size - fifo->in + fifo->out);
125
126         /*
127          * Ensure that we sample the fifo->out index -before- we
128          * start putting bytes into the kfifo.
129          */
130
131         smp_mb();
132
133         /* first put the data starting from fifo->in to buffer end */
134         l = min(len, fifo->size - (fifo->in & (fifo->size - 1)));
135         memcpy(fifo->buffer + (fifo->in & (fifo->size - 1)), buffer, l);
136
137         /* then put the rest (if any) at the beginning of the buffer */
138         memcpy(fifo->buffer, buffer + l, len - l);
139
140         /*
141          * Ensure that we add the bytes to the kfifo -before-
142          * we update the fifo->in index.
143          */
144
145         smp_wmb();
146
147         fifo->in += len;
148
149         return len;
150 }
151 EXPORT_SYMBOL(__kfifo_put);
向 kfifo 中 put数据的时候,分别调用了两次min() 函数。第一次调用 min函数,是比较期望放入kfifo中数据长度len和kfifo中剩余空间大小两者的最小值,将最小值放入len中,这个比较好理解。第二次调用min值和两次memcpy进行数据拷贝,对应着两种数据存放情况,如下图:
a. in的位置在out之后:

b. in 的位置在out之前:
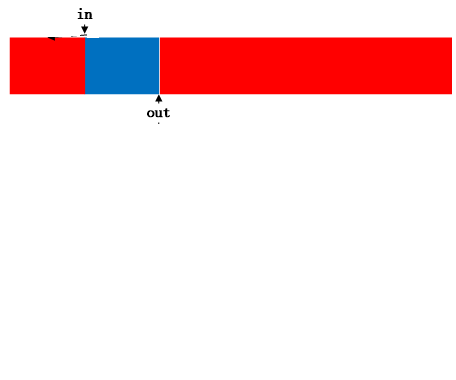
之所以会出现上面两种情况,是因为kernel中的kfifo是循环使用的,需要注意的是,不管怎么样,in的值总是大于out的。同样,不出意料,在include/kfifo.h中对提供了加锁的函数kfifo_put.我还未遇到内核调用 kfifo的列子,一下调用实例摘自网络:
#include "kn_common.h"

MODULE_LICENSE("Dual BSD/GPL");
struct student
{
    int id;
    char* name;
};

static void print_student(struct student*);

static int testkfifo_init(void)
{
    struct kfifo *fifo;
    struct student *stu1, *stu2, *stu3, *stu4;
    struct student *stu_tmp;
    char* c_tmp;
    int i;
    // !!importent  init a unlocked lock
    spinlock_t sl = SPIN_LOCK_UNLOCKED;

    // init kfifo
    fifo = kfifo_alloc(4*sizeof(struct student), GFP_KERNEL, &sl);

    stu1 = kmalloc(sizeof(struct student), GFP_KERNEL);
    stu1->id = 1;
    stu1->name = "wyb1";
    kfifo_put(fifo, (char *)stu1, sizeof(struct student));

    stu2 = kmalloc(sizeof(struct student), GFP_KERNEL);
    stu2->id = 1;
    stu2->name = "wyb2";
    kfifo_put(fifo, (char *)stu2, sizeof(struct student));

    stu3 = kmalloc(sizeof(struct student), GFP_KERNEL);
    stu3->id = 1;
    stu3->name = "wyb3";
    kfifo_put(fifo, (char *)stu3, sizeof(struct student));

    stu4 = kmalloc(sizeof(struct student), GFP_KERNEL);
    stu4->id = 1;
    stu4->name = "wyb4";
    kfifo_put(fifo, (char *)stu4, sizeof(struct student));

    c_tmp = kmalloc(sizeof(struct student), GFP_KERNEL);
    printk(KERN_ALERT "current fifo length is : %d
", kfifo_len(fifo));
    for (i=0; i < 4; i++) {

        kfifo_get(fifo, c_tmp, sizeof(struct student));
        stu_tmp = (struct student *)c_tmp;
        print_student(stu_tmp);
        printk(KERN_ALERT "current fifo length is : %d
", kfifo_len(fifo));
    }

    printk(KERN_ALERT "current fifo length is : %d
", kfifo_len(fifo));
    kfifo_free(fifo);
    kfree(c_tmp);
    return 0;
}

static void print_student(struct student *stu)
{
    printk(KERN_ALERT "=========================
");
    print_current_time(1);
    printk(KERN_ALERT "id = %d
", stu->id);
    printk(KERN_ALERT "name = %s
", stu->name);
    printk(KERN_ALERT "=========================
");
}

static void testkfifo_exit(void)
{
    printk(KERN_ALERT "*************************
");
    printk(KERN_ALERT "testkfifo is exited!
");
    printk(KERN_ALERT "*************************
");
}

module_init(testkfifo_init);
module_exit(testkfifo_exit);