1、/boot目录误删除 Centos7 (加载内核kernel)
1、重启机器,接入光盘,以救援模式引导系统;
2、通过chroot /mnt/sysimage/ 切根
3、新建临时文件挂载点 /mnt/temp,并挂载光盘
4、rpm -ivh /mnt/temp/Packages/kernel-3.10
5、grub2-install /dev/sda
6、grub2-mkconfig > /boot/grub2/grub.cfg
7、到此恢复完成,但同样Centos7,再此最好在执行sync 操作后,再重启;
2、root密码修复
(1)换新密码进入
1、重启机器,接入光盘,以救援模式引导系统;
2、通过chroot /mnt/sysimage/ 切根
3、passwd root
4、重启
(2)无密码进入
1、重启机器,接入光盘,以救援模式引导系统;
2、通过chroot /mnt/sysimage/ 切根
3、vi /etc/shadow 把密码密文删除
4、重启
(3)换新密码进入
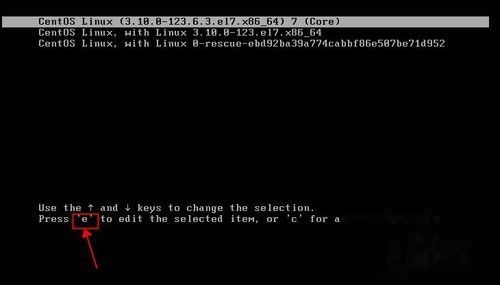
开机启动centos 7.0,看到如下画面,选择下图选单,按"e"键
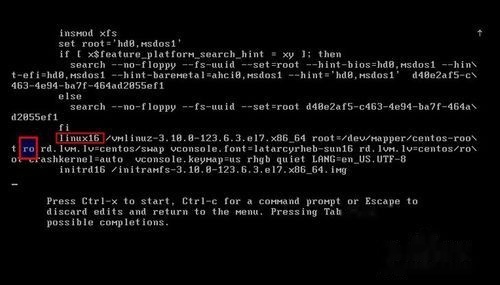
在下图linux16行中,将ro这两个字母修改为rw init=/sysroot/bin/sh
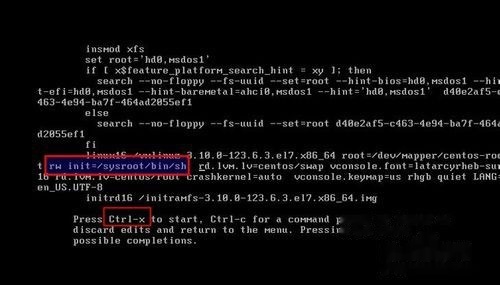
修改结果如下图所示,按ctrl+x进入单用户模式
使用命令访问系统: "chroot /sysroot"
重置密码:"passwd root"
方块不是乱码,root时输新密码,8时重新输入新密码
更新selinux信息:"touch /.autorelabel"
退出chroot:"exit"
重新启动系统:"reboot",密码修改完成。
3、文件系统修复
在Linux系统中,非正常关机,突然断电,设备数据读写异常等原因导致文件系统的破坏。比较常见的是超级块(supper-block)损坏。
2.名词解释:
超级块--文件系统的核心“档案”,它记录了该文件系统的类型,大小,空闲磁盘块等信息,类似Windows的分区表。
3.实验案例演示:
第一,破坏超级块(首先添加硬盘1G,并分区格式化)
dd if=/dev/zero of=/dev/sdb1 bs=512 count=4
mount /dev/sdb1 /mnt
显示:mount: you must specify the filesystem type
第二,修复超级块(参数的先后顺序不能错)
fsck -y -t ext3 /dev/sdb1 ext系列文件系统修复
4、空间耗尽故障
众所周知,Linux文件系统中inode编码是指向磁盘block的唯一编号,
若服务器遭入侵或日志文件将磁盘inode资源编号耗尽,新数据无法获取inode编号导致无法存储。
举例说明:在磁盘中/boot独立分区中查看现有inode资源并通过for循环创建大量文件占用耗尽inode编号,导致磁盘无法写入内容,最后进行处理故障。
[root@CentOS7 ~]# df -i /boot/ #查看inode编号
Filesystem Inodes IUsed IFree IUse% Mounted on
/dev/sda1 1024064 38 1024026 1% /boot
[root@centos7 ~] for i in {358..1024500}; do touch file$i;done
[root@centos7 ~]# df -i /boot #发现inode占满
Filesystem Inodes IUsed IFree IUse% Mounted on
/dev/sda1 1024064 1024064 0 100% /boot
[root@centos7 ~]# cd /boot
[root@centos7 boot]# touch 123.txt #创建文件无法成功
touch: cannot touch ‘123.txt’: No space left on device
方法一:通过传统方式利用for循环删除文件,但是比较缓慢
[root@centos7 ~] for i in {950000..1024500}; do rm -rf file$i;done #一点的删除
方法二:利用传参数的方法快速有效的删除文件
[root@centos7 boot]# ls file{400000..500000}|xargs rm 最为有效的方法,传参数
[root@centos7 boot]# ll file{600000..700000}|xargs rm ll列出的参数过多,传给rm
ls: cannot access file600000: No such file or directory 时,rm不识别,因此通过ls显示出独立的文件名进行传递。
rm: invalid option -- 'w'
Try 'rm --help' for more information.
rm: invalid option -- 'w'
Xargs用法详解
之所以能用到这个命令,关键是由于很多命令不支持|管道来传递参数,
而日常工作中有有这个必要,所以就有了xargs命令,例如:
find /sbin -perm +700 |ls -l 这个命令是错误的
find /sbin -perm +700 |xargs ls -l 这样才是正确的
xargs 可以读入 stdin 的资料,并且以空白字元或断行字元作为分辨,将 stdin 的资料分隔成为 arguments 。
因为是以空白字元作为分隔,所以,如果有一些档名或者是其他意义的名词内含有空白字元的时候, xargs 可能就会误判了~
mkfs.ext4 -N 600000 更改inode编码
5、磁盘坏道故障
centos出现磁盘坏掉,怎么修复和检测。
|
1
2
3
4
5
6
7
8
9
10
11
12
13
14
15
16
17
18
19
20
21
22
23
24
25
26
27
|
<strong>当dmesg的时候,出现下面的信息说明磁盘有问题</strong><br><br>Info fld=0x139066d0end_request: I/O error, dev sda, sector 328230608Buffer I/O error on device sda, logical block 41028826sd 0:0:0:0: SCSI error: return code = 0x08000002sda: Current: sense key: Medium Error Add. Sense: Unrecovered read errorInfo fld=0x139066d0end_request: I/O error, dev sda, sector 328230608Buffer I/O error on device sda, logical block 41028826sd 0:0:0:0: SCSI error: return code = 0x08000002sda: Current: sense key: Medium Error Add. Sense: Unrecovered read errorInfo fld=0x139066d0end_request: I/O error, dev sda, sector 328230608Buffer I/O error on device sda, logical block 41028826sd 0:0:0:0: SCSI error: return code = 0x08000002sda: Current: sense key: Medium Error Add. Sense: Unrecovered read errorInfo fld=0x139066d0end_request: I/O error, dev sda, sector 328230608Buffer I/O error on device sda, logical block 41028826sd 0:0:0:0: SCSI error: return code = 0x08000002sda: Current: sense key: Medium Error Add. Sense: Unrecovered read error |
1. 首先检测下坏掉
badblocks -s -v -o /root/bb.log /dev/sda 将结果保存到bb.log
[root@logging ~]# badblocks -s -v -o /root/badblocks.log /dev/sda
Checking blocks 0 to 586061784
Checking for bad blocks (read-only test): done
Pass completed, 173 bad blocks found.
smartctl -a /dev/sda3 (快速检测硬盘坏道,看read,write 后面有没有errors)
2. 逻辑坏道修复方法
①、badblocks -s -w /dev/sda END START (END代表需要修复的扇区末端,START代表需要修复的扇区起始端)
②、fsck -a /dev/sda
修复后再用badblocks -s -v -o /root/bb.log /dev/sda监测看是否还有坏道存在,如果坏道还是存在的话说明坏道属于硬盘坏道。硬盘坏道要用隔离方法,首先记录监测出的硬盘坏道然后分区的时候把硬盘坏道所在的扇区分在一个分区(大小一般大于坏扇区大小),划分出的坏道分区不使用即可达到隔离的目的
3. 0磁道坏道和硬盘坏道(准备换硬盘)
0磁道坏道的修复方法是隔离0磁道,使用fdisk划分区的时候从1磁道开始划分区。
如果是硬盘坏道的话,只能隔离不能修复
6、MBR修复和GRUB修复
CentOS 7修复MBR和GRUB
一、修复MBR:
MBR(Master Boot Record主引导记录):
硬盘的0柱面、0磁头、1扇区称为主引导扇区。其中446Byte是bootloader,64Byte为Partition table,剩下的2Byte为magic number。
备份MBR:
#dd if=/dev/sda of=/root/mbr.bak count=1 bs=512
破坏bootloader:
#dd if=/dev/zero of=/dev/sda count=1 bs=200
这里边block size只要小于等于446即可。
修复方式:
1、借助其他系统挂载磁盘修复。
修复方式同光盘修复类似,也是使用grub2-install命令。
2、借助安装光盘修复。
1.装入光盘,在光盘引导界面选择troubleshooting:

2.选择进入救援模式:

3.按回车键继续:

4.进入磁盘挂载选择模式:
磁盘将会被挂载至/mnt/sysimage/下
continue 以rw方式挂载分区。
read only 以ro方式挂载分区。
skip 跳过,将来自己手工挂载磁盘。

5.选择continue,稍等片刻,提示已经挂载完成。


6.此时进入救援模式的命令行:

7.使用grub2-install命令重建bootloader:
#grub2-install root-directory=/mnt/sysimage /dev/sda

显示无错误,使用sync写入硬盘,reboot重启系统。
8.重启后无错误,grub正常运行:

至此,MBR修复完成。
二、修复grub
grub配置文件丢失:
开机后会直接进入grub界面,显示为grub>:

修复步骤如下:
grub>insmod xfs
grub>set root=(hd0,1)
grub>linux16 /vmlinuz-xxxxx root=/dev/mapper/centos-root
grub>initrd16 /initramfs-.xxxxx.img

修复完成后即可进入系统,重建配置文件。
grub程序损坏:
如上
修复步骤:
有MBR备份,进入急救模式,用备份恢复或重建grub程序(dd 、cp)。
无MBR备份,进入急救模式,重建grub程序 ( grub2-install )。
注意:CentOS7因为使用的是grub2,配置文件同grub有不少变化,一定要切记备份grub.cfg以便恢复。