cmd_vel_mux包从名字就可以推测出它的用途,即进行速度的选择(In electronics, a multiplexer or mux is a device that selects one of several analog or digital input signals and forwards the selected input into a single line)。这一功能有时候很有用,比如机器人在自主导航时遇到紧急情况要切换到手动控制模式,这时就要将机器人控制权从自主导航的节点切换到方向盘、手柄、键盘、急停开关等控制节点。
如果有多个节点要想控制机器人的运动,多路复用器(cmd_vel_mux)允许平行使用所有这些命令,并且可以设置优先级,优先级高的会抢占优先级低的任务。例如机器人自主导航时可能会有下面4种优先级的任务(通常将自主行为的优先级设为最低):
- 3 (highest priority): safety controller (安全控制)
- 2: keyboard teleop (键盘遥控)
- 1: android teleop (Android 遥控)
- 0 (lowest priority): navi stack teleop (导航包自主控制)
在一般情况下,大部分时间都是navi包控制机器人。但是通过Android遥控app或键盘遥控触发命令,可以覆盖navi包的命令。如果两个都发出命令,那么会优先使用键盘的遥控命令。当碰撞、跌落传感器发出报警信号,触发safety controller的命令时,则又会重写上面所有的速度命令,这样就能保证机器人的自主移动时的安全。
下载yocs_cmd_vel_mux包的源文件到ROS工作目录的源文件夹中(比如catkin_ws/src),然后使用catkin进行编译。
先看一下包中的standalone.launch文件。先运行一个名为nodelet_manager的nodelet manager节点,然后加载cmd_vel_mux.launch文件:
<!--
  Example standalone launcher for the velocity multiplexer.

  For best results you would usually load this into the core control system
  to avoid latency for reactive controllers. However for other apps, running
  it standalone with a similar configuration will also work.
 -->
<launch>
  <arg name="nodelet_manager_name"  value="nodelet_manager"/>
  <arg name="config_file"           value="$(find yocs_cmd_vel_mux)/param/example.yaml"/>

  <!-- nodelet manager -->
  <node pkg="nodelet" type="nodelet" name="$(arg nodelet_manager_name)" args="manager"/>

  <!-- velocity mulitplexer -->
  <include file="$(find yocs_cmd_vel_mux)/launch/cmd_vel_mux.launch">
    <arg name="nodelet_manager_name"  value="$(arg nodelet_manager_name)"/>
    <arg name="config_file"           value="$(arg config_file)"/>
  </include>
</launch>
在cmd_vel_mux.launch中使用nodelet_manager加载yocs_cmd_vel_mux/CmdVelMuxNodelet
<!--
  YOCS Velocity Multiplexer launcher
  -->

<launch>
  <arg name="nodelet_manager_name"  default="nodelet_manager"/>
  <arg name="config_file"           default="$(find yocs_cmd_vel_mux)/param/example.yaml"/>

  <node pkg="nodelet" type="nodelet" name="yocs_cmd_vel_mux"
        args="load yocs_cmd_vel_mux/CmdVelMuxNodelet $(arg nodelet_manager_name)">
    <param name="yaml_cfg_file" value="$(arg config_file)"/>
  </node>
</launch>
下面是修改的配置文件,有默认、手柄和键盘3种优先级不同的控制方式。优先级从0到MAX_INT,数字越大优先级越高:
# Individual subscriber configuration:
#   name:           Source name
#   topic:          The topic that provides cmd_vel messages
#   timeout:        Time in seconds without incoming messages to consider this topic inactive
#   priority:       Priority: an UNIQUE unsigned integer from 0 (lowest) to MAX_INT
#   short_desc:     Short description (optional)

subscribers:
  - name:        "Default input"
    topic:       "input/default"
    timeout:     0.1
    priority:    0
    short_desc:  "The default cmd_vel, controllers unaware that we are multiplexing cmd_vel should come here"

  - name:        "Joystick control"
    topic:       "input/joystick"
    timeout:     0.1
    priority:    1

  - name:        "Keyboard operation"
    topic:       "input/keyop"
    timeout:     0.1
    priority:    2

publisher:       "output/cmd_vel"
下面以ROS中的小海龟为例子来展示一下cmd_vel_mux的使用方法。编写一个test.launch文件如下,文件中先开启了cmd_vel_mux,然后运行turtlesim_node节点,最后开启了turtle_teleop_key键盘控制节点:
<launch>
    <include file="$(find yocs_cmd_vel_mux)/launch/standalone.launch"/>

    <node pkg="turtlesim" type="turtlesim_node" name="turtlesim_node" >
        <remap from="/turtle1/cmd_vel" to="/yocs_cmd_vel_mux/output/cmd_vel" />
    </node>

    <node pkg="turtlesim" type="turtle_teleop_key" name="turtle_teleop_key" output="screen">
        <remap from="/turtle1/cmd_vel" to="/yocs_cmd_vel_mux/input/keyop" />
    </node>
</launch>
launch文件中将turtlesim_node节点订阅的/turtle1/cmd_vel消息重映射到mux的输出/yocs_cmd_vel_mux/output/cmd_vel上。将turtle_teleop_key发布的消息/turtle1/cmd_vel重映射到mux的输入/yocs_cmd_vel_mux/input/keyop上。要注意launch文件中remap的用法。如果该属性在顶层, 即作为 launch 元素的子元素出现, 重映射将会应用到所有的后续节点。这些重映射元素也可以作为一个节点元素的子元素,如:
<node node-attributes>
    <remap from="original-name" to="new-name"/>
</node>
在这种情况下,给出的重映射只应用于其所在的节点。
cmd_vel_mux的作用就像一个选择开关,接收多个输入信号,只输出一个结果:
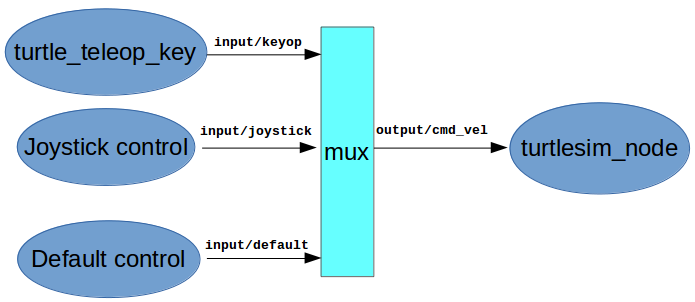
cmd_vel_mux会发布下面两个消息,分别是输出速度(名称可以在配置文件中更改)和mux的当前选择:
-
output/cmd_vel (geometry_msgs/Twist):Multiplexed output. Incoming velocity commands from the active source are republished on this topic. The topic name is specified on the configuration file.
-
active (std_msgs/String):The active input at each moment, or idle if nobody is commanding the robot. Latched topic
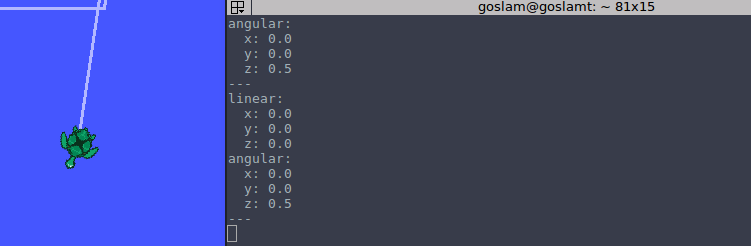
输入命令roslaunch yocs_cmd_vel_mux test.launch运行测试文件,然后打开一个新终端输入下面的指令作为默认控制信号:
rostopic pub -r 10 /yocs_cmd_vel_mux/input/default geometry_msgs/Twist '{linear: {x: 0.0, y: 0.0, z: 0.0}, angular: {x: 0.0,y: 0.0,z: 0.5}}'
使用rostopic echo查看一下mux的输出,可以看到正在执行默认控制指令,小海龟以0.5rad/s的角速度旋转:

active为:Default input

接着在turtle_teleop_key的窗口中按下方向键,可以看到小海龟改由键盘控制,active变为Keyboard operation:

输出速度output/cmd_vel也变为键盘控制的速度:
参考: