VREP中可以添加力传感器,用于刚性连接在两个物体之间以测量这两个物体之间的作用力或力矩。如下图所示,力传感器可以测量沿着X、Y、Z三个坐标轴的力和力矩:

[Forces and torques measured by a force sensor]
以下图中的场景为例,红色立方体为墙壁(设为静态物体,否则可能会倾覆),蓝色立方体为细长杆,长度0.4m,质量2Kg,用力传感器将这两个物体连接在一起。杆对墙壁会施加一个倾覆力矩,理论值为$T=frac{1}{2}lmg=3.92N*m$,根据右手定则方向为负。

[Force sensor object (green) measuring the force and torque exerted by a beam (blue) anchored in a wall (red)]
添加Graph,并添加数据流记录力传感器的Z轴转矩:

开始仿真,可以看到力传感器数值稳定在-3.92附近,与理论计算一致:

力传感器能刚性地连接两个物体,但在仿真过程中当其受到的力/力矩超过阈值或某些用户定义的条件发生时,这种刚性连接可以失效。Initially, a force sensor acts as a rigid link. During simulation, a force sensor can however be broken when a specified force/torque threshold is overshot or when some other user-defined conditions are met.
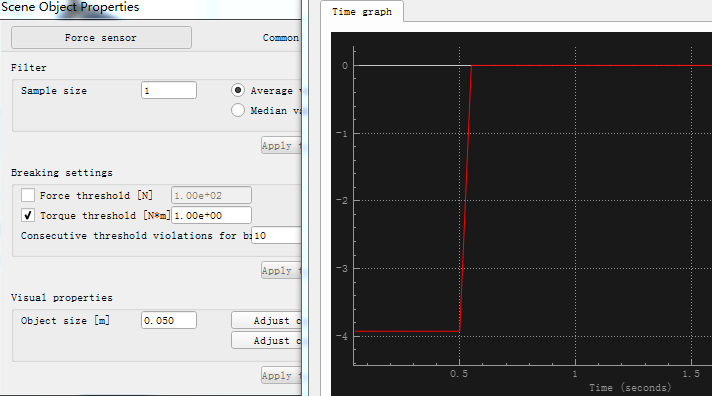
下面看看力传感器的属性对话框,Filter栏用于滤波减少数据抖动,Breaking settings栏用于设定力传感器失效的阈值,Visual properties设置其外观与尺寸:

- Filter: when force or torque data is acquired by the force sensor, then it is accumulated and can be filtered in order to obtain less jittery values.
- Sample size: the number of values that should be used for the filter. 1 will not filter values (raw output).
- Average value: if selected, then the force sensor will deliver average values (average of sample size values).
- Median value: if selected, then the force sensor will deliver median values (median of sample size values).
- Breaking settings: this section allows to set-up some automatic breaking conditions and behavior for a force sensor.
- Force threshold: the amplitude of the force vector that triggers a threshold violation.
- Torque threshold: the amplitude of the torque vector that triggers a threshold violation
- Consecutive threshold violations for breaking: the number of consecutive times the sensor is allowed to violate a threshold before breaking.
根据上面选项的描述,我们将力矩阈值设为1N*m(默认为10N*m),然后再进行仿真,一段时间(时间长短由Consecutive threshold violations for breaking控制:10*50ms=0.5s)后蓝色的杆会从墙上掉下来。从曲线图中也可以看出,超出一定时间后力传感器的力矩读数变为0:
VREP中力传感器的一大用处就是用来测量机器人与外界环境交互时的接触力,比如检测机械手爪的夹持力或是机器人脚底的压力分布等信息。通常需要将力传感器添加在末端(手指或脚底板上)然后再连接一个接触体。(Attach a force sensor at the tip of robot leg, then attach a contact shape to the force sensor (i.e. Tip --> forceSensor --> contactShape). Then you can read the force/torque in the force/torque sensor)
下面来进行一个测试,将两个立方垒起来,上面的质量为10Kg,用力传感器将其连接,如下图所示:

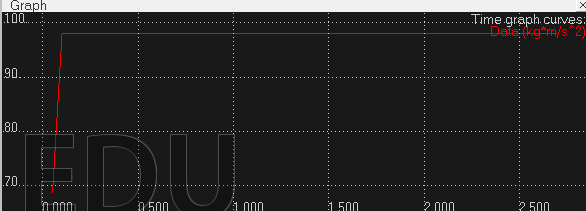
开始仿真,可是会出现很奇怪的现象:用Bullet和ODE引擎时,力的测量结果总是不稳定,随机地跳动。但切换到Vortex或Newton引擎时结果就很好,下图是用Newton引擎的测量结果,正好为98N。
开始以为是哪些参数没有设置好(比如物体质量、惯性矩等参数要合适,否则仿真会出现不稳定),后来在VREP官方论坛提问才知道是因为Bullet和ODE引擎在接触边界的时候也进行了碰撞的计算,跟物理引擎工作原理有关系。解决方法就是设置碰撞掩码(mask),使其掩码位错开,不进行碰撞计算。
The two objects collide with each other slightly (it is a border condition and only some of the engines will register that collision). The solution: simply adjust the local respondable masks of your two bodies, so that they won't react to collision anymore. Then the sensor reading will be much better.
像下面这样,让力传感器连接的两个物体的碰撞掩码位错开不重合(这样即使两个物体相互穿透也不会产生碰撞力)
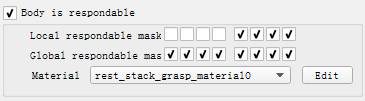

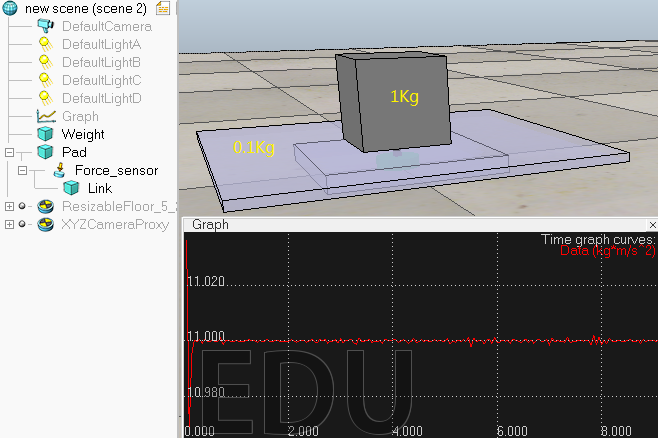
下面的一个例子模仿了称重仪,按照上面所述设置好碰撞掩码后可以在平台上添加不同质量的物体,用力传感器测量其重量(平台和物体的重量)。如下图所示,物体质量1Kg,平台质量0.1Kg,重力加速度设为10m/s2,则传感器检测出来的力应该是11N。可以减去平台的重量,消除这一固定偏差获取真实物体重量。
有一点需要注意,有人会想如果将平台质量设的很小,比如0.00001Kg那么传感器测量结果不就相当于真实值了(因为平台质量很小,忽略不计,就可以不用减去这个偏差...)。我开始也想这样偷懒,不过仿真时出现了不稳定和跳动等问题,重物过一段时间后开始抖动甚至从平台上掉下来...
因为物体间的质量相差太大,进行动态仿真时要避免物体的质量或惯性矩过小。但奇葩的是即使质量很小,切换到Vortex或Newton引擎时结果也很稳定... Bullet和ODE主要用于游戏中,而Vortex专注于科学物理仿真,计算准确度以及稳定性肯定会比游戏物理引擎要好。所以VREP提供了4个物理引擎还是有道理的,要根据它们的长处来选择合适的引擎进行仿真,不能总是用默认的Bullet。
Design consideration 7:
Keep masses similar and not too light. When linking two shapes with a dynamically enabled joint or a dynamically enabled force sensor, make sure the two shape's masses are not too different (m1<10*m2 and m2<10*m1), otherwise the joint or force sensor might be very soft and wobbly and present large positional/orientational errors (this effect can however also be used as a natural damping sometimes). Additionally, very low mass shapes should be avoided since they won't be able to exert very large forces onto other shapes (even if propelled by high force actuators!).
下面看一个稍微复杂一点的模型,机械手爪(夹持器)BaxterGripper,可以从模型浏览器的components——>grippers中找到。

这个模型的可动部分由rightFinger、leftFinger和closeJoint组成,closeJoint是一个移动关节用于控制手爪的张开和闭合。从层级关系图中可以看出左右指上都装有力传感器,分别连接着Finger和Pad。
下面是手爪的控制代码:
if (sim_call_type==sim_childscriptcall_initialization) then
    gripperHandle=simGetObjectHandle('BaxterGripper')
    objectName=simGetObjectName(gripperHandle)

    motorHandle=simGetObjectHandle('BaxterGripper_closeJoint')
    -- the 'BaxterGripper_centerJoint' is handled by a joint callback script (i.e. custom position controller)
    openedGap=simGetScriptSimulationParameter(sim_handle_self,'openedGap')
    closedGap=simGetScriptSimulationParameter(sim_handle_self,'closedGap')
    interval={0.0362-openedGap,openedGap-closedGap}
    simSetJointInterval(motorHandle,false,interval)
end

if (sim_call_type==sim_childscriptcall_cleanup) then

end

if (sim_call_type==sim_childscriptcall_actuation) then
    close=simGetIntegerSignal(objectName..'_close')

    if (close==1) then
        simSetJointTargetVelocity(motorHandle,0.005)
    else
        simSetJointTargetVelocity(motorHandle,-0.005)
    end
end
当整数值信号'BaxterGripper_close'的值为1时手爪闭合,值为0时手爪张开。信号可以看成是一种全局变量,因此可以在其它脚本中设置该信号来控制手爪模型的张合:
    -- simSetIntegerSignal(gripperName..'_close',1) -- close
    -- simSetIntegerSignal(gripperName..'_close',0) -- open
Signals can be seen as global variables. Three types of signals are currently supported: integer-type signals, floating-type signals and string-type signals. Signals can be defined, redefined, read and cleared. At simulation end, all signals created by the main script or any child script will be cleared.
设置整型信号的函数原型为:number result = simSetIntegerSignal(string signalName, number signalValue)
其中,参数signalName为信号名,是一个字符串变量;signalValue是要设置信号的整形数值。
获取信号值的函数为:number signalValue=simGetIntegerSignal(string signalName)
参考: