学习使用Reveal连接模拟器和真机调试
Reveal是一个ios程序界面调试工具。
(一)用终端创建文件,设置别名
首先打开Terminal(终端),输入vim~/.lldbinit创建一个名为.lldbinit的文件,然后将如下内容输入该文件中:
command alias reveal_load_sim expr (void*)dlopen("/Applications/Reveal.app/Contents/SharedSupport- Libraries/libReveal.dylib",0x2);
command alias reveal_load_dev expr (void*)dlopen([(NSString*)[(NSBundle*)[NSBundle mainBundle] pathForResource:@"libReveal" ofType:@"dylib"] cStringUsingEncoding:0x4],0x2);
command alias reveal_start expr (void)[(NSNotificationCenter *)[NSNotificationCenter defaultCenter] postNotificationName:@"IBARevealRequestStart" object:nil];
command alias reveal_stop expr (void)[(NSNotificationCenter *)[NSNotificationCenter defaultCenter] postNotificationName:@"IBARevealRequestStop" object:nil];
这步是为lldb设置了4个别名:
1、reveal_load_sim 为模拟器,加载reveal调试用的动态链接库。
2、reveal_load_dev为真机加载reveal调试用的动态链接库。
3、reveal_start启动reveal调试功能。
4、reveal_stop结束reveal调试功能。
(二)添加断点,设置断点
我们需要在APPDelegate类的application:didFinishLaunchingWithOptions:方法中操作:
1.给该方法添加一个断点,右击改断点,选择Edit Breakpoint。

2.单击Action旁边的Add Action(没有的话点击右边‘+’按钮),输入“Reveal_load_sim”。
3.勾选“Options”上的“Automatically continue after evaluating”选项。

(三)添加Reveal,并设置
现在,我们需要找到Reveal.app,右击选择显示包内容,将Contents-->SharedSupport-->iOS-Libraries里的Reveal.framework拖入打开的Xcode工程中。点击Build Phases 然后从Link Binary With Libraries 删除Reveal.framework(一定要移除啊)。
注:如果将Reveal.framework拖入打开的Xcode工程中时,没有操作下面这一步的话,就会出现错误:
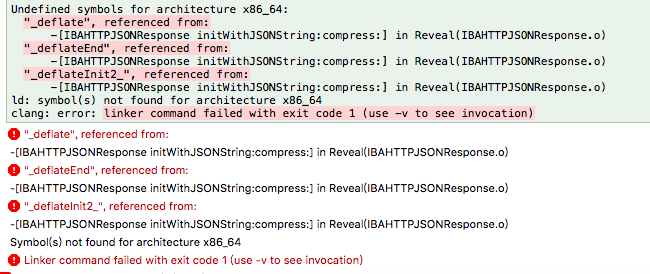
选中Build Settings 在搜索栏中输入 Other Linker Flags,在Other Linker Flags(也可以在Other Linker Flags下的Debug中)输入-ObjC -lz -framework Reveal。
(四)完成连接,进行调试
完成上边操作后 command + R 运行Xcode程序,打开Reveal,就可以在Reveal界面的左上角看到有模拟器(真机)可以连接调试。
注:真机的话保证在同一个wifi下。
参考:http://www.jianshu.com/p/0cc7089143a3(里边包含破解方法)