1.src属性和background属性的区别:
在API文档中我们发现ImageView有两个可以设置图片的属性,分别是:src和background
常识:
①background通常指的都是背景,而src指的是内容!!
②当使用src填入图片时,是按照图片大小直接填充,并不会进行拉伸
而使用background填入图片,则是会根据ImageView给定的宽度来进行拉伸
1)写代码验证区别:
写个简单的布局测试下:
<LinearLayout xmlns:android="http://schemas.android.com/apk/res/android"
    xmlns:tools="http://schemas.android.com/tools"
    android:id="@+id/LinearLayout1"
    android:layout_width="match_parent"
    android:layout_height="match_parent"
    android:orientation="vertical"
    tools:context="com.jay.example.imageviewdemo.MainActivity" >

    <ImageView
        android:layout_width="wrap_content"
        android:layout_height="wrap_content"
        android:background="@drawable/pen" />

    <ImageView
        android:layout_width="200dp"
        android:layout_height="wrap_content"
        android:background="@drawable/pen" />

    <ImageView
        android:layout_width="wrap_content"
        android:layout_height="wrap_content"
        android:src="@drawable/pen" />

    <ImageView
        android:layout_width="200dp"
        android:layout_height="wrap_content"
        android:src="@drawable/pen" />

</LinearLayout>
效果图如下:
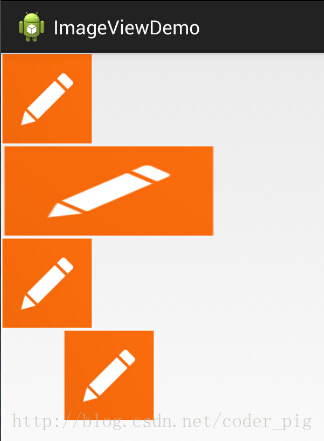
结果分析:
宽高都是wrap_content那就一样,是原图大小,但是,当我们固定了宽或者高的话, 差别就显而易见了,blackground完全填充了整个ImageView,而src依旧是那么大, 而且他居中了哦,这就涉及到了ImageView的另一个属性scaleType了! 另外还有一点,这里我们说了只设置width或者height哦!加入我们同时设置了 width和height的话,blackground依旧填充,但是,src的大小可能发生改变哦! 比如,我们测试下下面这段代码:
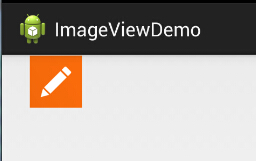
<ImageView
        android:layout_width="100dp"
        android:layout_height="50dp"
        android:src="@drawable/pen" />
运行效果图:
PS:scaleType下面会讲~
2)解决blackground拉伸导致图片变形的方法
在前面的效果图中的第二个Imageview中我们可以看到图片已经被拉伸变形了, 正方形变成了长方形,对于和我一样有轻微强迫症的人来说,显然是不可接受的, 有没有办法去设置呢?答案肯定是有的,笔者暂时知道的有以下两种方式:
-
这个适用于动态加载ImageView的,代码也简单,只要在添加View的时候,把大小写写死就可以了
LinearLayout.LayoutParams layoutParam = new LinearLayout.LayoutParams(48, 48); layout.addView(ibtnPen, layoutParam); -
除了动态加载view,更多的时候,我们还是会通过xml布局的方式引入ImageView的 解决方法也不难,就是通过drawable的Bitmap资源文件来完成,然后blackground属性设置为该文件即可! 这个xml文件在drawable文件夹下创建,这个文件夹是要自己创建的哦!!
pen_bg.xml:
<bitmap
    xmlns:android="http://schemas.android.com/apk/res/android"
    android:id="@id/pen_bg"
    android:gravity="top"
    android:src="@drawable/pen"
    android:tileMode="disabled" >
</bitmap>
上述代码并不难理解,估计大家最迷惑的是titleMode属性吧,这个属性是平铺,就是我们windows设置 背景时候的平铺,多个小图标铺满整个屏幕捏!记得了吧!不记得自己可以试试!disabled就是把他给禁止了!
就是上面这串简单的代码,至于调用方法如下:
动态: ibtnPen.setBacklgroundResource(R.drawable.penbg);
静态: android:background = "@drawable/penbg"
3)设置透明度的问题
说完前面两个区别,接着再说下setAlpha属性咯!这个很简单,这个属性,只有src时才是有效果的!!
4)两者结合妙用:
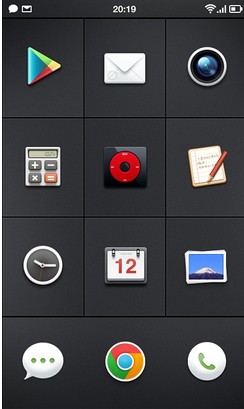
一看去是一个简单的GridView,每个item都是一个ImageView,但是细心的你可能发现了, 上面的ICON都不是规则的,而是圆形,圆角矩形等等,于是乎这里用到了src + background了! 要实现上述的效果,你只需要两个操作: 找一张透明的png图片 + 设置一个黑色的背景 (当然你也可以设置png的透明度来实现,不过结果可能和预想的有出入哦!) 我们写个简单例子:
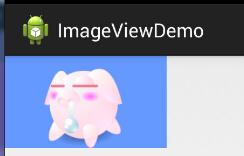
如图,呆萌呆萌的小猪就这样显示到ImageView上了,哈哈,blackground设置了蓝色背景!
实现代码:
<ImageView
    android:layout_width="150dp"
    android:layout_height="wrap_content"
    android:src="@drawable/pig"
    android:background="#6699FF" />
PS: 当然你也可以用selctor实现点击效果,设置不同的情况设置不同的图片,以实现点击或者触摸效果!
5)Java代码中设置blackground和src属性:
前景(对应src属性):setImageDrawable( );
背景(对应background属性):setBackgroundDrawable( );