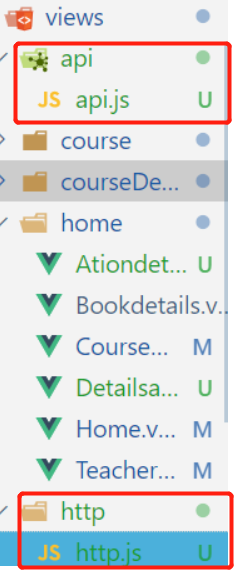
一般我们写小型的项目是用不到封装axios实例
但是当我们写大型项目时 接口有时候多到有上百个接口,那我们在请求一次调用一次接口,接口上好多都是重复的,这个时候我们就可以封装axios实例,既节省了事件。有可以少些好多代码
首先我们要先安装axios
npm i axios --save
然后在vue项目中要创建两个文件夹api文件和http文件 当然文件名是自定义的

在http文件下http.js中要这样写
import axios from 'axios';

//环境的切换 环境指的就是开发环境和生产环境
//开发环境(development) 中用到的是测试接口
if (process.env.NODE_ENV == 'development') {
    axios.defaults.baseURL = 'http://120.53.31.103:84/'
}
//通过if判断处于开发环境还是生产环境
if (process.env.NODE_ENV == 'production') {
    axios.defaults.baseURL = 'https://www.365msmk.com/'
}

//设置请求超时的事件
axios.defaults.timeout = 5000;
// 请求拦截
axios.interceptors.request.use(
    config => {
        //获取轮播图要设置的头信息
        config.headers = { DeviceType: 'H5' }
        //可每次发送请求之间的逻辑处理 ,比如判断token
        return config
    }
)
// 响应拦截
axios.interceptors.response.use(
    response => {
        //如果返回的·状态码为200时,说明接口请求成功
        return response
    },
    error => {
        if (error.response.status) {
        }
    }
)
//设置get请求方式 用promise方式返回的实例来实现
export function get(url, params) {
    return new Promise((resolve, reject) => {
        axios.get(url, {
            params: params
        }).then(res => {
            resolve(res)
        }).catch(err => {
            reject(err)
        })
    })
}

//设置post请求方式 用promise方式返回的实例来实现
export function post(url, params) {
    return new Promise((resolve, reject) => {
        axios.post(url, params).then(res => {
            resolve(res.data)
        }).catch(err => {
            reject(err.data)
        })
    })
}
在api文件下api.js中要这样
首先要引入我们上个http.js文件中的两种请求方式post,get
import { post, get } from '../http/http.js'

//首页讲师和精选课堂  资讯数据的请求
//Indexlist是我们定义的函数名  用于·在后面调用方法
export function Indexlist() {
// return get('这里面写的是请求接口后面需要拼接的一部分')
    return get('api/app/recommend/appIndex')
}
//轮播图数据的请求
export function Indexbanner() {
    return get('api/app/banner')
}
在vue组件中要这样应用
 1 import {Indexlist} from "../api/api.js";
 2 //首先要引用api文件中当时定义的方法名 这样也用到了解构赋值 ,提取api.js文件中我们要用的数据
 3
 4 async mounted() {
 5    //这里也可以用到async await语法
 6     var ids = this.$route.query.item;
 7     //接收上个页面传过来的id名
 8     var objlist = await Indexlist({ id: ids });
 9
10  console.log(objlist)
11 //打印我们请求那个接口,看下有数据没
12
13 this.CommentList = [...objlist.data.list];
14 //定义一个数组用扩展运算符进行赋值 console.log(this.CommentList);
15 }
16