MVC
Model 模型(dao,service):数据模型,提供要展示的数据,因此包含数据和行为,数据Dao和服务层
- View 视图(jsp):用户界面
- Controller 控制器(Servlet):接收用户请求,委托给模型层,处理完毕后把返回的数据返回给视图
SpringMVC
SpringMVC是Spring Framework 的一部分,是基于Java实现MVC的轻量级web框架
HelloSpringMVC
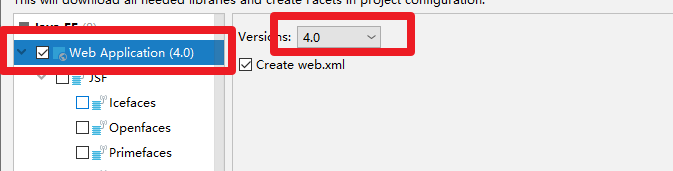
- maven创建一个普通的项目,再右键项目,从而建立了web文件夹

- 在WEB-INF中新建一个jsp/test.jsp
<%@ page contentType="text/html;charset=UTF-8" language="java" %>
<html>
<head>
    <title>Title</title>
</head>
<body>

S{msg}

</body>
</html>
- 确定maven中有springmvn依赖
- 也要导入servlet依赖
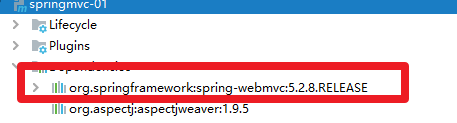
<dependencies>
    <dependency>
        <groupId>org.springframework</groupId>
        <artifactId>spring-webmvc</artifactId>
        <version>5.2.8.RELEASE</version>
    </dependency>
    <dependency>
        <groupId>org.aspectj</groupId>
        <artifactId>aspectjweaver</artifactId>
        <version>1.9.5</version>
    </dependency>
    <!--        Servlet依赖-->
        <dependency>
            <groupId>javax.servlet</groupId>
            <artifactId>javax.servlet-api</artifactId>
            <version>3.1.0</version>
            <scope>provided</scope>
        </dependency>
<!--        JSP依赖-->
        <dependency>
            <groupId>javax.servlet.jsp</groupId>
            <artifactId>javax.servlet.jsp-api</artifactId>
            <version>2.3.3</version>
            <scope>provided</scope>
        </dependency>
<!--        jstl表达式的依赖-->
        <dependency>
            <groupId>javax.servlet</groupId>
            <artifactId>jstl</artifactId>
            <version>1.2</version>
        </dependency>
<!--        standar标签库-->
        <dependency>
            <groupId>taglibs</groupId>
            <artifactId>standard</artifactId>
            <version>1.1.2</version>
        </dependency>
</dependencies>
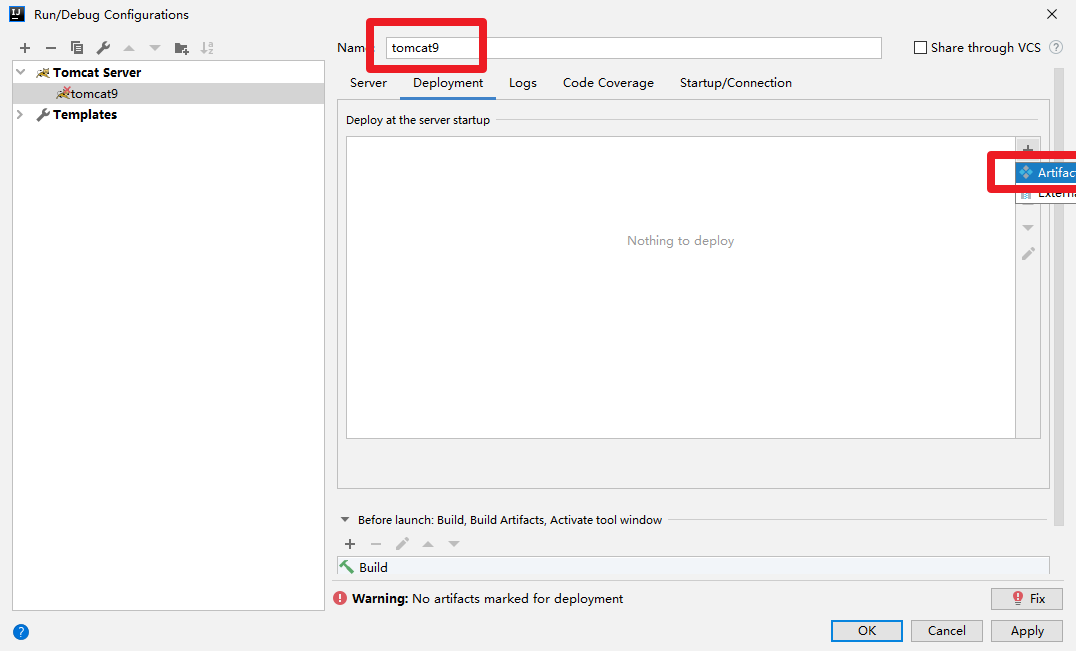
- 配置一下tomcat,注意,如果没有第一步去生成web项目,就没有Artifact
- 编写
web.xml(主要配置DispatchSer)
<?xml version="1.0" encoding="UTF-8"?>
<web-app xmlns="http://xmlns.jcp.org/xml/ns/javaee"
         xmlns:xsi="http://www.w3.org/2001/XMLSchema-instance"
         xsi:schemaLocation="http://xmlns.jcp.org/xml/ns/javaee http://xmlns.jcp.org/xml/ns/javaee/web-app_4_0.xsd"
         version="4.0">
<!--    配置DispatchSer:这是SpringMVC的核心:请求分发器,前端控制器-->
    <servlet>
        <servlet-name>springmvc</servlet-name>
        <servlet-class>org.springframework.web.servlet.DispatcherServlet</servlet-class>
        <init-param>
            <param-name>contextConfigLocation</param-name>
            <param-value>classpath:springmvc-servlet.xml</param-value>
        </init-param>
<!--        启动级别 1(即服务器一启动,他就启动了)-->
        <load-on-startup>1</load-on-startup>
    </servlet>

<!--
    在SpringMVC中 区别
        /:只匹配所有的请求 ,不会去匹配jsp页面
        /* 只匹配所有的请求 ,包括匹配jsp页面
-->
    <servlet-mapping>
        <servlet-name>springmvc</servlet-name>
        <url-pattern>/</url-pattern>
    </servlet-mapping>
</web-app>
- 在resources中新建一个
springmvc-servlet.xml,(文件名可以随便取,但是建议取这个)- 其实这个配置文件的头文件就是Spring的配置文件
<?xml version="1.0" encoding="UTF-8"?>
<beans xmlns="http://www.springframework.org/schema/beans"
       xmlns:xsi="http://www.w3.org/2001/XMLSchema-instance"
       xsi:schemaLocation="http://www.springframework.org/schema/beans
        https://www.springframework.org/schema/beans/spring-beans.xsd
        ">
<!--    处理器映射器-->
    <bean class="org.springframework.web.servlet.handler.BeanNameUrlHandlerMapping" />
<!--    处理器适配器-->
    <bean class="org.springframework.web.servlet.mvc.SimpleControllerHandlerAdapter" />
<!--    视图解析器 -->
    <bean class="org.springframework.web.servlet.view.InternalResourceViewResolver" id="internalResourceViewResolver">
<!--        前缀 /WEB-INF/jsp/注意jsp后面还有一杠-->
        <property name="prefix" value="/WEB-INF/jsp/" />
<!--        后缀-->
        <property name="suffix" value=".jsp" />
    </bean>

<!--    BeanNameUrlHandlerMapping-->
    <bean id="/hello" class="com.jmu.controller.HelloController" />
</beans>
- 编写HelloController
- 注意 :
import org.springframework.web.servlet.mvc.Controller;
- 注意 :
package com.jmu.controller;

import org.springframework.web.servlet.ModelAndView;
import org.springframework.web.servlet.mvc.Controller;

public class HelloController implements Controller {
    public ModelAndView handleRequest(javax.servlet.http.HttpServletRequest httpServletRequest, javax.servlet.http.HttpServletResponse httpServletResponse) throws Exception {
        ModelAndView modelAndView = new ModelAndView();
        //业务代码
        String result = "HelloSpringMVC";
        modelAndView.addObject("msg",result);
        //视图跳转
        modelAndView.setViewName("test");
        return modelAndView;
    }
}
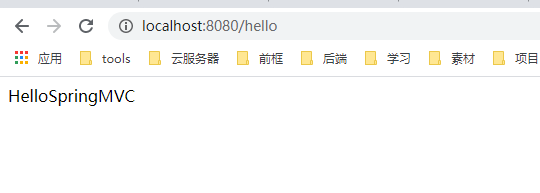
- 运行测试
出现404问题
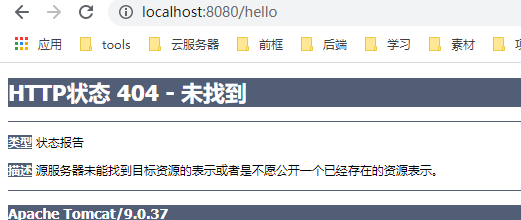
解决问题:
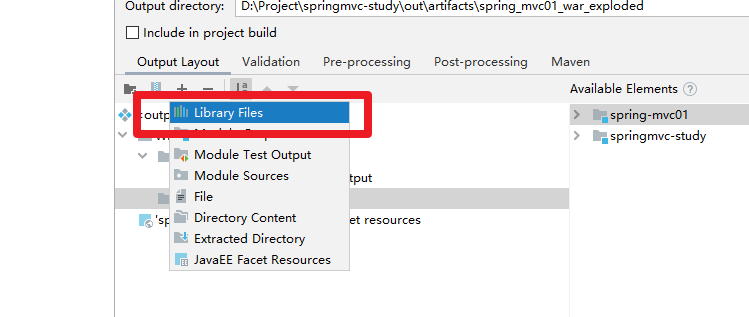
在项目结构中WEB-INF新建一个lib文件夹
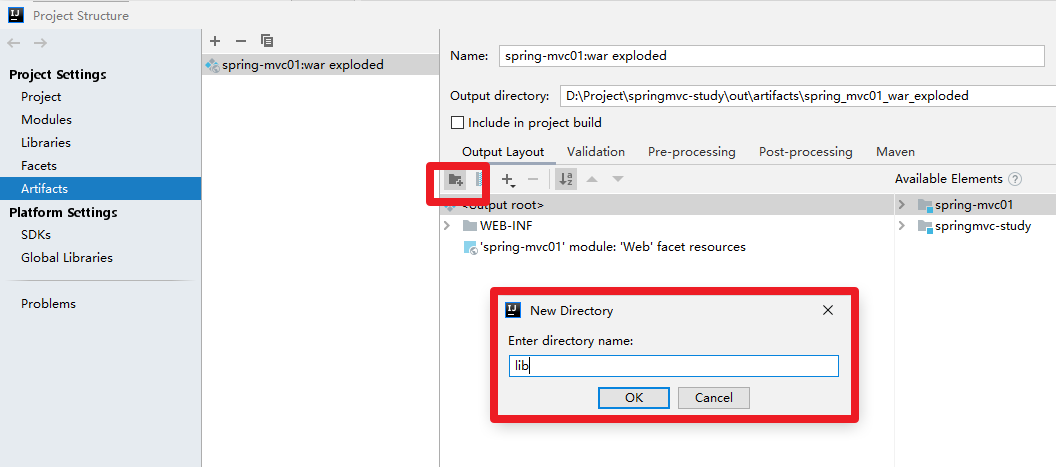
导入所有jar包
成功结果
SpringMVC执行原理

一.1234步骤,是拿到请求以后拦截了,做一些处理(比如权限校验),然后决定是否放行
二.5678步骤,是请求已经通过了拦截器,现在要传给Controller,然后将调用业务层得到的结果,封装成ModelAndView返回给前端控制器
三.9,10步骤,拿到ModelAndView对象,就会请求视图解析器进行视图解析,得到View对象,然后再返还给前端控制器
四.11前端控制器最后拿到视图,以后,渲染视图,然后将模型里的数据填充到request域里面
( ServletContext、ServletRequest、HttpSession、PageContext ),
五.最后再请求跳转,或者是response把数据写到响应体里,返回给浏览器。
使用注解开发SpringMVC
①:在父项目中新建一个module模块
②:解决maven的资源过滤问题和导入相关依赖
③:配置web.xml
注意点:
- web.xml的版本要最新版
- 注册DispatcherServlet
- 关联SpringMVC的配置文件
- 启动级别为1
- 映射路径为/【不要用/*,会404】
<?xml version="1.0" encoding="UTF-8"?>
<web-app xmlns="http://xmlns.jcp.org/xml/ns/javaee"
         xmlns:xsi="http://www.w3.org/2001/XMLSchema-instance"
         xsi:schemaLocation="http://xmlns.jcp.org/xml/ns/javaee http://xmlns.jcp.org/xml/ns/javaee/web-app_4_0.xsd"
         version="4.0">
    <!--注册servlet-->
    <servlet>
        <servlet-name>springmvc</servlet-name>
        <servlet-class>org.springframework.web.servlet.DispatcherServlet</servlet-class>
    <!--通过初始化参数指定SpringMVC的配置文件的位置,进行关联-->
        <init-param>
            <param-name>contextConfigLocation</param-name>
            <param-value>classpath:springmvc-servlet.xml</param-value>
        </init-param>
        <!--启动级别 1-->
        <load-on-startup>1</load-on-startup>
    </servlet>
    <!--所有请求都会被springmvc拦截-->
    <servlet-mapping>
        <servlet-name>springmvc</servlet-name>
        <url-pattern>/</url-pattern>
    </servlet-mapping>
</web-app>
④:在项目结构中WEB-INF新建一个lib文件夹导jar
详细步骤见HelloSpringMVC
⑤:添加SpriingMVC配置文件
- 让IOC注解生效
- 静态资源过滤:HTML,JS,CSS,图片,视频...
- MVC的注解驱动
- 配置视图解析器
在resources目录下添加springmvc-servlet.xml配置文件,创建配置文件中对应的文件夹
有注释版
<?xml version="1.0" encoding="UTF8"?>
<beans xmlns="http://www.springframework.org/schema/beans"
       xmlns:xsi="http://www.w3.org/2001/XMLSchema-instance"
       xmlns:context="http://www.springframework.org/schema/context"
       xmlns:mvc="http://www.springframework.org/schema/mvc"
       xsi:schemaLocation="http://www.springframework.org/schema/beans
        https://www.springframework.org/schema/beans/spring-beans.xsd
        http://www.springframework.org/schema/context
        https://www.springframework.org/schema/context/spring-context.xsd
        http://www.springframework.org/schema/mvc
        https://www.springframework.org/schema/mvc/spring-mvc.xsd">
<!--    自动扫描包,让指定包下的注解生效,由IOC容器统一管理-->
    <context:component-scan base-package="com.jmu.controller" />
<!--    让Spring MVC不处理静态资源-->
    <mvc:default-servlet-handler />
<!--    支持mvc注解驱动
            在Spring中一般采用@RequestMapping注解来完成映射关系
            要想使@RequestMapping注解生效
            必须向上下文中注册DefaultAnnotationHandlerMapping
            和一个AnnotationMethodHandlerAdapter实例
            这两个实例分别在类级别和方法级别处理
            而annotation-driver配置帮助我们自动完成上诉两个实例的注入
-->
    <mvc:annotation-driven />
<!--    视图解析器-->
    <bean class="org.springframework.web.servlet.view.InternalResourceViewResolver"
        id="internalResourceViewResolver">
<!--        前缀-->
        <property name="prefix" value="/WEB-INF/jsp/" />
<!--        后缀-->
        <property name="suffix" value=".jsp" />
    </bean>
</beans>
少注释版
使用UTF-8会出现中文错误,使用UTF8
<?xml version="1.0" encoding="UTF8"?>
<beans xmlns="http://www.springframework.org/schema/beans"
       xmlns:xsi="http://www.w3.org/2001/XMLSchema-instance"
       xmlns:context="http://www.springframework.org/schema/context"
       xmlns:mvc="http://www.springframework.org/schema/mvc"
       xsi:schemaLocation="http://www.springframework.org/schema/beans
        https://www.springframework.org/schema/beans/spring-beans.xsd
        http://www.springframework.org/schema/context
        https://www.springframework.org/schema/context/spring-context.xsd
        http://www.springframework.org/schema/mvc
        https://www.springframework.org/schema/mvc/spring-mvc.xsd">
<!--    自动扫描包,让指定包下的注解生效,由IOC容器统一管理-->
    <context:component-scan base-package="com.jmu.controller" />
<!--    让Spring MVC不处理静态资源-->
    <mvc:default-servlet-handler />
    <mvc:annotation-driven />
<!--    视图解析器-->
    <bean class="org.springframework.web.servlet.view.InternalResourceViewResolver"
        id="internalResourceViewResolver">
        <property name="prefix" value="/WEB-INF/jsp/" />
        <property name="suffix" value=".jsp" />
    </bean>
</beans>
⑥创建Controller
com.jmu.controoler.HelloController
- @Controller是为了让Spring IOC容器初始化自动扫描
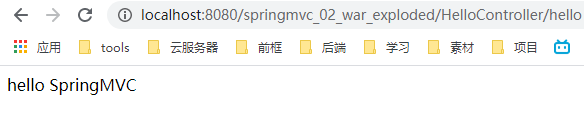
- @RequestMapping是为了映射请求路径,这里因为类和方法上都有映射所以访问时应该是/HelloController/hello
- 方法中声明Model类型为了把Action中的数据带到视图中
- 方法的返回结果是视图的名称,加上配置文件的前后缀变成WEB-INF/jsp/hello.jsp
package com.jmu.controller;

import org.springframework.stereotype.Controller;
import org.springframework.ui.Model;
import org.springframework.web.bind.annotation.RequestMapping;

@Controller
@RequestMapping("/HelloController")
public class HelloController {

    @RequestMapping("/hello")
    public String hello(Model model){
        //封装数据
        model.addAttribute("msg","hello SpringMVC");
        return "hello";//会被视图解析器处理
    }
}
⑦创建视图层
WEB-INF/jsp/hello.jsp
<%@ page contentType="text/html;charset=UTF-8" language="java" %>
<html>
<head>
    <title>Title</title>
</head>
<body>
${msg}
</body>
</html>
⑧测试
配置tomcat运行测试,运行成功!
小结
使用SpringMVC必须配置三大件:
处理器映射器、处理器适配器、视图解析器
通过,我们只需要手动配置视图解析器,而处理器映射器和处理器适配器只需要开启注解驱动即可
分析⑥
控制器Controller
- 控制器通常通过接口定义或者注解定义两种方法实现
- 实现接口Controller定义控制器是比较老的办法
- 一个控制器只有一个方法,如果要多个方法就需要定义多个Controller,定义麻烦
- @Controller注解类用于声明Spring类的实例是一个控制器
- Spring可以使用扫描机制来找到应用程序中所有基于注解的控制器类,为了保证Spring能找到你的控制器,需要在配置文件中声明组件扫描
<context:component-scan base-package="com.jmu.controller" />
映射RequestMapping
-
@RequestMapping注解用于映射url到控制器或者一个特定的处理程序方法,可用于类或方法上
但是一般建议在方法上直接配置成,因为如果项目很大,就会把上面的类的路径映射忘了
@RequestMapping("/HelloController/hello")
ModelAndView
设置ModelAndView对象,根据view的名称和视图解析器跳转到指定页面
页面:{视图解析器前缀}+viewName+{视图解析器后缀}
Restful 风格
概念
Restful就是一个资源定位及资源操作的风格,不是标准也不是协议,只是一种风格!!!这个风格可以更加简洁、更有层次、更易于实现缓存机制
使用Restful操作资源:可以通过不同的请求方式来实现不同的效果!如下:请求地址一样,但是功能可以不同
htp://127.0.0.1/tem/1查询GET
http://127.0.0.1/item新增PosT
http://127.0.0.1/item更新,PUT
http://127.0.0.1/item/1删除DELETE
没有使用restful风格
请求地址:http://localhost:8080/springmvc_02_war_exploded/add?a=1&b=hello
@Controller
public class RestfulController {
    @RequestMapping("/add")
    //方法定义的名字就是需要传入的参数
    public String test1(int a, String b, Model model){
        String res=a+b;
        model.addAttribute("msg","结果:"+res);
        return "hello";//写一个hello.jsp
    }
}
使用Restful风格
在SpringMVC可以使用@PathVariable注解,让方法参数的值对应绑定到一个URL模板变量上
请求地址:http://localhost:8080/springmvc_02_war_exploded/add/1/hello
@Controller
public class RestfulController {
    @RequestMapping("/add/{a}/{b}")
    public String test1(@PathVariable int a,@PathVariable String b, Model model){
        String res=a+b;
        model.addAttribute("msg","结果:"+res);
        return "hello";//写一个hello.jsp
    }
}
如果是要post请求,将RequestMapping改成PostMapping
如果是要get请求,将RequestMapping改成GetMapping
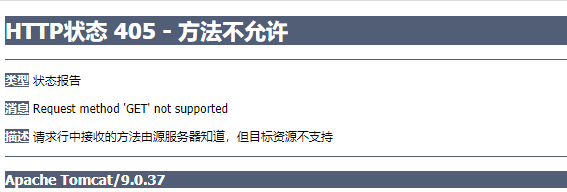
如果是post请求,却用了GetMapping会 报错
数据处理
处理提交数据
①提交的域名和处理方法的参数名一致
提交数据:http://localhost:8080/hello?name=zhangsan
处理方法:
@RequestMapping("/hello")
public String test2(String name){
    System.out.println(name);
    return "index";
}
后台输出:zhangsan
②提交的域名称和处理方法不一致
提交数据:http://localhost:8080/hello?username=zhangsan
处理方法:
@RequestMapping("/hello")
public String test2(@RequestParam("username") String name){
    System.out.println(name);
    return "index";
}
后台输出:zhangsan
建议:无论名字是否一样,都加一个@RequestParam("xxx")
③提交的是一个对象
要求提交的表单和对象的属性名一致,参数使用对象即可,否则返回null
- 实体类
public class User{
	private int id;
    private int name;
}
@RequestMapping("/hello")
public String test2(User user){
    System.out.println(user.getName());
    return "index";
}
数据显示到前端
-
ModelAndView
-
Model【推荐】
乱码问题
首先看一下网页的编码格式
其次我们可以通过过滤器filter解决,而SpringMVC给我们提供了一个过滤器,可以在web.xml中配置
注意:
/ 只匹配所有的请求 不会去匹配jsp页面
/* 只匹配所有的请求 包括匹配jsp页面
<!--    配置SpringMVC乱码过滤-->
    <filter>
        <filter-name>encoding</filter-name>
        <filter-class>org.springframework.web.filter.CharacterEncodingFilter</filter-class>
        <init-param>
            <param-name>encoding</param-name>
            <param-value>utf-8</param-value>
        </init-param>
    </filter>
    <filter-mapping>
        <filter-name>encoding</filter-name>
        <url-pattern>/*</url-pattern>
    </filter-mapping>
Controller返回JSON数据
- jackson应该是目前比较好的json解析工具
- 当然工具不止一个,比如阿里巴巴的fastjson等等
- 我们这里使用Jackson,使用他需要导入它的jar包
测试步骤
新建一个Springmvc项目
配置springmvc-servlet.xml和web.xml,jsp文件夹,com.jmu...包,项目结构的lib
导入jar包
<dependency>
    <groupId>com.fasterxml.jackson.core</groupId>
    <artifactId>jackson-databind</artifactId>
    <version>2.11.0</version>
</dependency>
记得去项目结构那边应该一下lib的jar包,不然会报500说包找不到
java.lang.ClassNotFoundException: com.fasterxml.jackson.core.JsonProcessingE....
编写实体类
public class User {
    private String name;
    private int  age;
    private String sex;
    ...
编写HelloController
package com.jmu.controller;

import org.springframework.stereotype.Controller;
import org.springframework.ui.Model;
import org.springframework.web.bind.annotation.RequestMapping;

@Controller
@RequestMapping("/HelloController")
public class HelloController {

    @RequestMapping("/hello")
    public String hello(Model model){
        //封装数据
        model.addAttribute("msg","hello SpringMVC");
        return "hello";//会被视图解析器处理
    }
}
请求数据:http://localhost:8080/springmvc_02_war_exploded/j1

出现乱码问题(因为没有走到jsp,所以过滤器也不会生效执行)
SpringMVC提供的统一解决json中文乱码配置,在 springmvc-servlet.xml中添加
<!--springmvc 统一解决json中文乱码问题-->
<mvc:annotation-driven>
    <mvc:message-converters register-defaults="true">
        <bean class="org.springframework.http.converter.StringHttpMessageConverter">
            <constructor-arg value="UTF-8"/>
        </bean>
        <bean class="org.springframework.http.converter.json.MappingJackson2HttpMessageConverter">
            <property name="objectMapper">
                <bean class="org.springframework.http.converter.json.Jackson2ObjectMapperFactoryBean">
                    <property name="failOnEmptyBeans" value="false"/>
                </bean>
            </property>
        </bean>
    </mvc:message-converters>
</mvc:annotation-driven>
