前面学习了Linux内核中Nand Flash驱动程序的编写,现在继续学习如何编写NOR Flash驱动程序,在编写自己的NOR Flash驱动前,我们还是先来弄清楚NOR Flash驱动程序编写的框架。
我们知道在MTD系统层次下,Flash硬件驱动通过mtd_info结构体和上层的设备层进行交互,mtd_info结构体是一个高度抽象的接口,向上层提供了对存储设备的_read、_erase、_write等操作函数,这些接口屏蔽了硬件的差异,使得设备层不需要了解硬件特性直接使用mtd_info结构体中函数完成数据传递。这意味着mtd_info结构体中的成员需要在驱动程序中构造和向上注册,如在Nand Flash驱动中内核为它抽象出了nand_chip结构体,驱动程序编写者只需实现不同硬件间差异的一些内容,所有NAND Flash共性的读写的协议部分已经由内核实现。驱动程序编写者只需调用nand_scan函数扫描硬件信息,完成mtd_info结构体成员填充。那么NOR Flash驱动中是否也实现了一个像nand_chip的结构体呢?下面我们猜想和疑问进行分析。
先从内核中自带的NOR Flash驱动程序physmap.c函数进行分析
入口函数physmap_init
static int __init physmap_init(void)
{
    int err;

    err = platform_driver_register(&physmap_flash_driver);--------------------->①
#ifdef CONFIG_MTD_PHYSMAP_COMPAT
    if (err == 0) {
        err = platform_device_register(&physmap_flash);------------------------>②
        if (err)
            platform_driver_unregister(&physmap_flash_driver);
    }
#endif

    return err;
}
① 注册了一个平台相关的driver,注册的平台相关的driver在注册时会自动搜索平台总线下挂接的所有device,查找是否有同名的device,如果有调用driver的probe函数
② 如果定义了CONFIG_MTD_PHYSMAP_COMPAT宏,注册一个平台相关的device。同注册的平台总线的driver一样,注册的平台相关的device在注册时会自动搜索平台总线下挂接的所有driver,找到是否有同名的driver,如果有调用driver的probe函数。
CONFIG_MTD_PHYSMAP_COMPAT这些宏是在内核配置时设置的,如make menuconfig按照下面步骤进行设置
Device Drivers  --->
    <*> Memory Technology Device (MTD) support  --->
        Mapping drivers for chip access  --->
            <M> Flash device in physical memory map
            [*]   Physmap compat support
            (0x0)   Physical start address of flash mapping----------------------->①
            (0x10000000) Physical length of flash mapping------------------------->②
            (2)     Bank width in octets------------------------------------------>③
如果选中了Physmap compat support,还需要设置它下面的三项内容,分别是flash映射的物理起始地址、映射的长度、以及位宽。这些配置信息最终在编译内核时自动生成宏定义,存放在autoconfig.h文件中,这个文件将被内核中的其他源文件包含。
继续看注册的平台相关的driver结构体的probe函数
physmap_flash_probe
static int physmap_flash_probe(struct platform_device *dev)
{
    struct physmap_flash_data *physmap_data;
    struct physmap_flash_info *info;
    const char **probe_type;
    const char **part_types;
    ...
    physmap_data = dev->dev.platform_data;
    ...
    info = devm_kzalloc(&dev->dev, sizeof(struct physmap_flash_info), ------------------------>①
                GFP_KERNEL);
    ...
    for (i = 0; i < dev->num_resources; i++) {
        ...
        if (!devm_request_mem_region(&dev->dev,----------------------------------------------->②
            dev->resource[i].start,
            resource_size(&dev->resource[i]),
            dev_name(&dev->dev)))
        ...
        info->map[i].name = dev_name(&dev->dev);---------------------------------------------->③
        info->map[i].phys = dev->resource[i].start;
        info->map[i].size = resource_size(&dev->resource[i]);
        info->map[i].bankwidth = physmap_data->width;
        ...
        info->map[i].virt = devm_ioremap(&dev->dev, info->map[i].phys,
                         info->map[i].size);
        ...
        simple_map_init(&info->map[i]);------------------------------------------------------>④
        probe_type = rom_probe_types;
        if (physmap_data->probe_type == NULL) {
            for (; info->mtd[i] == NULL && *probe_type != NULL; probe_type++)
                info->mtd[i] = do_map_probe(*probe_type, &info->map[i]);--------------------->⑤
        } else
            info->mtd[i] = do_map_probe(physmap_data->probe_type, &info->map[i]);
        ...
        info->mtd[i]->owner = THIS_MODULE;
        info->mtd[i]->dev.parent = &dev->dev;
    }

    if (devices_found == 1) {
        info->cmtd = info->mtd[0];
    } else if (devices_found > 1) {
        /*
         * We detected multiple devices. Concatenate them together.
         */
        info->cmtd = mtd_concat_create(info->mtd, devices_found, dev_name(&dev->dev));------>⑥
        if (info->cmtd == NULL)
            err = -ENXIO;
    }
    ...
    part_types = physmap_data->part_probe_types ? : part_probe_types;

    mtd_device_parse_register(info->cmtd, part_types, NULL,---------------------------------->⑦
                  physmap_data->parts, physmap_data->nr_parts);
    ...
}
① 分配一个struct physmap_flash_info结构体,这个结构体包含了mtd_info结构体指针和map_info结构体数据成员。关于mtd_info结构体前面已经接触过了,map_info结构体是新引入的结构体,可以猜想它的功能可能类似Nand Flash驱动中nand_chip结构体,用于描述NOR Flash设备
② devm_request_mem_region获取平台总线匹配到的platform_device的信息,platform_device中存放的一般是硬件相关信息。该平台总线注册的driver匹配到的platform_device结构体也是在physmap.c文件中定义,内容如下:
static struct physmap_flash_data physmap_flash_data = {
    .width        = CONFIG_MTD_PHYSMAP_BANKWIDTH,
};

static struct resource physmap_flash_resource = {
    .start        = CONFIG_MTD_PHYSMAP_START,
    .end        = CONFIG_MTD_PHYSMAP_START + CONFIG_MTD_PHYSMAP_LEN - 1,
    .flags        = IORESOURCE_MEM,
};

static struct platform_device physmap_flash = {
    .name        = "physmap-flash",
    .id        = 0,
    .dev        = {
        .platform_data    = &physmap_flash_data,
    },
    .num_resources    = 1,
    .resource    = &physmap_flash_resource,
};
physmap_flash该结构体描述了硬件相关的资源信息
.num_resources = 1代表只有一个硬件资源
CONFIG_MTD_PHYSMAP_BANKWIDTH、CONFIG_MTD_PHYSMAP_START、CONFIG_MTD_PHYSMAP_LEN这些宏的值都是在只需make menuconfig配置内核时设置的,按照前面的配置,这些宏的信息值如下所示:
CONFIG_MTD_PHYSMAP_BANKWIDTH = 2
CONFIG_MTD_PHYSMAP_START = 0
CONFIG_MTD_PHYSMAP_LEN = 0x10000000
③ 根据②获取的描述硬件的信息设置map_info结构体,最后根据物理值范围大小,映射对应的虚拟地址传给map_info结构体的virt成员变量
④ 调用simple_map_init函数,顾名思义,该函数完成map_info结构体简单的初始化,设置默认的读、写、拷贝等函数
⑤ 如果匹配platform_device中没有指定probe_type信息,遍历probe_type指针指向内容中的所有参数,调用do_map_probe函数,如果do_map_probe函数返回的内容不为空(即匹配成功),结束后面查找
probe_type是一个二级指针,指向指针数组rom_probe_types,这个数组指针每一项指向一个字符串
static const char *rom_probe_types[] = { "cfi_probe", "jedec_probe", NULL };
do_probe_type是一个比较核心的函数,根据传入的字符串名称在链表中找到相关的probe函数,如cif_probe将尝试以CFI规范去解析nor flash,如果nor flash支持cfi协议,将解析成功,读取nor flash信息,分配、设置mtd_info结构体
⑥ 如果检测到多个flash设备,将他们连接到一起,设置统一的mtd_info结构体
⑦ 调用mtd_device_parse_register函数,设置分区范围、注册mtd_info结构体,尝试以指定文件系统类型去解析flash分区
通过上面对physmap_flash_probe分析,我们基本可以知道了编写一个nor flash驱动的步骤,do_map_probe函数是其中的关键步骤。do_map_probe函数根据传入的参数去调用相关规范的probe函数,判断该flash支持那种规范去访问。我们下面详细分析do_map_probe函数
do_map_probe函数
struct mtd_info *do_map_probe(const char *name, struct map_info *map)
{
    struct mtd_chip_driver *drv;
    struct mtd_info *ret;

    drv = get_mtd_chip_driver(name);---------------->①
    ...
    ret = drv->probe(map);-------------------------->②
        ...
}
① 根据传入名称找到一个mtd_chip_driver函数
② 调用找到的mtd_chip_driver结构体的probe函数
get_mtd_chip_driver函数是如何寻找的呢?继续看该函数
static struct mtd_chip_driver *get_mtd_chip_driver (const char *name)
{
    .........

    list_for_each(pos, &chip_drvs_list) {
        this = list_entry(pos, typeof(*this), list);

        if (!strcmp(this->name, name)) {
            ret = this;
            break;
        }
    }
    ..........
}
get_mtd_chip_driver函数遍历chip_drv_list链表,找到链表中挂载的所有内容,如果和传入名称匹配,将返回匹配成功链表对象的地址。
chip_drv_list链表在哪里被设置呢?在内核源码树中查找,找到了往链表中注册成员的register_mtd_chip_driver函数。该函数又被很多驱动的入口函数调用,如cfi_probe.c/jedec_probe.c/map_ram.c/map_rom.c等文件的入口函数,在以cfi_probe.c文件入口函数为例进行分析
static struct mtd_chip_driver cfi_chipdrv = {
    .probe        = cfi_probe,
    .name        = "cfi_probe",
    .module        = THIS_MODULE
};

static int __init cfi_probe_init(void)
{
    register_mtd_chip_driver(&cfi_chipdrv);
    return 0;
}
调用register_mtd_chip_driver函数,注册了一个名为cif_chipdrv的mtd_chip_driver结构体,该结构体name成员名为“cfi_probe”,probe指针指向cif_probe函数。
由此可见,在对于nor_flash这种类内存类型接口的存储设备进行访问时,驱动程序会调用do_map_probe函数,使用内核中支持的mtd_chip_driver的probe函数去检测硬件的类型。如果内核中注册的mtd_chip_driver支持该芯片的访问,将填充mtd_info结构体,设置mtd_info结构体的设备读写函数。同时,我们可以使用内核中注册的mtd_chip_driver,去尝试匹配一个新的类内存接口的flash设备,可以仿照内核physmap.c文件,将mtd_chip_driver名称放在一个指针数组中,使用时遍历指针数组中每一项内容进行匹配,直到匹配完成返回。
下面我们将简化上述驱动,不使用make menuconfig配置传入相关参数,编写一个更简练的nor flash驱动程序,源码实现如下:
#include <linux/module.h>
#include <linux/types.h>
#include <linux/kernel.h>
#include <linux/init.h>
#include <linux/slab.h>
#include <linux/device.h>
#include <linux/platform_device.h>
#include <linux/mtd/mtd.h>
#include <linux/mtd/map.h>
#include <linux/mtd/partitions.h>
#include <linux/mtd/physmap.h>
#include <linux/mtd/concat.h>
#include <linux/io.h>

struct mtd_info *mtd = NULL;
struct map_info *map;


static const char *rom_probe_types[] = { "cfi_probe", "jedec_probe", NULL };
static const char *part_probe_types[] = { "cmdlinepart", "RedBoot", NULL };

static struct mtd_partition nor_partitions[] = {
       [0] = {
        .name   = "bootloader",
        .size   = 0x00040000,
        .offset     = 0,
       },
       [1] = {
        .name   = "root",
        .offset = MTDPART_OFS_APPEND,
        .size   = MTDPART_SIZ_FULL,
       }
};


int s3c_nor_drv_init(void)
{
    const char **probe_type;
    const char **part_types;

    map = kzalloc(sizeof(struct map_info), GFP_KERNEL);

    map->name = "nor_flash";
    map->phys = 0;
    map->size = 0x1000000;
    map->bankwidth = 2;
    //map->set_vpp = physmap_data->set_vpp;

    map->virt = ioremap(map->phys, map->size);

    simple_map_init(map);

    probe_type = rom_probe_types;
    for (; mtd == NULL && *probe_type != NULL; probe_type++)
        mtd = do_map_probe(*probe_type, map);

    mtd->owner = THIS_MODULE;

    part_types = part_probe_types;
    mtd_device_parse_register(mtd, part_types, NULL, nor_partitions, ARRAY_SIZE(nor_partitions));

    return 0;
}

void s3c_nor_drv_exit(void)
{
    mtd_device_unregister(mtd);
    map_destroy(mtd);

    kfree(map);
}

module_init(s3c_nor_drv_init);
module_exit(s3c_nor_drv_exit);

MODULE_LICENSE("GPL");
测试驱动程序
1)insmod s3c_nor_drv.c

2) 执行./flash_eraseall -j /dev/mtd1格式化分区,注意格式化分区是以MTD的字符设备进行的。

-j代表格式化为jffs2文件类型,可通过./flash_eraseall --help查看应用程序的帮助信息

3)挂载分区到mnt目录, mount -t jffs2 /dev/mtdblok1 /mnt,使用命令进行读写测试,-t代表挂载文件系统的类型
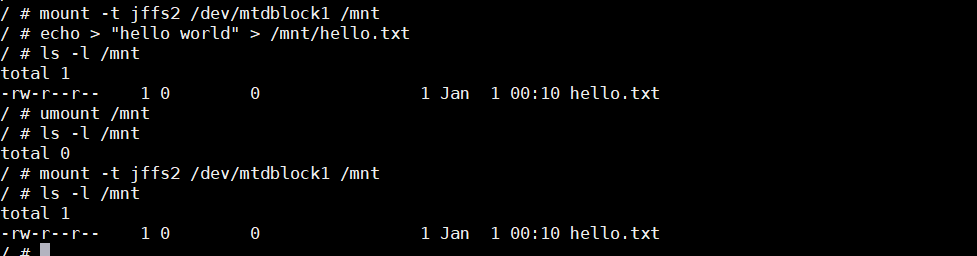
由测试结果可以看出我们编写的nor flash驱动程序可以正常运行,还有须注意的是s3c2440测试nor flash驱动程序时,启动方式一定要设置成nor flash驱动,如果是nand flash启动,芯片的0地址将映射到4K的Boot Internal SRAM区域,这样肯定不能访问到nor flash设备。