目录
前端设计模式介绍
前端设计模式其实和前端没啥关系,这个“前端”就是一个Servlet,可以将这个servlet理解为一个网关(gateway),所有对服务器的请求都会被这个servlet处理。
这个servlet(front servlet)在处理请求的时候,会分析用户的请求URL,根据不同的URL,调用不同的方法处理,或者转发给对应的servlet去处理。
另外,这个servlet还有另外一个名字——dispatcher servlet(调度servlet),因为他的工作方式就是:调度不同方法或者servlet来处理请求。
举个特别简单的例子:
package cn.ganlixin.servlet;

import java.io.IOException;

import javax.servlet.ServletException;
import javax.servlet.annotation.WebServlet;
import javax.servlet.http.HttpServlet;
import javax.servlet.http.HttpServletRequest;
import javax.servlet.http.HttpServletResponse;

@WebServlet("/")  // 拦截所有请求(除jsp以外的请求)
public class DispatcherServlet extends HttpServlet {
	@Override
	protected void service(HttpServletRequest request, HttpServletResponse response) throws ServletException, IOException {
		request.setCharacterEncoding("utf-8");

		String action = request.getParameter("action");

		if ("demo".equals(action)) {
			demo(request, response);
		} else if ("test".equals(action)) {
			test(request, response);
		} else {
			response.sendError(404);
		}

	}

	private void demo(HttpServletRequest request, HttpServletResponse response) throws IOException {
		response.getWriter().println("this is demo action");
	}

	private void test(HttpServletRequest request, HttpServletResponse response) throws IOException {
		response.getWriter().println("this is test action");
	}
}
访问该项目的任意servlet,请求都会被这个DispatcherServlet拦截,然后根据请求中的action的值来调用不同的方法去处理,当然,也可以改一种方式,将请求转发给其他servlet进行处理。
分析前端设计模式
分析上面这个DispatcherServlet,他的工作流程大概分为4步:
1、接受请求;
2、获取请求参数(解析请求信息);
3、根据请求调用不同的处理程序;
4、返回响应给客户端。
这4步,如果对每一步进行深入的开发,就有点像Spring MVC了。Spring MVC就提供了四个接口去完成上面这几个步骤。
Spring MVC简单介绍
Spring MVC是Spring框架的子项目,在进行Web开发的时候,可以提升相当大的效率。
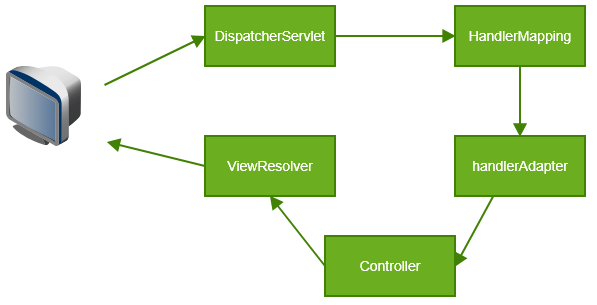
上面分析了前端设计模式工作流程,分为4个步骤,在Spring MVC中,有4个接口专门与之对应:
1、DispatcherServlet:前端控制器,用于接收所有请求。
2、HandlerMappering:解析请求格式,判断需要执行哪个方法
3、HandlerAdapter:负责调用具体的方法(controller)处理请求
4、ViewResolver:视图解析器,返回指定视图给客户端。
流程图如下:
Spring和Spring MVC的关系
Spring MVC是Spring的子项目,Spring容器是Spring MVC容器的父容器。所以Spring MVC能够使用Spring的所有资源(包括IoC、DI、AOP....以及Spring容器中的bean)
配置Spring MVC环境并简单测试
导入jar包
需要spring-web 和 spring-webmvc包,另外,Spring MVC还需要spring-aop包。
创建Spring MVC配置文件
Spring MVC的配置文件可以任意指定,存放位置也可以任意,这里测试的时候,选择将Spring MVC的配置文件存放在src目录下的/config目录下(自己创建的),配置文件名为springmvc.xml。内容如下:
<?xml version="1.0" encoding="UTF-8"?>
<beans xmlns="http://www.springframework.org/schema/beans"
	xmlns:xsi="http://www.w3.org/2001/XMLSchema-instance"
	xmlns:mvc="http://www.springframework.org/schema/mvc"
	xmlns:context="http://www.springframework.org/schema/context"
	xsi:schemaLocation="http://www.springframework.org/schema/beans
        http://www.springframework.org/schema/beans/spring-beans.xsd
        http://www.springframework.org/schema/mvc
        http://www.springframework.org/schema/mvc/spring-mvc.xsd
		http://www.springframework.org/schema/context
        http://www.springframework.org/schema/context/spring-context.xsd">

	<!-- 执行注解所在的package -->
	<context:component-scan base-package="cn.ganlixin.controller"></context:component-scan>

	<!-- 使用注解驱动,配置之后可以省略下面两个注解的配置  -->
	<mvc:annotation-driven  />
	<!--
	org.springframework.web.servlet.mvc.annotation.DefaultAnnotationHandlerMapping
	org.springframework.web.servlet.mvc.annotation.AnnotationMethodHandlerAdapter
	 -->

	<!-- 设置静态资源目录 -->
	<mvc:resources location="/js/" mapping="/js/**"></mvc:resources>
	<mvc:resources location="/css/" mapping="/css/**"></mvc:resources>
	<mvc:resources location="/images/" mapping="/images/**"></mvc:resources>
	<!--
		URL中满足mapping的请求,会去对应的location中寻找
		mapping的/js/*可以匹配js目录下的所有文件,/js/**可以匹配js目录下的文件以及子目录(子目录的子目录)
	-->
</beans>
配置web.xml
前面我们已经创建了Spring MVC的配置文件(projectRoot/src/config/springmvc.xml),创建之后,启动服务器其实和没有配置Spring MVC是一样的,原因:
1、所有请求都不会被Spring MVC的DispatcherServlet拦截;
2、项目下的所有注解不会被扫描,因为Spring MVC的配置文件虽然配置了扫描,但是却没有读取配置文件(也就不会去扫描注解了,因为<context:component-scan />指定了注解所在的package)。
所以,下面就配置web.xml:
<?xml version="1.0" encoding="UTF-8"?>
<web-app xmlns:xsi="http://www.w3.org/2001/XMLSchema-instance"
	xmlns="http://xmlns.jcp.org/xml/ns/javaee"
	xsi:schemaLocation="http://xmlns.jcp.org/xml/ns/javaee
		http://xmlns.jcp.org/xml/ns/javaee/web-app_3_1.xsd" version="3.1">

	<!-- 配置Tomcat加载SpringMVC的DispatcherServlet,并设置SpringMVC的配置文件路径 -->
	<servlet>
		<servlet-name>SpringMVC</servlet-name>
		<servlet-class>org.springframework.web.servlet.DispatcherServlet</servlet-class>
		<init-param>
			<param-name>contextConfigLocation</param-name>
			<param-value>classpath:config/springmvc.xml</param-value>
		</init-param>
		<!-- 设置为自启动  -->
		<load-on-startup>1</load-on-startup>
	</servlet>
	<servlet-mapping>
		<servlet-name>SpringMVC</servlet-name>
		<url-pattern>/</url-pattern>
	</servlet-mapping>

	<!-- 配置字符编码 -->
	<filter>
		<filter-name>encoding</filter-name>
		<filter-class>org.springframework.web.filter.CharacterEncodingFilter</filter-class>
		<init-param>
			<param-name>encoding</param-name>
			<param-value>utf-8</param-value>
		</init-param>
	</filter>
	<filter-mapping>
		<filter-name>encoding</filter-name>
		<url-pattern>/*</url-pattern>
	</filter-mapping>

</web-app>
创建一个简单的controller
package cn.ganlixin.controller;

import org.springframework.stereotype.Controller;
import org.springframework.web.bind.annotation.RequestMapping;

@Controller
public class FirstController {

	@RequestMapping("demo")
	public String demo() {
		System.out.println("hello");
		return "test.jsp";
	}

	@RequestMapping("test")
	public String test11111() {
		System.out.println("test");
		return "test.jsp";
	}
}
解释上面这个FirstController:
1、这个controller就相当于一个servlet,只是他没有继承HttpServlet;
2、使用@Controller来标记类名,目的是创建一个bean(和@Component功能类似),只是语义与@Component不同。
3、使用@RequestMapping("url-pattern")就是为url-pattern绑定处理方法,比如@RequestMapping("test")表示访问ip:port/project/test时会执行test11111()方法。url-pattern不是必须和方法名一致。
4、方法中的return "*.jsp",就是将指定的jsp返回给客户端(返回之前会进行数据处理)。