Linux安装FastFDS
准备基础环境
1.因为fastdfs是C语言写的,所以我们需要安装gcc环境。
yum -y install gcc-c++
2.fastdfs依赖libevent库,需要安装它。
yum -y install libevent
3.安装 Perl 库,nginx 的 http 模块使用 pcre 来解析正则表达式
yum install -y pcre pcre-devel
4.安装zlib 库,它提供了很多种压缩和解压缩的方式
yum install -y zlib zlib-devel
5.安装OpenSSL,它是一个强大的安全套接字层密码库
yum install -y openssl openssl-devel
上传安装文件
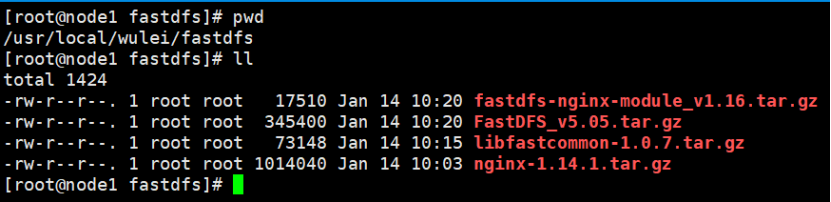
安装libfastcommon
1.解压
tar -zxvf libfastcommon-1.0.7.tar.gz
2.进入解压后的目录,编译并安装
cd libfastcommon-1.0.7 && ./make.sh && ./make.sh install
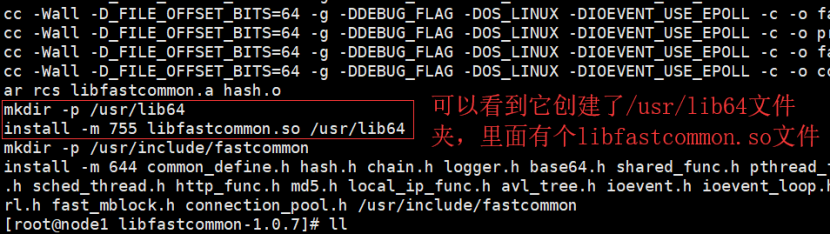
3.将这个文件copy到/usr/lib目录
cp /usr/lib64/libfastcommon.so /usr/lib
安装fastdfs_v5.05 (tracker+storage)
1.解压
tar -zxvf FastDFS_v5.05.tar.gz
2.编译并安装
cd FastDFS && ./make.sh && ./make.sh install
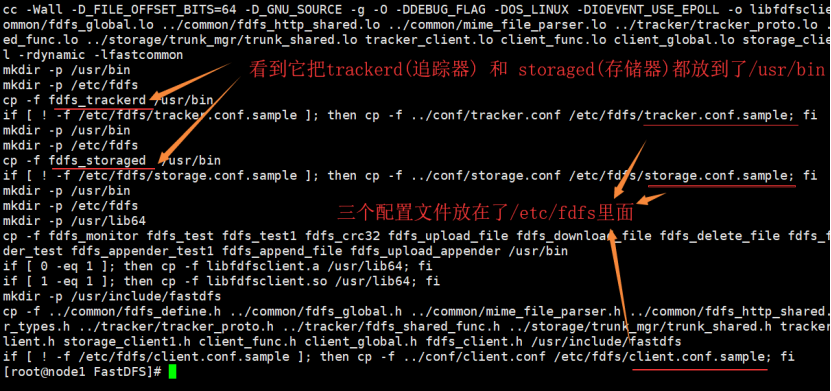
3.将fastdfs/conf的配置文件全copy到/etc/fdfs目录里面

安装tracker
指定追踪器的文件和日志存储位置 vim /etc/fdfs/tracker.conf

安装storage
指定存储器的文件和日志存储位置以及与追踪器通信的所在地址 vim /etc/fdfs/storage.conf

启动服务
启动追踪器(几乎秒开)
/usr/bin/fdfs_trackerd /etc/fdfs/tracker.conf

启动存储器 (这个时间会稍微久一点,它比tracker做的事情要多一些,我这边大概花了3s)
/usr/bin/fdfs_storaged /etc/fdfs/storage.conf

测试是否安装成功
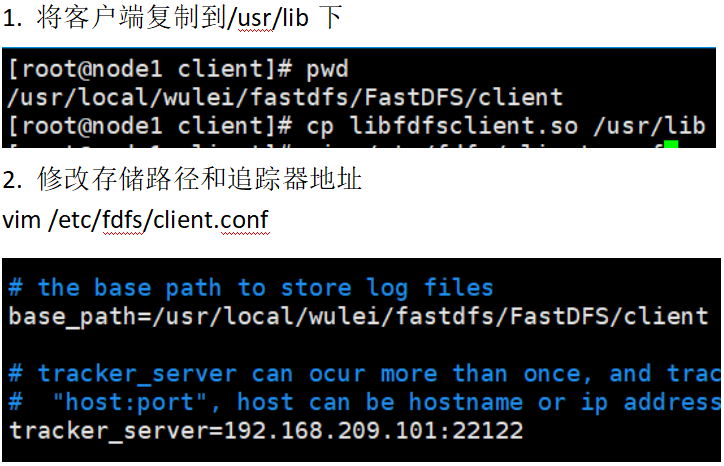
3. 上传文件
创建测试文件
[root@node1 client]# vim /wulei.html
[root@node1 client]# cat /wulei.html
这是我的测试文件 wulei.html 。
上传测试文件

[root@node1 client]# /usr/bin/fdfs_test /etc/fdfs/client.conf upload /wulei.html
This is FastDFS client test program v5.05

Copyright (C) 2008, Happy Fish / YuQing

FastDFS may be copied only under the terms of the GNU General
Public License V3, which may be found in the FastDFS source kit.
Please visit the FastDFS Home Page http://www.csource.org/
for more detail.

[2020-01-15 08:50:43] DEBUG - base_path=/usr/local/wulei/fastdfs/FastDFS/client, connect_timeout=30, network_timeout=60, tracker_server_count=1, anti_steal_token=0, anti_steal_secret_key length=0, use_connection_pool=0, g_connection_pool_max_idle_time=3600s, use_storage_id=0, storage server id count: 0

tracker_query_storage_store_list_without_group:
    server 1. group_name=, ip_addr=192.168.209.101, port=23000

group_name=group1, ip_addr=192.168.209.101, port=23000
storage_upload_by_filename
group_name=group1, remote_filename=M00/00/00/wKjRZV4fGLOAWuU6AAAAKOg17r881.html
source ip address: 192.168.209.101
file timestamp=2020-01-15 08:50:43
file size=40
file crc32=3895848639
example file url: http://192.168.209.101/group1/M00/00/00/wKjRZV4fGLOAWuU6AAAAKOg17r881.html
storage_upload_slave_by_filename
group_name=group1, remote_filename=M00/00/00/wKjRZV4fGLOAWuU6AAAAKOg17r881_big.html
source ip address: 192.168.209.101
file timestamp=2020-01-15 08:50:43
file size=40
file crc32=3895848639
example file url: http://192.168.209.101/group1/M00/00/00/wKjRZV4fGLOAWuU6AAAAKOg17r881_big.html

看到上面 粉橙色文字 说明上传成功了,我们可以去到这个目录查看文件。
[root@node1 client]# cd /usr/local/wulei/fastdfs/FastDFS/storage/data/00/00
[root@node1 00]# ll
total 16
-rw-r--r--. 1 root root 40 Jan 15 08:50 wKjRZV4fGLOAWuU6AAAAKOg17r881_big.html
-rw-r--r--. 1 root root 49 Jan 15 08:50 wKjRZV4fGLOAWuU6AAAAKOg17r881_big.html-m
-rw-r--r--. 1 root root 40 Jan 15 08:50 wKjRZV4fGLOAWuU6AAAAKOg17r881.html
-rw-r--r--. 1 root root 49 Jan 15 08:50 wKjRZV4fGLOAWuU6AAAAKOg17r881.html-m
[root@node1 00]#
安装nginx的fastdfs插件
上面就完成了fastdfs的安装,但此时文件的url还是无法访问的,我们需要配置nginx的fastdfs模块来代理。
安装fastdfs-nginx-module.
1.解压
tar -zxvf fastdfs-nginx-module_v1.16.tar.gz
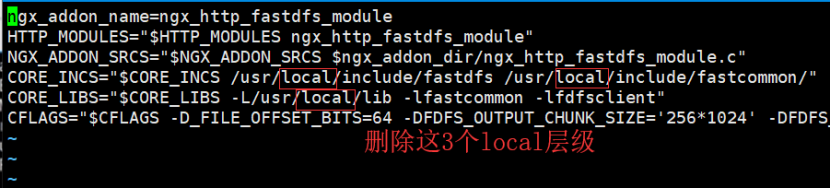
2.修改 fastdfs-nginx-module 配置文件
vim fastdfs-nginx-module/src/config
3.修改 mod_fastdfs.conf 配置
cp ./fastdfs-nginx-module/src/mod_fastdfs.conf /etc/fdfs
vim /etc/fdfs/mod_fastdfs.conf
# 跟踪器地址
tracker_server=192.168.209.101:22122

# 存储器端口
storage_server_port=23000

# 存储器的组名称
group_name=group1

# 若文件url包含组名称则为true,反之false。我们刚才的就包含
url_have_group_name = true


# 存储器存文件的地址
store_path0=/usr/local/wulei/fastdfs/FastDFS/storage
安装nginx
1.解压
tar -zxvf nginx-1.14.1.tar.gz
2.nginx添加fastdfs-nginx-module模块
cd nginx-1.14.1 && ./configure --add-module=/usr/local/wulei/fastdfs/fastdfs-nginx-module/src
我们也可以同时指定安装目录 cd nginx-1.14.1 && ./configure --add-module=/usr/local/wulei/fastdfs/fastdfs-nginx-module/src --prefix=/usr/local/wulei/fastdfs/nginx-1.14.1 我们需要在指定目录 mkdir logs, 因为他不会自动生成。
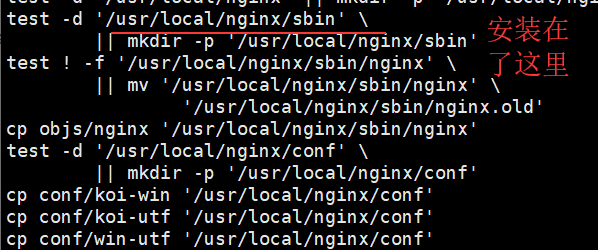
3.编译并安装,此时会生成 sbin目录
make && make install
4. 修改配置文件 vim /usr/local/nginx/conf/nginx.conf
location /group1/M00/{
ngx_fastdfs_module;
}
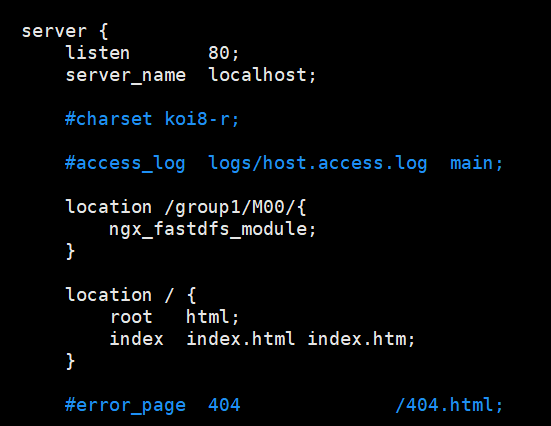
5. 启动 /usr/local/nginx/sbin/nginx

Springboot实现图片上传
导入依赖


    <dependencies>
        <!--web-->
        <dependency>
            <groupId>org.springframework.boot</groupId>
            <artifactId>spring-boot-starter-web</artifactId>
        </dependency>
        <!-- 页面薄板 -->
        <dependency>
            <groupId>org.springframework.boot</groupId>
            <artifactId>spring-boot-starter-thymeleaf</artifactId>
        </dependency>
        <!-- 文件服务器客户端 -->
        <dependency>
            <groupId>com.github.tobato</groupId>
            <artifactId>fastdfs-client</artifactId>
            <version>1.26.1-RELEASE</version>
        </dependency>
    </dependencies>
application.yml
server:
  port: 8081

spring:
  # ==============================================================
  # 静态资源配置(页面静态化缓存,不需要访问服务端)
  resources:
    # 页面在浏览器的缓存时间
    cache:
      cachecontrol:
        max-age: 3600
    # static-locations:表示需要放行的静态资源
    static-locations: classpath:/META-INF/resources/,classpath:/resources/,classpath:/static/,classpath:/templates/
    #启动静态资源文件处理,默认为true
    add-mappings: true
    chain:
      cache: true
      enabled: true
      # 对静态资源进行压缩
      gzipped: true
      html-application-cache: true
  # thymeleaf模板参数配置
  thymeleaf:
    cache: false
    content-type: text/html
    enabled: true
    encoding: UTF-8
    mode: HTML5
    prefix: classpath:/templates/
    suffix: .html
  servlet:
    multipart:
      #单个文件最大尺寸
      max-file-size: 10mb
      #一个请求文件的最大尺寸
      max-request-size: 50mb

fdfs:
  # 读取inputsream阻塞时间
  so-timeout: 1501
  connect-timeout: 601
  # 缩略图
  thumb-image:
     250
    height: 250
  # tracker地址
  tracker-list: 192.168.200.100:22122
  # 通过nginx 访问地址
  resHost: 192.168.200.100
  storagePort: 80
  #获取连接池最大数量
  pool:
    max-total: 200
fastdfs工具类
import java.math.BigDecimal;
import java.util.Arrays;
import java.util.List;
import org.slf4j.Logger;
import org.slf4j.LoggerFactory;
import org.springframework.util.StringUtils;
import org.springframework.web.multipart.MultipartFile;
import com.github.tobato.fastdfs.domain.StorePath;
import com.github.tobato.fastdfs.domain.ThumbImageConfig;
import com.github.tobato.fastdfs.service.FastFileStorageClient;

import cn.wulei.conf.ApplicationProperties;

public class FastUtils {

    private static Logger logger = LoggerFactory.getLogger(FastUtils.class);

    private  static ApplicationProperties applicationProperties= SpringUtil.getBean(ApplicationProperties.class);
    //fastDFS
    private  static FastFileStorageClient storageClient = SpringUtil.getBean(FastFileStorageClient.class);
    //fastDFS 缩略图配置
    private  static ThumbImageConfig thumbImageConfig= SpringUtil.getBean(ThumbImageConfig.class);

    private static final String FEN = "/";

    /**
     * 支持上传的文件类型
     */
    private static final List<String> SUFFIXES = Arrays.asList("png", "jpeg", "jpg", "docx", "doc", "xls", "xlsx", "pdf", "txt");


    /**
     * fastDFS文件存储
     *
     * @param file
     * @param thumbImageFlag 是否创建缩略图
     * @return
     */
    public static UploadFileVo uploadFile(MultipartFile file, boolean thumbImageFlag) {
        UploadFileVo fileVo = new UploadFileVo();
        try {
            //http配置
            String http = applicationProperties.getResHost();

            if (StringUtils.isEmpty(http)) {
                throw new RuntimeException("httpProperties 配置错误!");
            }
            // 原名称
            String fileName = file.getOriginalFilename();
            fileVo.setFileName(fileName);
            //后缀
            String extension = fileName.substring(fileName.lastIndexOf(".") + 1);
            fileVo.setExtension(extension);
            if (!SUFFIXES.contains(extension)) {
                throw new RuntimeException("上传文件类型不匹配");
            }

            //文件大小
            fileVo.setFileSize(file.getSize());
            fileVo.setFileSizeStr(getPrintSize(file.getSize()));

            //文件上传
            StorePath storePath = null;
            if (thumbImageFlag) {
                // 上传图片并且生成缩略图
                storePath = storageClient.uploadImageAndCrtThumbImage(file.getInputStream(), file.getSize(), extension, null);
                //原图
                fileVo.setFileUrl(http +FEN+ storePath.getFullPath());
                //缩略图
                fileVo.setThumbImageUrl(http +FEN+ thumbImageConfig.getThumbImagePath(storePath.getFullPath()));
            } else {
                // 上传文件
                storePath = storageClient.uploadFile(file.getInputStream(), file.getSize(), extension, null);
                //文件地址
                fileVo.setFileUrl(http +FEN+  storePath.getFullPath());
            }

            return fileVo;
        } catch (Exception e) {
            logger.info("func[uploadFile]  Exception [文件上传异常: {} - {}] stackTrace[{}]", e.getCause(), e.getMessage(), Arrays.deepToString(e.getStackTrace()));
            fileVo.setErrorMsg("上传异常:" + e.getMessage());
            return fileVo;
        }
    }


    /**
     * 删除文件
     */
    public static  boolean deleteFile(String path) {
        try {
            String fullPath = getfullPath(path);
            storageClient.deleteFile(fullPath);
            return true;
        } catch (Exception e) {
            logger.info("func[deleteFile] path={} Exception [{} - {}] stackTrace[{}]", path, e.getCause(), e.getMessage(), Arrays.deepToString(e.getStackTrace()));
            return false;
        }
    }

    /**
     * 删除缩略图
     */
    public static   boolean deleteThumbImage(String path) {
        try {
            String fullPath = getfullPath(path);
            //获取缩略图地址
            fullPath = thumbImageConfig.getThumbImagePath(fullPath);
            storageClient.deleteFile(fullPath);
            return true;
        } catch (Exception e) {
            logger.info("func[deleteThumbImage] path={} Exception [{} - {}] stackTrace[{}]", path, e.getCause(), e.getMessage(), Arrays.deepToString(e.getStackTrace()));
            return false;
        }
    }

    //获取文件相对地址
    private static String getfullPath(String path) {
        String fullPath;
        if (path.indexOf("http") != -1) {
            fullPath = path.substring(path.indexOf("group"));
        } else {
            fullPath = path;
        }
        return fullPath;
    }

    /**
     * 返回文件大小字符
     *
     * @param size
     * @return
     */
    public static String getPrintSize(long size) {
        // 如果字节数少于1024,则直接以B为单位,否则先除于1024,后3位因太少无意义
        double value = (double) size;
        if (value < 1024) {
            return value+ "B";
        } else {
            value = BigDecimal.valueOf(value / 1024).setScale(2, BigDecimal.ROUND_DOWN).doubleValue();
        }
        // 如果原字节数除于1024之后,少于1024,则可以直接以KB作为单位
        // 因为还没有到达要使用另一个单位的时候
        // 接下去以此类推
        if (value < 1024) {
            return value + "KB";
        } else {
            value = BigDecimal.valueOf(value / 1024).setScale(2, BigDecimal.ROUND_DOWN).doubleValue();
        }
        if (value < 1024) {
            return value + "MB";
        } else {
            // 否则如果要以GB为单位的,先除于1024再作同样的处理
            value = BigDecimal.valueOf(value / 1024).setScale(2, BigDecimal.ROUND_DOWN).doubleValue();
            return value+ "GB";
        }
    }
}
开启配置
@SpringBootApplication
// fastdfs启动配置
@EnableMBeanExport(registration = RegistrationPolicy.IGNORE_EXISTING)
@Import(FdfsClientConfig.class)
public class Main {

    final static Logger logger = LoggerFactory.getLogger(Main.class);

    public static void main(String[] args) {
        SpringApplication.run(Main.class, args);
        logger.info("========== APPLICATION START SUCCESS ==========");

    }
}
别忘了防火墙开启 tracker storage nginx 的端口再测试。