springboot集成RabbitMQ非常简单,如果只是简单的使用配置非常少,springboot提供了spring-boot-starter-amqp项目对消息各种支持。
Direct Exchange介绍
Direct Exchange是RabbitMQ默认的交换机模式,也是最简单的模式,根据key全文匹配去寻找队列。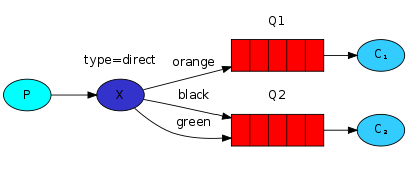
第一个
X - Q1 就有一个 binding key,名字为 orange; X - Q2 就有 2 个 binding key,名字为 black
和 green。当消息中的 路由键 和 这个 binding key 对应上的时候,那么就知道了该消息去到哪一个队列中。
Ps:为什么 X 到 Q2 要有 black,green,2个 binding key呢,一个不就行了吗? - 这个主要是因为可能又有 Q3,而Q3只接受 black 的信息,而Q2不仅接受black 的信息,还接受 green 的信息。
1.新建一个Spring Boot工程,命名为:“rabbitmq-hello”。
在pom.xml中引入如下依赖内容,其中spring-boot-starter-amqp用于支持RabbitMQ。
<dependency>
<groupId>org.springframework.boot</groupId>
<artifactId>spring-boot-starter-amqp</artifactId>
</dependency>
2.在application.properties中配置关于RabbitMQ的连接和用户信息,用户可以回到上面的安装内容,在管理页面中创建用户。
spring.application.name=rabbitmq-hello
spring.rabbitmq.host=localhost
spring.rabbitmq.port=5672
spring.rabbitmq.username=admin
spring.rabbitmq.password=123456
3.创建消息生产者Sender。通过注入AmqpTemplate接口的实例来实现消息的发送,AmqpTemplate接口定义了一套针对AMQP协议的基础操作。在Spring Boot中会根据配置来注入其具体实现。在该生产者,我们会产生一个字符串,并发送到名为hello的队列中。
@Component
public class Sender {
@Autowired
private AmqpTemplate rabbitTemplate;
public void send() {
String context = "hello " + new Date();
System.out.println("Sender : " + context);
this.rabbitTemplate.convertAndSend("hello", context);
}
}
4.创建消息消费者Receiver。通过@RabbitListener注解定义该类对hello队列的监听,并用@RabbitHandler注解来指定对消息的处理方法。所以,该消费者实现了对hello队列的消费,消费操作为输出消息的字符串内容。
@Component
@RabbitListener(queues = "hello")
public class Receiver {
@RabbitHandler
public void process(String hello) {
System.out.println("Receiver : " + hello);
}
}
5.创建RabbitMQ的配置类RabbitConfig,用来配置队列、交换器、路由等高级信息。这里我们以入门为主,先以最小化的配置来定义,以完成一个基本的生产和消费过程。
@Configuration
public class RabbitConfig {
@Bean
public Queue helloQueue() {
return new Queue("hello");
}
}
6.创建应用主类:
@SpringBootApplication
public class HelloApplication {
public static void main(String[] args) {
SpringApplication.run(HelloApplication.class, args);
}
}
7.创建单元测试类,用来调用消息生产:
@RunWith(SpringJUnit4ClassRunner.class)
@SpringApplicationConfiguration(classes = HelloApplication.class)
public class HelloApplicationTests {
@Autowired
private Sender sender;
@Test
public void hello() throws Exception {
sender.send();
}
}
8.启动应用主类,从控制台中,我们看到如下内容,程序创建了一个访问127.0.0.1:5672中admin的连接。
o.s.a.r.c.CachingConnectionFactory : Created new connection: SimpleConnection@29836d32 [delegate=amqp://admin@127.0.0.1:5672/]
同时,我们通过RabbitMQ的控制面板,可以看到Connection和Channels中包含当前连接的条目。
9.运行单元测试类,我们可以看到控制台中输出下面的内容,消息被发送到了RabbitMQ Server的hello队列中。
Sender : hello Sun Sep 25 11:06:11 CST 2016
10.切换到应用主类的控制台,我们可以看到类似如下输出,消费者对hello队列的监听程序执行了,并输出了接受到的消息信息。
Receiver : hello Sun Sep 25 11:06:11 CST 2016
通过上面的示例,我们在Spring Boot应用中引入spring-boot-starter-amqp模块,进行简单配置就完成了对RabbitMQ的消息生产和消费的开发内容。
实际上RabbitMQ还可以支持发送对象:当然由于涉及到序列化和反序列化,该对象要实现Serilizable接口.HelloSender做出如下改写:
public void send() {
User user=new User(); //实现Serializable接口
user.setUsername("hlhdidi");
user.setPassword("123");
template.convertAndSend("queue",user);
}
HelloReceiver做出如下改写:
@RabbitListener(queues="queue") //监听器监听指定的Queue
public void process1(User user) { //用User作为参数
System.out.println("Receive1:"+user);
}