相信大家将这三者部署到同一台主机应该已经不陌生了,今天在这里,给大家演示一下如何将三者部署到三台主机上。
实验系统:CentOS 6.6_x86_64
实验前提:大部分软件使用编译安装,请提前准备好编译环境,防火墙和selinux都关闭
实验软件:nginx-1.9.3 mariadb-10.0.20 php-5.6.11 memcache-2.2.7 xcache-3.2.0
实验拓扑:

一、安装nginx
1.解决依赖关系:
需要专门安装pcre-devel包:
1 yum -y install pcre-devel
2.添加nginx用户:
1 useradd -r nginx
3.解压并编译安装nginx:
 1 tar xf nginx-1.9.3.tar.gz
 2 cd nginx-1.9.3
 3 ./configure
 4   --prefix=/usr/local/nginx                     //安装位置
 5   --sbin-path=/usr/local/nginx/sbin/nginx             //程序文件
 6   --conf-path=/etc/nginx/nginx.conf                 //配置文件安装位置
 7   --error-log-path=/var/log/nginx/error.log            //错误日志安装位置
 8   --http-log-path=/var/log/nginx/access.log            //访问日志安装位置
 9   --pid-path=/var/run/nginx/nginx.pid                //pid文件位置
10   --lock-path=/var/lock/nginx.lock                 //锁文件位置
11   --user=nginx                             //运行进程时使用的用户身份
12   --group=nginx                            //运行进程时使用的用户组
13   --with-http_ssl_module                       //支持ssl模块
14   --with-http_flv_module                       //支持flv模块
15   --with-http_stub_status_module                  //支持stub_status模块
16   --with-http_gzip_static_module                  //支持gzip_static模块
17   --http-client-body-temp-path=/var/tmp/nginx/client/     //存储HTTP客户端请求body体的临时文件位置
18   --http-proxy-temp-path=/var/tmp/nginx/proxy/         //存储HTTP代理的临时文件位置
19   --http-fastcgi-temp-path=/var/tmp/nginx/fcgi/         //存储fasycgi临时文件位置
20   --http-uwsgi-temp-path=/var/tmp/nginx/uwsgi          //存储uwsgi临时文件位置
21   --http-scgi-temp-path=/var/tmp/nginx/scgi           //存储scgi临时文件位置
22   --with-pcre                             //支持pcre库
23 make && make install
4.提供脚本文件:
  1 vim /etc/init.d/nginx
  2 --------------------------------
  3 #!/bin/sh
  4 #
  5 # nginx - this script starts and stops the nginx daemon
  6 #
  7 # chkconfig:   - 85 15
  8 # description:  Nginx is an HTTP(S) server, HTTP(S) reverse
  9 #               proxy and IMAP/POP3 proxy server
 10 # processname: nginx
 11 # config:      /etc/nginx/nginx.conf
 12 # config:      /etc/sysconfig/nginx
 13 # pidfile:     /var/run/nginx.pid
 14
 15 # Source function library.
 16 . /etc/rc.d/init.d/functions
 17
 18 # Source networking configuration.
 19 . /etc/sysconfig/network
 20
 21 # Check that networking is up.
 22 [ "$NETWORKING" = "no" ] && exit 0
 23
 24 nginx="/usr/local/nginx/sbin/nginx"
 25 prog=$(basename $nginx)
 26
 27 NGINX_CONF_FILE="/etc/nginx/nginx.conf"
 28
 29 [ -f /etc/sysconfig/nginx ] && . /etc/sysconfig/nginx
 30
 31 lockfile=/var/lock/subsys/nginx
 32
 33 make_dirs() {
 34    # make required directories
 35    user=`nginx -V 2>&1 | grep "configure arguments:" | sed 's/[^*]*--user=([^ ]*).*/1/g' -`
 36    options=`$nginx -V 2>&1 | grep 'configure arguments:'`
 37    for opt in $options; do
 38        if [ `echo $opt | grep '.*-temp-path'` ]; then
 39            value=`echo $opt | cut -d "=" -f 2`
 40            if [ ! -d "$value" ]; then
 41                # echo "creating" $value
 42                mkdir -p $value && chown -R $user $value
 43            fi
 44        fi
 45    done
 46 }
 47
 48 start() {
 49     [ -x $nginx ] || exit 5
 50     [ -f $NGINX_CONF_FILE ] || exit 6
 51     make_dirs
 52     echo -n $"Starting $prog: "
 53     daemon $nginx -c $NGINX_CONF_FILE
 54     retval=$?
 55     echo
 56     [ $retval -eq 0 ] && touch $lockfile
 57     return $retval
 58 }
 59
 60 stop() {
 61     echo -n $"Stopping $prog: "
 62     killproc $prog -QUIT
 63     retval=$?
 64     echo
 65     [ $retval -eq 0 ] && rm -f $lockfile
 66     return $retval
 67 }
 68
 69 restart() {
 70     configtest || return $?
 71     stop
 72     sleep 1
 73     start
 74 }
 75
 76 reload() {
 77     configtest || return $?
 78     echo -n $"Reloading $prog: "
 79     killproc $nginx -HUP
 80     RETVAL=$?
 81     echo
 82 }
 83
 84 force_reload() {
 85     restart
 86 }
 87
 88 configtest() {
 89   $nginx -t -c $NGINX_CONF_FILE
 90 }
 91
 92 rh_status() {
 93     status $prog
 94 }
 95
 96 rh_status_q() {
 97     rh_status >/dev/null 2>&1
 98 }
 99
100 case "$1" in
101     start)
102         rh_status_q && exit 0
103         $1
104         ;;
105     stop)
106         rh_status_q || exit 0
107         $1
108         ;;
109     restart|configtest)
110         $1
111         ;;
112     reload)
113         rh_status_q || exit 7
114         $1
115         ;;
116     force-reload)
117         force_reload
118         ;;
119     status)
120         rh_status
121         ;;
122     condrestart|try-restart)
123         rh_status_q || exit 0
124             ;;
125     *)
126         echo $"Usage: $0 {start|stop|status|restart|condrestart|try-restart|reload|force-reload|configtest}"
127         exit 2
128 esac
129 --------------------------------
130 chmod +x /etc/init.d/nginx
131 chkconfig --add nginx
132 chkconfig nginx on
133 service nginx start
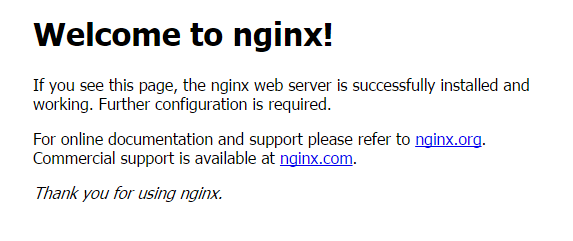
5.测试访问页面,nginx安装完毕:
二、安装mysql
1.添加mysql用户和创建数据目录:
1 useradd -r mysql
2 mkdir -pv /mydata/data
3 chown -R mysql:mysql /mydata/data
2.解压并初始化mysql:
1 tar xf mariadb-10.0.20-linux-x86_64.tar.gz -C /usr/local/
2 cd /usr/local/
3 ln -sv mariadb-10.0.20-linux-x86_64 mysql
4 cd mysql/
5 chown -R root:mysql .
6 scripts/mysql_install_db --user=mysql --datadir=/mydata/data/
3.提供配置文件:
1 cp support-files/my-large.cnf /etc/my.cnf
2 vim /etc/my.cnf
3 修改此文件中thread_concurrency的值为你的CPU个数乘以2,比如:thread_concurrency = 2
4 另外还需要添加如下行指定mysql数据文件的存放位置:datadir = /mydata/data
4.提供脚本文件:
1 cp support-files/mysql.server /etc/init.d/mysqld
2 chkconfig --add mysqld
3 chkconfig mysqld on
4 service mysqld start
使用mysql目录的下的bin/mysql去连接mysql,出现如下画面表示连接成功:

5.输出mysql的man手册至man命令的查找路径:
编辑/etc/man.config,添加如下行即可:MANPATH /usr/local/mysql/man
1 ln -sv /usr/local/mysql/include /usr/include/mysql
7.输出mysql的库文件给系统库查找路径:
1 echo '/usr/local/mysql/lib' > /etc/ld.so.conf.d/mysql.conf
2 ldconfig
三、安装PHP
1.解决依赖关系:
1 yum -y install libxml2-devel bzip2-devel libcurl-devel libmcrypt-devel
2.编译安装php:
 1 ./configure --prefix=/usr/local/php       //安装位置
 2  --with-mysql                    //支持mysql
 3  --with-pdo-mysql                 //支持pdo模块
 4  --with-mysqli                   //支持mysqli模块
 5  --with-openssl                   //支持openssl模块
 6  --enable-fpm                    //支持fpm模式
 7  --enable-sockets                 //启用socket支持
 8  --enable-sysvshm                 //启用系统共享内存支持
 9  --enable-mbstring                 //使多字节字符串的支持
10  --with-freetype-dir               //设置FreeType安装前缀路径
11  --with-jpeg-dir                 //设置libjpeg安装前缀路径
12  --with-png-dir                  //设置libpng安装前缀路径
13  --with-zlib-dir                 //设置libz安装前缀路径
14  --with-libxml-dir=/usr             //设置libxml2安装路径
15  --enable-xml
16  --with-mhash                  //支持mhash
17  --with-mcrypt                  //支持mcrypt
18  --with-config-file-path=/etc         //配置文件路径
19  --with-config-file-scan-dir=/etc/php.d    //配置文件扫描路径
20  --with-bz2                       //支持BZip2
21  --with-curl                   //支持curl
22 make && make install
3.提供配置文件:
1 cp php.ini-production /etc/php.ini
4.为php-fpm提供脚本:
1 cp sapi/fpm/init.d.php-fpm /etc/init.d/php-fpm
2 chmod +x /etc/init.d/php-fpm
3 chkconfig --add php-fpm
4 chkconfig php-fpm on
5.提供php-fpm配置文件并编辑:
1 cp /usr/local/php/etc/php-fpm.conf.default /usr/local/php/etc/php-fpm.conf
2 ------------------------------------------------------
3 pm.max_children = 150
4 pm.start_servers = 8
5 pm.min_spare_servers = 5
6 pm.max_spare_servers = 10
7 pid = /usr/local/php/var/run/php-fpm.pid
1 service php-fpm start
四、整合nginx与PHP
1.nginx服务器建立网页文件存放目录/www,并修改其权限:
1 mkdir /www
2 chown -R nginx:nginx /www
2.修改nginx配置文件:
 1 vim /etc/nginx/nginx.conf
 2 --------------------------------------
 3 location / {
 4             root   /www;
 5             index  index.php index.html index.htm;
 6         }
 7
 8 location ~ .php$ {
 9             root           /www;
10             fastcgi_pass   192.168.19.92:9000;
11             fastcgi_index  index.php;
12             fastcgi_param  SCRIPT_FILENAME  $document_root$fastcgi_script_name;
13             include        fastcgi_params;
14         }
3.修改fastcgi_params文件为:
 1 fastcgi_param  GATEWAY_INTERFACE  CGI/1.1;
 2 fastcgi_param  SERVER_SOFTWARE    nginx;
 3 fastcgi_param  QUERY_STRING       $query_string;
 4 fastcgi_param  REQUEST_METHOD     $request_method;
 5 fastcgi_param  CONTENT_TYPE       $content_type;
 6 fastcgi_param  CONTENT_LENGTH     $content_length;
 7 fastcgi_param  SCRIPT_FILENAME    $document_root$fastcgi_script_name;
 8 fastcgi_param  SCRIPT_NAME        $fastcgi_script_name;
 9 fastcgi_param  REQUEST_URI        $request_uri;
10 fastcgi_param  DOCUMENT_URI       $document_uri;
11 fastcgi_param  DOCUMENT_ROOT      $document_root;
12 fastcgi_param  SERVER_PROTOCOL    $server_protocol;
13 fastcgi_param  REMOTE_ADDR        $remote_addr;
14 fastcgi_param  REMOTE_PORT        $remote_port;
15 fastcgi_param  SERVER_ADDR        $server_addr;
16 fastcgi_param  SERVER_PORT        $server_port;
17 fastcgi_param  SERVER_NAME        $server_name;
1 vim /usr/local/php/etc/php-fpm.conf
2 ---------------------------------------------
3 listen = 192.168.19.92:9000         //监听物理网卡地址,供其它机器调用
4 user = nginx                           //php-fpm以nginx用户运行
5 group = nginx
6 ---------------------------------------------
7 service php-fpm restart
6.在PHP服务器上创建/www目录,并开启nfs服务:
1 mkdir /www
2 chown -R nginx:nginx /www
3 vim /etc/exports
4 ---------------------------------------------
5 /www    192.168.19.0/24(rw,no_root_squash)
6 ---------------------------------------------
7 service nfs start
7.nginx服务器挂载nfs文件,并测试php,测试成功后删除index.php:
1 mount -t nfs 192.168.19.92:/www /www
2 vim /www/index.php
3 ---------------------------------------
4 <?php
5      phpinfo();
6 ?>
7 --------------------------------------
8 service nginx restart

五、整合PHP与MYSQL
在mysql服务器上创建php服务器能够访问的数据库和用户:
1 /usr/local/mysql/bin/mysql
2 --------------------------------------------
3 CREATE DATABASE wordpress;
4 GRANT ALL ON wordpress.* TO 'wordpress'@'192.168.19.92' IDENTIFIED BY '123456';
5 FLUSH PRIVILEGES;
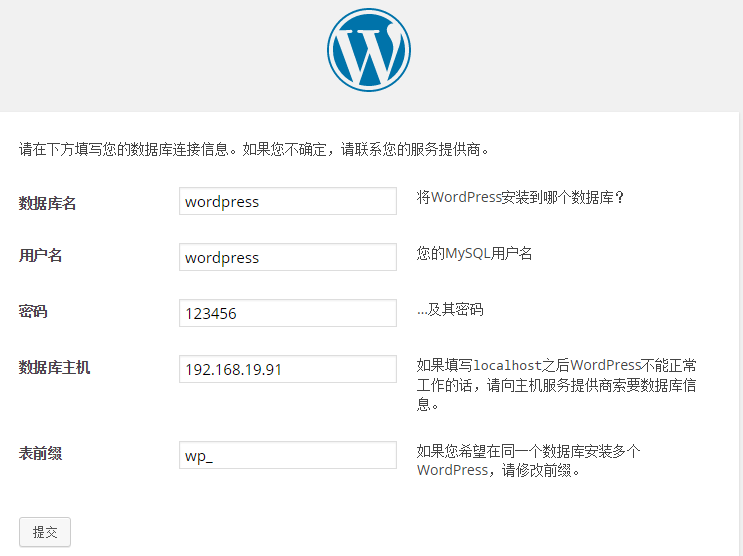
六、安装wordpress
1.在/www文件夹下放入网页文件
2.访问http://192.168.19.83,并按提示进行安装,配置没问题则会安装成功
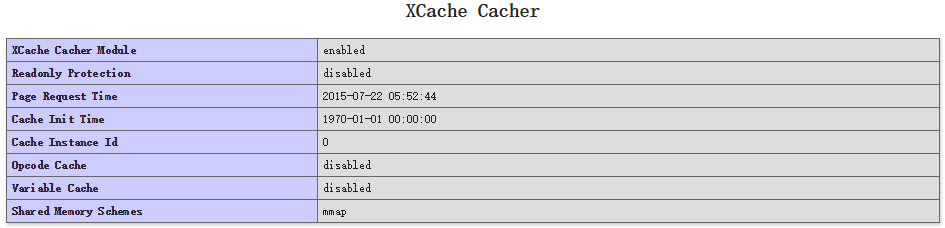
七、为php安装xcache
1.解压并安装:
1 tar xf xcache-3.2.0.tar.gz
2 cd xcache-3.2.0
3 /usr/local/php/bin/phpize
4 ./configure --enable-xcache --with-php-config=/usr/local/php/bin/php-config
5 make && make install
完成后,会出现:Installing shared extensions: /usr/local/php/lib/php/extensions/no-debug-non-zts-20131226/
2.加载模块:
1 vim /etc/php.ini
2 -----------------------------------
3 extension = /usr/local/php/lib/php/extensions/no-debug-non-zts-20131226/xcache.so        //找到extension配置的地方,加上此句
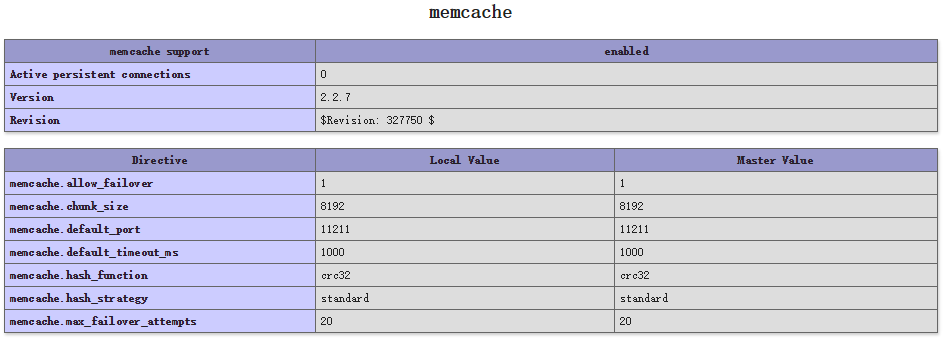
八、为php安装memcache
1.解压并安装:
1 tar xf memcache-2.2.7.tgz
2 cd memcache-2.2.7
3 /usr/local/php/bin/phpize
4  ./configure --with-php-config=/usr/local/php/bin/php-config --enable-memcache
5 make && make install
完成后,会出现:Installing shared extensions: /usr/local/php/lib/php/extensions/no-debug-non-zts-20131226/
2.加载模块:
1 vim /etc/php.ini
2 -----------------------------------
3 extension = /usr/local/php/lib/php/extensions/no-debug-non-zts-20131226/memcache.so        //找到extension配置的地方,加上此句

3.两个加速模块都安装完毕,重启php-fpm:
1 service php-fpm restart
4.创建一个php测试页,并查看模块是否加载成功:
至此,演示完毕。如果您发现了什么问题,请及时联系我,谢谢! QQ:82800452