Manage Your Workflow in Xcode
As you saw in the tutorial Your First Mac App, you perform your major workflow tasks in the Xcode workspace window. A separate Organizer window allows you to perform ancillary tasks, such as reading documentation, managing source repositories, and preparing your app for submission to the Mac App Store.
正如你在 Your First Mac App 教程中看到那样,你在Xcode 工作窗口里完成主要工作任务。 一个单独的管理器窗口(Organizer window)可让你执行辅助任务,比如阅读文档,源代码库管理,并准备你的应用程序提交到Mac 应用商店中。
The workspace window features a navigator area, an editor area, and a utility area. In Your First Mac App, you used the navigator area to select files to edit. You used the editor area to edit source files and to design user interface components. In the utility area, you set the button title and a default value for the slider.
工作区窗口(workspace window)包括 一个 导航区(navigator area), 一个编辑区(editor area) 和 一个实用区(utility area). 在 Your First Mac App 教程中,我们使用导航区来选择要编辑的文件。使用编辑区 编辑源代码文件 和 设计用户界面组件。在实用区,我们设置了按钮标题(button title) 和 滑动条的默认值。
Customize Your Workspace
自定义你的工作区
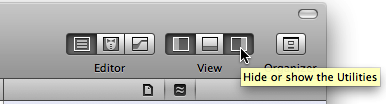
You can hide the navigator, editor, and utility areas in various combinations. In Your First Mac App, you used the View selector in the toolbar to hide and disclose the utility area. Hiding the utility area allowed you to view a larger editor area, whereas disclosing the utility area allowed you to inspect and select various object attributes.
你可以以多种方式组合 导航,编辑器,和实用区。 在教程中,我们使用位于toolbar(工具栏)的View selector(视图选择器)来隐藏和打开(disclose)实用区。 隐藏实用区,让你更大的编辑区,而打开实用区则让你检查和选择各个对象属性。
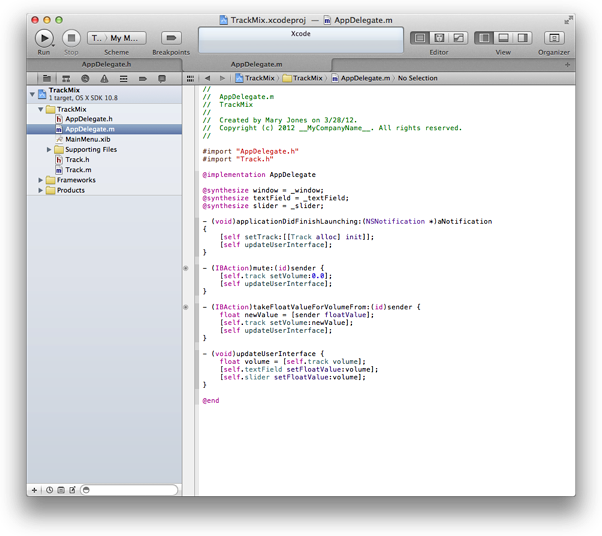
You can customize the workspace in other ways, such as by using Safari-style tabs to implement multiple, workflow-specific layouts of the workspace window. For example, you can use one tab to view a header file and another to view an implementation file.
你也可以以另外方式自定义工作区,比如使用Safari-style(Safari浏览器型)标签实现多个,工作流程具体工作区窗口。举个例子,你可以用一个标签(tab)查看一个头文件,另一个查看一个实现文件。
-
Select AppDelegate.h in the project navigator to display the header file in the source editor.
在项目导航,选择AppDelegate.h 在源文件编辑器里显示头文件。
-
Choose View > Show Tab Bar.
选择 View > Show Tab Bar
-
Choose File > New > Tab.
选择 File > New > Tab
-
Select AppDelegate.m in the project editor to display the implementation file in the tabbed source editor window.
选择AppDelegate.m, 在标签源代码编辑器窗口(tabbed source editor window)的项目编辑器显示实现文件
-
Click the tabs to move between source files.
点击标签(tabs),来回切换源代码文件。
-
To remove a tab, move the pointer to the tab and click its close box.
要想关闭标签,鼠标移动到标签,点击它的关闭按钮。
-
You can hide the tab bar by choosing View > Hide Tab Bar.
选择View > Hide Tab Bar 隐藏标签栏(tab bar)
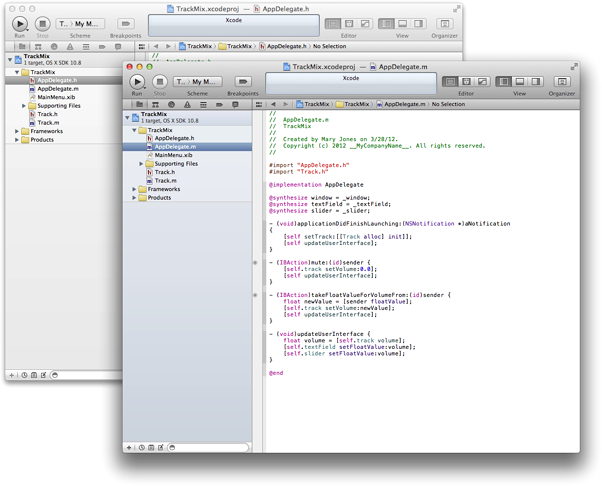
You can also create multiple workspace windows. Each tab or workspace window can be customized independently of the others.
你也可以创建多个工作区窗口。每隔标签或工作区窗口可以自定义为独立于别的窗口。
-
Select AppDelegate.h in the project navigator to display the header file in the source editor.
在项目导航里,选择AppDelegate.h 在代码编辑器里显示头文件。
-
Choose File > New > Window to open a new workspace window.
选择File > New >Window 打卡一个新的工作窗口。
-
Select AppDelegate.m in the project editor to display the implementation file in the new window.
在项目编辑器中选择 AppDelegate.m , 在新窗口里显示该实现文件。
-
Customize either window, such as by showing and hiding the utilities area with the View selector.
自定义任一窗口,比如通过用视图选择器(View selector) 显示 和隐藏实用区(utilities area).
Write Faster with Code Completion and Automatic Issue Correction
用代码补全(Code Completion) 和 自动错误更正(Automatic Issue Correction)更快编程
If you followed the Your First Mac App tutorial in Xcode, you probably noticed that Xcode suggests code completions as you type. By taking advantage of code completion, you write code more efficiently and accurately. Xcode also offers in-line issue detection and automatic issue correction. When possible, Xcode describes the problem and offers a possible solution.
如果你在Xcode里照着Your First Mac App 完成教程,你可能已经注意到Xcode在你输入代码时会建议代码不全(code completions)。 利用代码不全功能, 让你的代码更有效率更准确。 Xcode 同时提供了问题在线检测(in-line issue detection)和自动问题矫正(automatic issue correction)功能。在可能的情况下,Xcode描述出现的问题,并提供一个可能的解决办法。
-
In your TrackMix project, select Track.h in the project navigator to display the header file for your Track class.
在TrackMix项目,在项目导航,选择Track.h 显示 Track类的头文件。
-
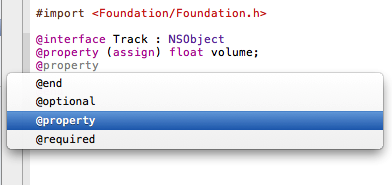
Add a property to the Track class to store the name of the track. Begin by typing
@. Xcode displays possible completions for you to choose from. You should see:给Track类添加一个特性(property), 叫做track. 输入@,Xcode 显示了提供了可供选择的所有可能补全。如下图:
-
Continue typing
@puntil@propertyis the only option listed. Press Return.继续输入@p 直到 @property 是列出来的最后一个选项。按回车键(Return)。
-
Finish typing the property declaration, using code completion, until you’ve added this code:
用代码补全,完成特性声明的输入,直到你添加了以下代码:
@property (copy) NSString *name
-
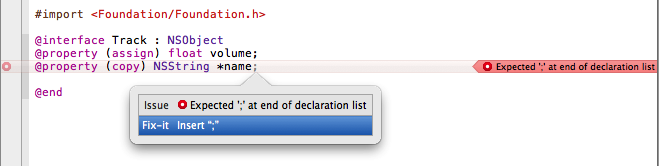
Notice that Xcode issues a warning in the gutter. Click the warning icon to view the diagnosis. You should see something like this:
注意Xcode 在边上(gutter)发出的警告。点击 警告图标 查看诊断。你应该能看到像下图的内容:
-
Because you are typing a declaration, Xcode expects a semicolon. Press Return to accept the Fix-it correction from Xcode.
因为你在输入一个声明,Xcode 期望一个分号。 点击 "Return" 回车键,接受Xcode的 Fix-it 矫正。
Find Xcode Help Quickly
快速找到Xcode 帮助
During the course of app development, you perform a lot of operations in Xcode. If you need assistance with a task, Xcode provides workflow-sensitive help, which you can access directly from the Xcode user interface. This assistance includes easy-to-follow steps, videos or screenshots, and concise descriptions that help you get back to work quickly.
在应用程序开发课程中,你在Xcode 里执行了很多操作。 如果你需要认为帮助,Xcode提供了工作流敏感(workflow-sensitive)帮助, 你可以从Xcode 用户界面(user interface)直接进入。 该帮助包括 easy-to-follow steps(易于遵循的步骤), 视频 或 截图, 和简洁的说明, 能帮助你快速返回工作。
-
In your TrackMix project, select AppDelegate.h in the project navigator to display the header file in the source editor.
在你的TrackMix 项目中, 在项目导航 选择 AppDelegate.h , 在代码编辑器显示头文件。
-
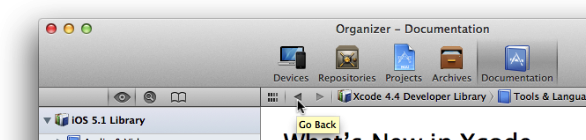
If you are reading this document in the Xcode Documentation organizer, locate its Go Back button. You will need to click it to return to this document after performing the remaining steps.
如果你是在Xcode 文档组织器(Xcode Documentation organizer)里阅读本文档, 找到它的返回按钮(Go Back button)。你需要在完成以下步骤后返回到本文档。
-
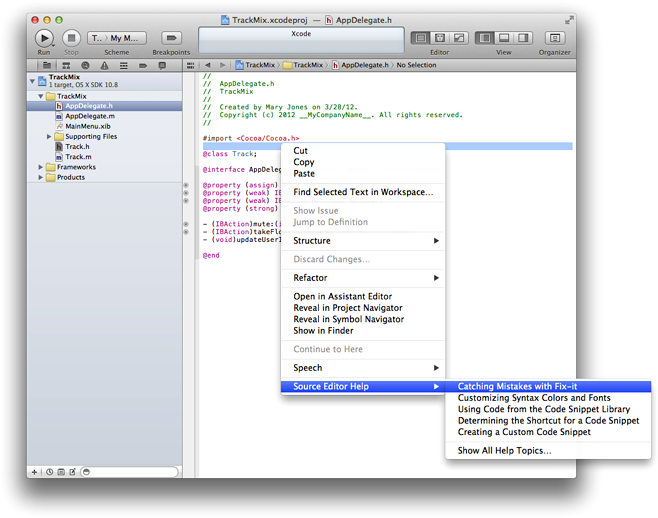
Control-click anywhere in the source editor.
在代码编辑器里,Control-click 任何地方。
A contextual menu opens in which Source Editor Help is the final item.
打开上下文菜单(contextual menu), Source Editor Help 在最后一项。
-
Choose Source Editor Help to display a list of common source-editor tasks.
选择 Source Editor Help,显示一系列 常用 source-editor 任务(source-editor tasks)。
-
Choose Source Editor Help > “Catching Mistakes with Fix-it” to see a help article in the Documentation organizer.
选择 Source Editor Help > "Catching Mistakes with Fix-it" , 在文档组织器(Documentation organizer)里查看一帮组文档。
-
Click the thumbnail image to play an instructional video.
点击缩略图(thumbnail) 播放视频教程。
Improve the Performance of Your App
改进应用性能
To ensure that you deliver the best user experience for your software, launch the Instruments application from Xcode to analyze the performance of your app as it runs. Instruments gathers data from your running app and presents it in a graphical timeline.
为了确保你为你的软件创造了最好的用户体验, 从Xcode启动Instruments 应用程序, 运行你的应用并分析应用的性能。 Instruments 从你运行的应用中搜集数据,并绘制一个图形化的时间表(graphical timeline).
You can gather data about your app’s memory usage, disk activity, network activity, and graphics performance, among other measurements. By viewing the data together, you can analyze different aspects of your app’s performance to identify potential areas of improvement. You can automate the testing of your app’s user interface elements. You can also compare your app’s behavior at different times to determine whether your changes improve the performance of your app.
你可以搜集有关你的应用的 内存使用情况, 磁盘活动, 网络活动 和 显卡的性能数据(graphics performace) 以及其他测量数据。 通过查看搜集的数据,你可以分析应用程序性能的不同方面, 以便改进潜在区域。 你可以自动测试应用程序的用户界面元素。 你还可以在不同时间段比较应用程序的行为, 看是否需要更改以促进应用程序的性能。
-
From your TrackMix project in Xcode, choose Product > Perform Action > Profile Without Building.
在你的TrackMix 项目, 选择 Product > Perform Action > Profile Without Building
-
If necessary, click Build & Profile.
Instruments launches and appears in the foreground.
如有需要,点击 Build & Profile.
Instruments 启动 并 在前台出现。
-
Under Mac OS X in the left column, click All to see the available trace templates.
在左边栏的Mac OS X 下,点击 All 查看 所有可用的跟踪模板。
-
Select the Leaks template and click Profile.
The Instruments app appears, and the TrackMix app launches.
选择 Leaks 模板,并点击 Profile.
Instruments 应用出现,TrackMix 应用启动。
-
Try moving the TrackMix slider up and down or typing a value into the text field.
试着向上向下拖动 TrackMix 滑动条,或者在文本框输入一个值。
-
Click Stop in the Instruments app to stop recording performance data.
点击 Instruments 应用 中的 Stop,停止记录性能数据。
-
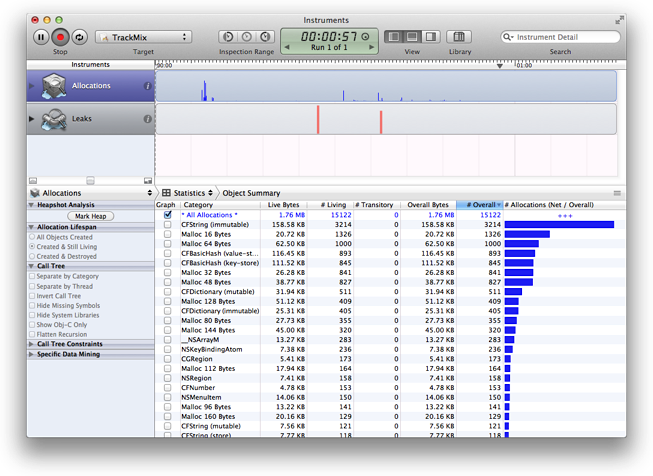
Click Allocations in the Instruments pane to examine TrackMix’s memory allocations.
点击 Instruments 面板中的 "Allocations",检查 TrackMix 的内存分配。
For example, the track pane graphs where the memory allocations occurred, allowing you to see how frequently memory allocations occurred throughout the program. (Large spikes in the track pane can indicate potential bottlenecks that you might want to mitigate by either preallocating some blocks or being more lazy about other blocks.)
举个例子, track 面板图中发生的内存分配,让你查看在整个程序中内存分配发生的频率。(track 面板中的 大尖峰(spikes)表明那些你可能需要预先分配一些块 或 让其它块更懒(lazy)来减轻的 潜在瓶颈(potential bottlenaecks))
Manage Versions of Your App
管理你的应用版本
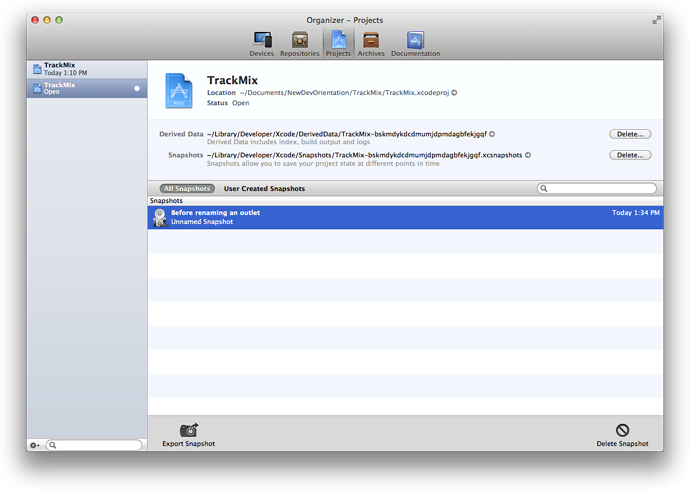
If something goes wrong because of a code change you make, an Xcode snapshot makes it easy to restore your project, even a deleted project, to a previous state. A snapshot saves the current state of your project onto disk for possible restoration later. The Projects organizer in Xcode lists your snapshots.
如果因为你改变代码造成一些错误,Xcode快照(snapshot)可以很容易的恢复你的项目到以前的状态,甚至是一个已经删除的项目。快照保存你项目的当前状态到磁盘,已被以后可能的恢复工作。Xcode 的 项目组织器(Projects organizer)列出你所有的快照。
You can create a snapshot manually whenever you like, and you can set Xcode to automatically create snapshots in other circumstances, such as before every build or before executing every Find and Replace operation.
你任何时候都可以手动创建一个快照, 你可以设置Xcode 在其它一些情况下自动创建快照,比如在每次构建(build)之前,或执行每次查找(Find)和替换(Replace)操作之前。
-
With the TrackMix project open, choose File > Create Snapshot.
打开 TrackMix 项目, 选择 File > Create 快照。
-
Type a name and description in the provided fields.
在提供的字段内 输入一个名称 和 描述。
-
Click Create Snapshot.
点击 Create Snapshot
-
To view the snapshot, Choose Window > Organizer to display the Organizer window.
要想查看这个快照,选择 Window > Organizer 显示 组织器窗口(Organizer window)。
-
Click the Projects button. You should see a list of all snapshots.
点击 Projects 按钮。 你应该看到一个所有快照的列表。
Source control management (SCM) allows you to keep track of changes at a more fine-grained level than snapshots allow. (Source control management also helps you coordinate efforts if you work with a team of programmers.) An SCM system saves multiple versions of each file onto disk, storing metadata about each version of each file in an SCM repository.
源代码控制管理系统(Source control management -- SCM) 可以让你比快照更详细的保持跟踪变化。(如果你跟一队程序员一起工作,源代码控制管理也可以帮助你协调努力。 ) 一个 SCM 系统在磁盘上给每个文件都保存了多个版本,每个文件的每个版本都在一个SCM 仓库里保存了元数据。
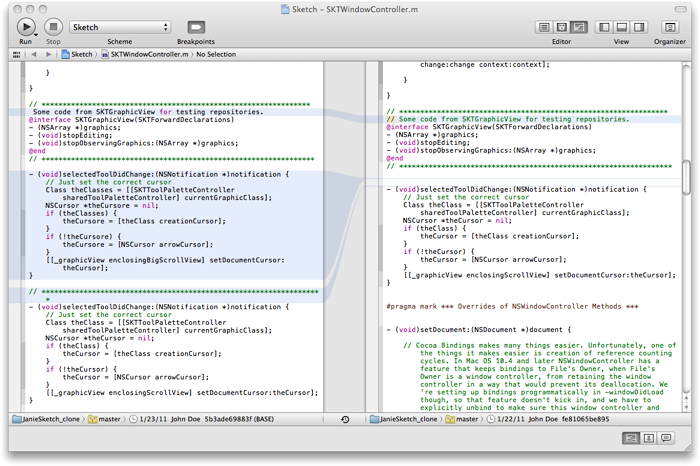
Xcode supports two popular SCM systems: Git and Subversion. Xcode includes a version editor that makes it easy to compare versions of files saved in repositories from either system. If you find you’ve introduced bugs in your code, you can compare changes between the latest version of a file and an earlier version that worked correctly, helping you to zero in on the source of the trouble.
Xcode 支持2种流行的SCM 系统: Git 和 Subversion。 Xcode 包含一个版本编辑器(version editor),使存在仓库的文件版本 跟别的系统中的文件版本进行比较变得容易。如果你发现你在代码中引入了bugs, 你可以 让最新版本的文件 和 更早版本能正确的工作的文件进行比较,查看变更,帮助你消除源代码文件中的问题。
Distribute and Publish Your App
分发和发布你的应用程序
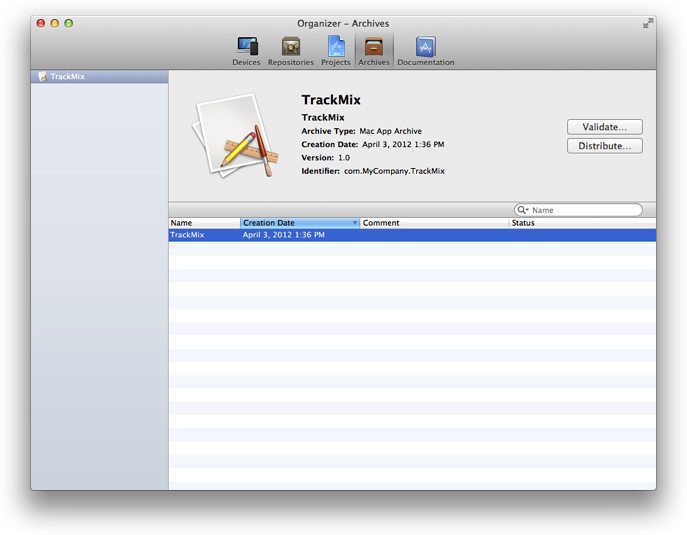
Xcode makes it easy to share your app for user testing and to publish your app on the Mac App Store. You start the distribution process by using the scheme editor to create an archive of your app in Xcode. You can then use the Archives organizer in Xcode to share your app with others for testing.
Xcode 让分享你的应用到用户测试(user testing) 和 发布你的应用到Mac 应用商店变得简单。 你启动分发进程 通过 scheme editor(计划编辑器) 在Xcode创建一个应用程序的压缩(archive)。 然后你可以用 Xcode 的 Archives organizer(归档组织器) 跟其他人分享你的应用,以便测试。
When you’re ready to publish your app, use the Archives organizer to perform essential validation tests required for Mac App Store publication. Passing these tests ensures that your app’s approval process is as fast as possible. You'll then be ready to submit your app directly to the Mac App Store from Xcode.
当你准备好发布你的应用时, 使用 Archives organizer 执行Mac 应用商店发布要求的必要的认证测试。通过这些测试确保你应用程序的审批过程(approval process)尽可能的快。然后你就可以直接从Xcode提交你的应用到Mac 应用商店。
You’ll learn more about distributing and publishing your app in the article Prepare for Mac App Store Submission later in this road map.