自动重装工具--koan
客户机已经通过cobbler安装centos7系统完毕。
安装koan,能实现重装,安装之前先安装epel源
koan是kickstart-over-a-network的缩写,它是cobbler的客户端帮助程序,koan允许你通过网络提供虚拟机
也允许你重装已经存在的客户端。当运行时,koan会从远端的cobbler server获取安装信息,然后根据获取的安装信息进行安装。
[root@localhost ~]# rpm -ivh https://mirrors.aliyun.com/epel/epel-release-latest-7.noarch.rpm
Retrieving https://mirrors.aliyun.com/epel/epel-release-latest-7.noarch.rpm
warning: /var/tmp/rpm-tmp.iRJRma: Header V3 RSA/SHA256 Signature, key ID 352c64e5: NOKEY
Preparing...                          ################################# [100%]
Updating / installing...
   1:epel-release-7-9                 ################################# [100%]
[root@localhost ~]#
安装koan
[root@localhost ~]# yum install -y koan
Loaded plugins: fastestmirror, langpacks
Loading mirror speeds from cached hostfile
 * base: mirrors.zju.edu.cn
 * epel: mirrors.ustc.edu.cn
 * extras: centos.ustc.edu.cn
 * updates: mirrors.zju.edu.cn
Package koan-2.8.0-4.el7.noarch already installed and latest version
Nothing to do
[root@localhost ~]#
[root@localhost ~]# koan --server=192.168.58.11 --list=profiles
- looking for Cobbler at http://192.168.58.11:80/cobbler_api
CentOS-7-x86_64
CentOS-6-x86_64
[root@localhost ~]#
把系统重装装成centos6
执行完毕,重启就会自动重装为centos6的系统
[root@localhost ~]# koan --server=192.168.58.11 --list=profiles
- looking for Cobbler at http://192.168.58.11:80/cobbler_api
CentOS-7-x86_64
CentOS-6-x86_64
[root@localhost ~]# koan --replace-self --server=192.168.58.11 --profile=CentOS-6-x86_64
- looking for Cobbler at http://192.168.58.11:80/cobbler_api
- reading URL: http://192.168.58.11/cblr/svc/op/ks/profile/CentOS-6-x86_64
install_tree: http://192.168.58.11/cblr/links/CentOS-6-x86_64
downloading initrd initrd.img to /boot/initrd.img_koan
url=http://192.168.58.11/cobbler/images/CentOS-6-x86_64/initrd.img
- reading URL: http://192.168.58.11/cobbler/images/CentOS-6-x86_64/initrd.img
downloading kernel vmlinuz to /boot/vmlinuz_koan
url=http://192.168.58.11/cobbler/images/CentOS-6-x86_64/vmlinuz
- reading URL: http://192.168.58.11/cobbler/images/CentOS-6-x86_64/vmlinuz
- ['/sbin/grubby', '--add-kernel', '/boot/vmlinuz_koan', '--initrd', '/boot/initrd.img_koan', '--args',
 '"ks=http://192.168.58.11/cblr/svc/op/ks/profile/CentOS-6-x86_64 ksdevice=link kssendmac lang= text "', '--copy-default',
 '--make-default', '--title=kick1491222834']
- ['/sbin/grubby', '--update-kernel', '/boot/vmlinuz_koan', '--remove-args=root']
- reboot to apply changes
[root@localhost ~]#
执行reboot应用改变
全程不需要手动干预,它自动重装

自动重装完毕
[root@localhost ~]# cat /etc/redhat-release
CentOS release 6.6 (Final)
[root@localhost ~]# ip ad
1: lo: <LOOPBACK,UP,LOWER_UP> mtu 65536 qdisc noqueue state UNKNOWN
    link/loopback 00:00:00:00:00:00 brd 00:00:00:00:00:00
    inet 127.0.0.1/8 scope host lo
    inet6 ::1/128 scope host
       valid_lft forever preferred_lft forever
2: eth0: <BROADCAST,MULTICAST,UP,LOWER_UP> mtu 1500 qdisc pfifo_fast state UP qlen 1000
    link/ether 00:0c:29:c6:4f:61 brd ff:ff:ff:ff:ff:ff
    inet 192.168.58.130/24 brd 192.168.58.255 scope global eth0
    inet6 fe80::20c:29ff:fec6:4f61/64 scope link
       valid_lft forever preferred_lft forever
[root@localhost ~]#
cobbler-web
火狐浏览器打开
https://192.168.58.11/cobbler_web
用户和密码其实在配置文件中
user.conf是用户文件 ,users.digest是密码文件
[root@linux-node1 ~]# cd /etc/cobbler/
[root@linux-node1 cobbler]# ls
auth.conf               iso             reporting           users.digest
cheetah_macros          ldap            rsync.exclude       version
cobbler_bash            modules.conf    rsync.template      zone.template
completions             mongodb.conf    secondary.template  zone_templates
dhcp.template           named.template  settings
dnsmasq.template        power           tftpd.template
import_rsync_whitelist  pxe             users.conf
[root@linux-node1 cobbler]# tail -5 users.conf

[admins]
admin = ""
cobbler = ""

[root@linux-node1 cobbler]# cat users.digest
cobbler:Cobbler:a2d6bae81669d707b72c0bd9806e01f3
[root@linux-node1 cobbler]#
更改cobbler密码为123123
前面的“Cobbler”其实是用户描述,后面小写的cobbler才是用户名
[root@linux-node1 cobbler]# htdigest /etc/cobbler/users.digest "Cobbler" cobbler
Changing password for user cobbler in realm Cobbler
New password:
Re-type new password:
[root@linux-node1 cobbler]#
通过密码123123登录cobbler-web成功
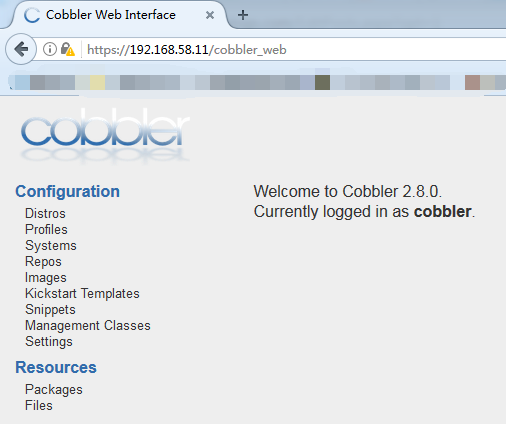
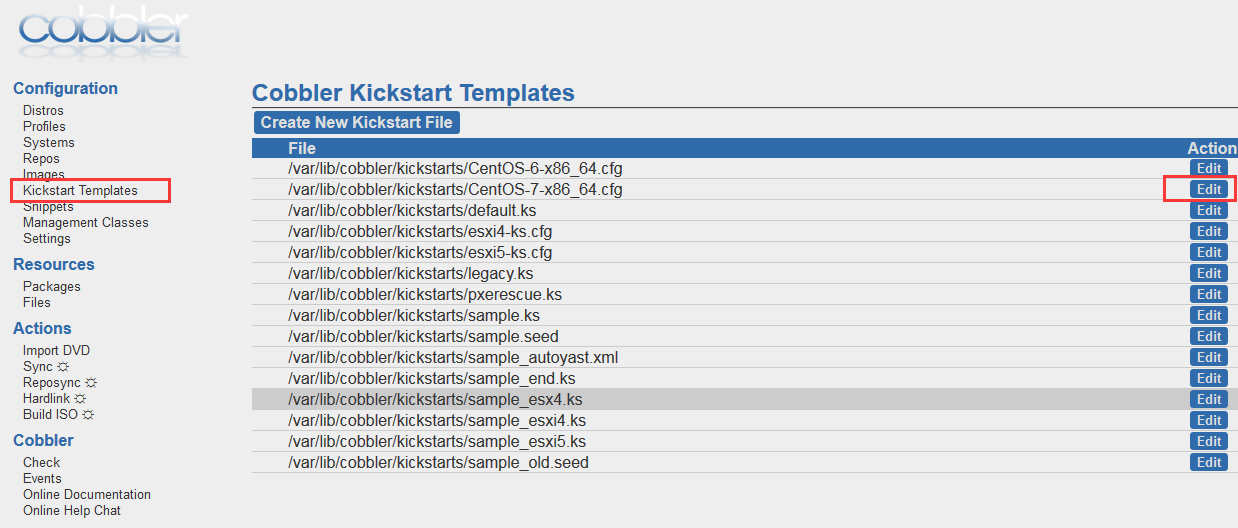
可以查看配置文件
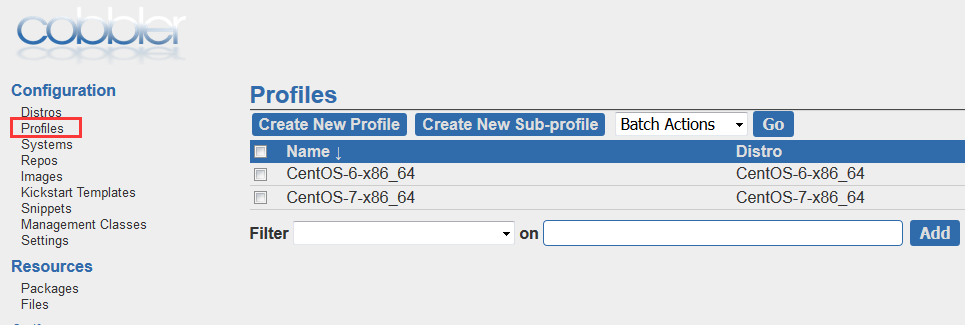
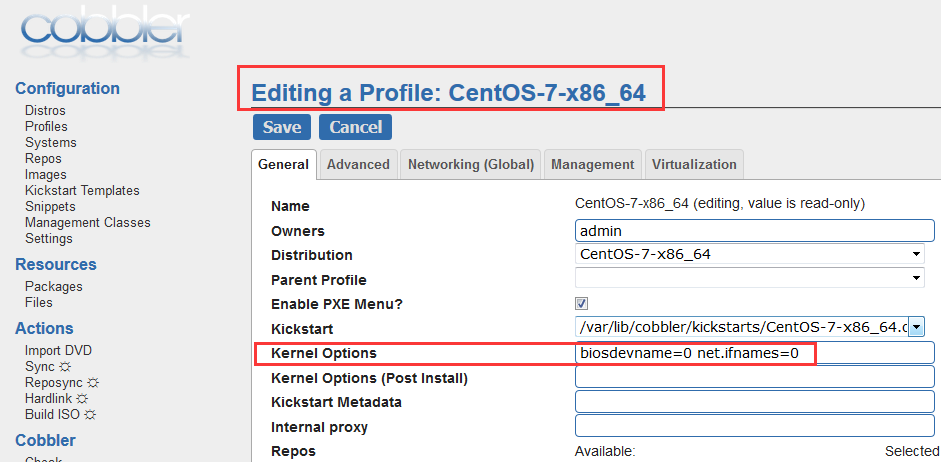
这里也可以选择ks文件
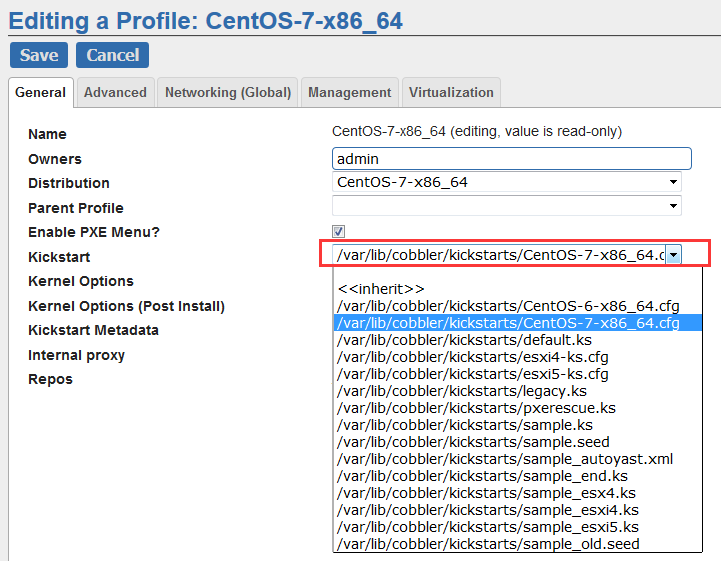
还可以在这上面编辑ks文件
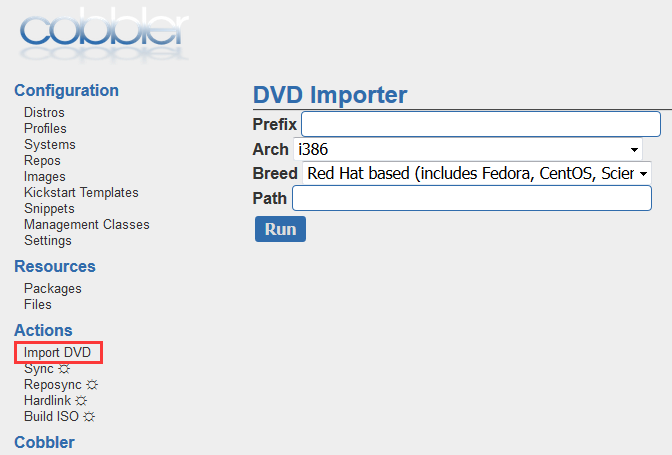
也可以通过页面导入dvd
[root@linux-node1 cobbler]# cd
[root@linux-node1 ~]# vim /etc/cobbler/pxe/pxedefault.template
这里更改为自定义的地址。

更改之后如果想让配置生效需要执行cobbler sync 来同步最新的配置信息
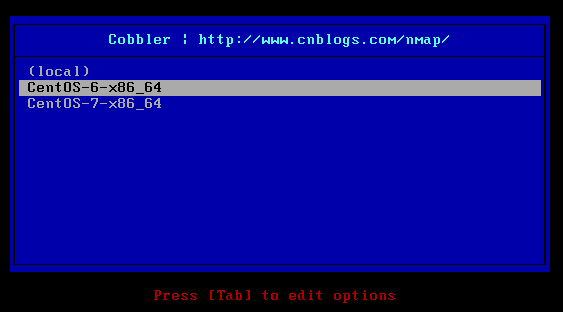
测试安装显示界面
新建一个client

变化了,上面链接变了
repo_mirror目录是默认yum仓库存放位置,这里还没有文件,因为我们还没配置自己的yum仓库
[root@linux-node1 ~]# cd /var/www/cobbler
[root@linux-node1 cobbler]# ls
aux  images  ks_mirror  links  localmirror  pub  rendered  repo_mirror  svc
[root@linux-node1 cobbler]# ls ks_mirror/
CentOS-6-x86_64  CentOS-7-x86_64  config
[root@linux-node1 cobbler]# ls repo_mirror/
[root@linux-node1 cobbler]#
下面目录都是系统启动需要的文件
[root@linux-node1 cobbler]# cd /var/lib/cobbler/
[root@linux-node1 cobbler]# ls
config                  kickstarts  lock     snippets  web.ss
distro_signatures.json  loaders     scripts  triggers  webui_sessions
[root@linux-node1 cobbler]# ls loaders/
COPYING.elilo     COPYING.yaboot  grub-x86_64.efi  menu.c32    README
COPYING.syslinux  elilo-ia64.efi  grub-x86.efi     pxelinux.0  yaboot
[root@linux-node1 cobbler]#
[root@linux-node1 cobbler]# cd /etc/cobbler/
[root@linux-node1 cobbler]# ll
total 108
-rw-r--r-- 1 root root    40 Nov 17 03:09 auth.conf
-rw-r--r-- 1 root root    75 Nov 17 03:09 cheetah_macros
-rw-r--r-- 1 root root  2409 Nov 17 03:09 cobbler_bash
-rw-r--r-- 1 root root 11636 Nov 17 03:09 completions
-rw-r--r-- 1 root root  2951 Apr  3 18:29 dhcp.template
-rw-r--r-- 1 root root   385 Nov 17 03:09 dnsmasq.template
-rw-r--r-- 1 root root  2014 Nov 17 03:09 import_rsync_whitelist
drwxr-xr-x 2 root root    30 Apr  3 16:31 iso
drwxr-xr-x 2 root root    37 Apr  3 16:31 ldap
-rw-r--r-- 1 root root  3076 Nov 17 03:09 modules.conf
-rw-r--r-- 1 root root    43 Nov 17 03:09 mongodb.conf
-rw-r--r-- 1 root root   680 Nov 17 03:09 named.template
drwxr-xr-x 2 root root  4096 Apr  3 16:31 power
drwxr-xr-x 2 root root  4096 Apr  3 21:41 pxe
drwxr-xr-x 2 root root    40 Apr  3 16:31 reporting
-rw-r--r-- 1 root root   368 Nov 17 03:09 rsync.exclude
-rw-r--r-- 1 root root  1073 Nov 17 03:09 rsync.template
-rw-r--r-- 1 root root   754 Nov 17 03:09 secondary.template
-rw-r--r-- 1 root root 19655 Apr  3 17:21 settings
-rw-r--r-- 1 root root   740 Nov 17 03:09 tftpd.template
-rw-r--r-- 1 root root   848 Nov 17 03:09 users.conf
-rw-r--r-- 1 root root    49 Apr  3 21:27 users.digest
-rw-r--r-- 1 root root   115 Feb  1 07:25 version
-rw-r--r-- 1 root root   522 Nov 17 03:09 zone.template
drwxr-xr-x 2 root root     6 Feb  1 07:25 zone_templates
[root@linux-node1 cobbler]#
cobbler还可以管理dns(dnsmasq.template),其实生产中一般都是单独的dns服务器。不使用cobbler
目前用的是cobbler2.8, 不同版本是不一样的
[root@linux-node1 ~]# rpm -qa | grep cobbler
cobbler-2.8.0-4.el7.x86_64
cobbler-web-2.8.0-4.el7.noarch
[root@linux-node1 ~]#
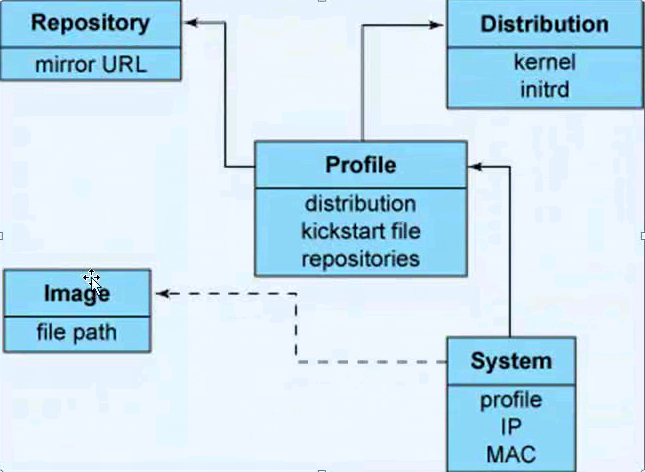
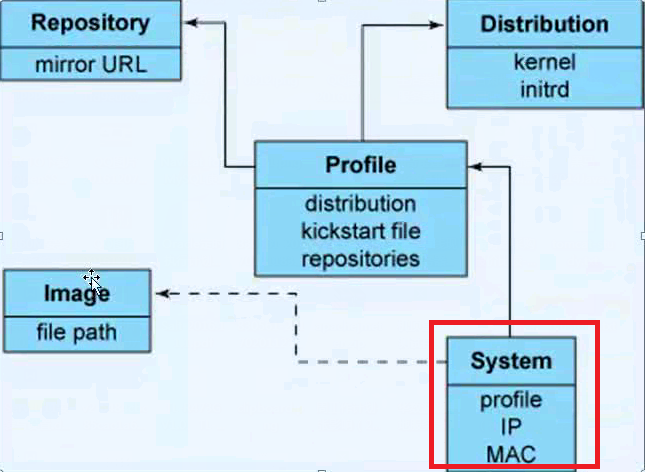
Cobbler 配置结构
Cobbler 的配置结构基于一组注册的对象。每个对象表示一个与另一个实体相关联的实体(该对象指向另一个对象,或者另一个对象指向该对象)。当一个对象指向另一个对象时,它就继承了被指向对象的数据,并可覆盖或添加更多特定信息。
以下对象类型的定义为:
发行版:表示一个操作系统。它承载了内核和 initrd 的信息,以及内核参数等其他数据。
配置文件:包含一个发行版、一个 kickstart 文件以及可能的存储库,还包含更多特定的内核参数等其他数据。
系统:表示要配给的机器。它包含一个配置文件或一个镜像,还包含 IP 和 MAC 地址、电源管理(地址、凭据、类型)以及更为专业的数据等信息。
存储库:保存一个 yum 或 rsync 存储库的镜像信息。
镜像:可替换一个包含不属于此类别的文件的发行版对象(例如,无法分为内核和 initrd 的对象)。
基于注册的对象以及各个对象之间的关联,Cobbler 知道如何更改文件系统以反映具体配置。
因为系统配置的内部是抽象的,所以您可以仅关注想要执行的操作。下面是Cobbler各对象之间的关系图,
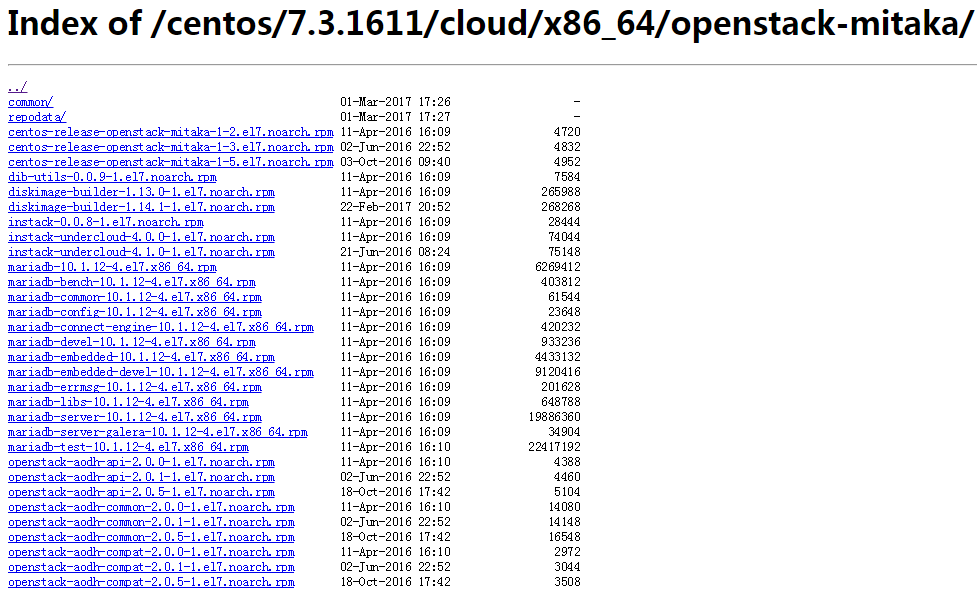
下面地址可以周到Openstack的mitaka版本的yum源
https://mirrors.aliyun.com/centos/7.3.1611/cloud/x86_64/openstack-mitaka/
[root@linux-node1 ~]# cobbler repo add --name=openstack-mitaka --mirror=https://mirrors.aliyun.com/centos/7.3.1611/cloud/x86_64/openstack-mitaka/ --arch=x86_64 --breed=yum
[root@linux-node1 ~]#
同步之前先查看本地cobbler的目录中是否有文件,方便同步之后比较,目前是没有任何rpm包的
[root@linux-node1 cobbler]# cd /var/www/cobbler
[root@linux-node1 cobbler]# ls
aux  images  ks_mirror  links  localmirror  pub  rendered  repo_mirror  svc
[root@linux-node1 cobbler]# cd repo_mirror/
[root@linux-node1 repo_mirror]# ls
[root@linux-node1 repo_mirror]# pwd
/var/www/cobbler/repo_mirror
[root@linux-node1 repo_mirror]# ls
[root@linux-node1 repo_mirror]#
执行下载操作,省略一部分输出
[root@linux-node1 ~]# cobbler reposync
.
.
.
.
Spawning worker 3 with 305 pkgs
Workers Finished
Saving Primary metadata
Saving file lists metadata
Saving other metadata
Generating sqlite DBs
Sqlite DBs complete

received on stderr:
running: chown -R root:apache /var/www/cobbler/repo_mirror/openstack-mitaka
received on stdout:
received on stderr:
running: chmod -R 755 /var/www/cobbler/repo_mirror/openstack-mitaka
received on stdout:
received on stderr:
*** TASK COMPLETE ***
[root@linux-node1 ~]#
再次查看cobbler存放rpm包的位置,把Openstack-mitaka相关的包都下载了
[root@linux-node1 repo_mirror]# pwd
/var/www/cobbler/repo_mirror
[root@linux-node1 repo_mirror]# ls
openstack-mitaka
[root@linux-node1 repo_mirror]# ls openstack-mitaka/* | wc -l
2456
[root@linux-node1 repo_mirror]#
总共700多MB
[root@linux-node1 repo_mirror]# du -sh openstack-mitaka/
732M	openstack-mitaka/
[root@linux-node1 repo_mirror]#
[root@linux-node1 ~]# cobbler profile edit --name=CentOS-7-x86_64 --repo="openstack-mitaka"
[root@linux-node1 ~]#
[root@linux-node1 ~]# cobbler reposync
task started: 2017-04-03_224404_reposync
task started (id=Reposync, time=Mon Apr  3 22:44:04 2017)
hello, reposync
run, reposync, run!
creating: /var/www/cobbler/repo_mirror/openstack-mitaka/config.repo
creating: /var/www/cobbler/repo_mirror/openstack-mitaka/.origin/openstack-mitaka.repo
running: /usr/bin/reposync -l -n -d --config=/var/www/cobbler/repo_mirror/openstack-mitaka/.origin/openstack-mitaka.repo --repoid=openstack-mitaka --download_path=/var/www/cobbler/repo_mirror -a x86_64
添加计划任务,定期跟新yum仓库
[root@linux-node1 ~]# echo "1 3 * * * /usr/bin/cobbler reposync --tries=3 --no-fail" >> /var/spool/cron/root
[root@linux-node1 ~]# crontab -l
1 3 * * * /usr/bin/cobbler reposync --tries=3 --no-fail
[root@linux-node1 ~]#
总结以上过程
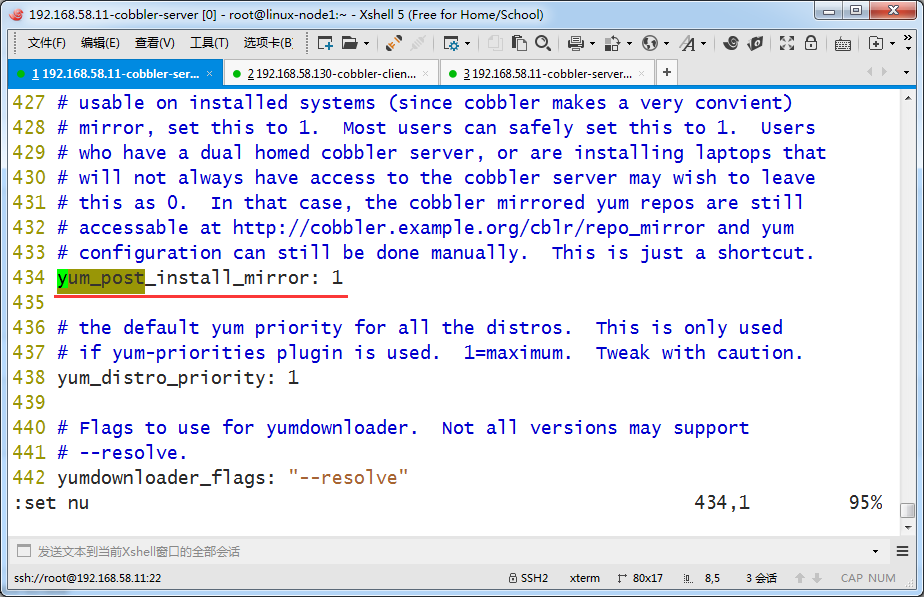
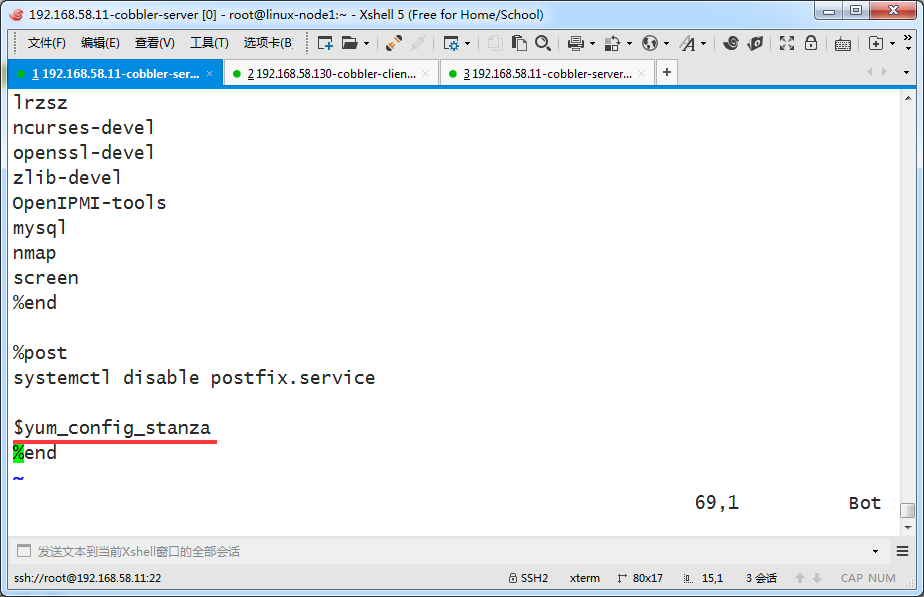
1、添加repo
cobbler repo add --name=openstack-mitaka --mirror=https://mirrors.aliyun.com/centos/7.3.1611/cloud/x86_64/openstack-mitaka/ --arch=x86_64 --breed=yum

2、同步repo
cobbler reposync

3、添加repo到对应的profile
cobbler profile edit --name=CentOS-7-x86_64 --repo="openstack-mitaka"

4、修改kickstart文件,添加。(在%post %end中间)
%post
systemctl disable postfix.service

$yum_config_stanza
%end

5、添加定时任务,定期同步repo
echo "1 3 * * * /usr/bin/cobbler reposync --tries=3 --no-fail" >> /var/spool/cron/root
实际生产中会有很多kickstart文件,即使相同系统的kickstart文件也有不同,比如根据业务,对应不同的分区方案(web服务器和数据库服务器对磁盘分区要求就不同)
比如新建一台虚拟机,根据mac地址给它指定一个IP地址

规划下,给它分配这个IP
00:50:56:31:E4:ED
IP:192.168.58.12
主机名:linux-node2.nmap.com
掩码:255.255.255.0
网关:192.168.58.2
DNS:192.168.58.2
自定义配置,注意下面配置需要在一行命令,这里处于美观写成了3行
注意--name不是主机名,就是自定义的一个配置规划的名字
[root@linux-node1 ~]# ls /var/lib/cobbler/kickstarts/CentOS-7-x86_64.cfg
/var/lib/cobbler/kickstarts/CentOS-7-x86_64.cfg
[root@linux-node1 ~]# cobbler system add --name=linux-node2.nmap.com --mac=00:50:56:31:E4:ED --profile=CentOS-7-x86_64
--ip-address=192.168.58.12 --subnet=255.255.255.0 --gateway=192.168.58.2 --interface=eth0 --static=1
--hostname=linux-node2.nmap.com --name-servers="192.168.58.2" --kickstart=/var/lib/cobbler/kickstarts/CentOS-7-x86_64.cfg
[root@linux-node1 ~]#
查看是否添加成功
[root@linux-node1 ~]# cobbler system list
   linux-node2.nmap.com
[root@linux-node1 ~]#
执行cobbler sync 让配置生效
这里省略了一些输出
[root@linux-node1 ~]# cobbler sync
task started: 2017-04-03_231612_sync
task started (id=Sync, time=Mon Apr  3 23:16:12 2017)
running pre-sync triggers
cleaning trees
removing: /var/www/cobbler/images/CentOS-7-x86_64
removing: /var/www/cobbler/images/CentOS-6-x86_64
removing: /var/lib/tftpboot/pxelinux.cfg/default
removing: /var/lib/tftpboot/pxelinux.cfg/01-00-50-56-31-e4-ed
removing: /var/lib/tftpboot/grub/images
removing: /var/lib/tftpboot/grub/grub-x86.efi
removing: /var/lib/tftpboot/grub/grub-x86_64.efi
removing: /var/lib/tftpboot/grub/efidefault
removing: /var/lib/tftpboot/grub/01-00-50-56-31-E4-ED
removing: /var/lib/tftpboot/images/CentOS-7-x86_64
removing: /var/lib/tftpboot/images/CentOS-6-x86_64
removing: /var/lib/tftpboot/s390x/profile_list
copying bootloaders
.
.
.

running shell triggers from /var/lib/cobbler/triggers/sync/post/*
running python triggers from /var/lib/cobbler/triggers/change/*
running python trigger cobbler.modules.scm_track
running shell triggers from /var/lib/cobbler/triggers/change/*
*** TASK COMPLETE ***
[root@linux-node1 ~]#
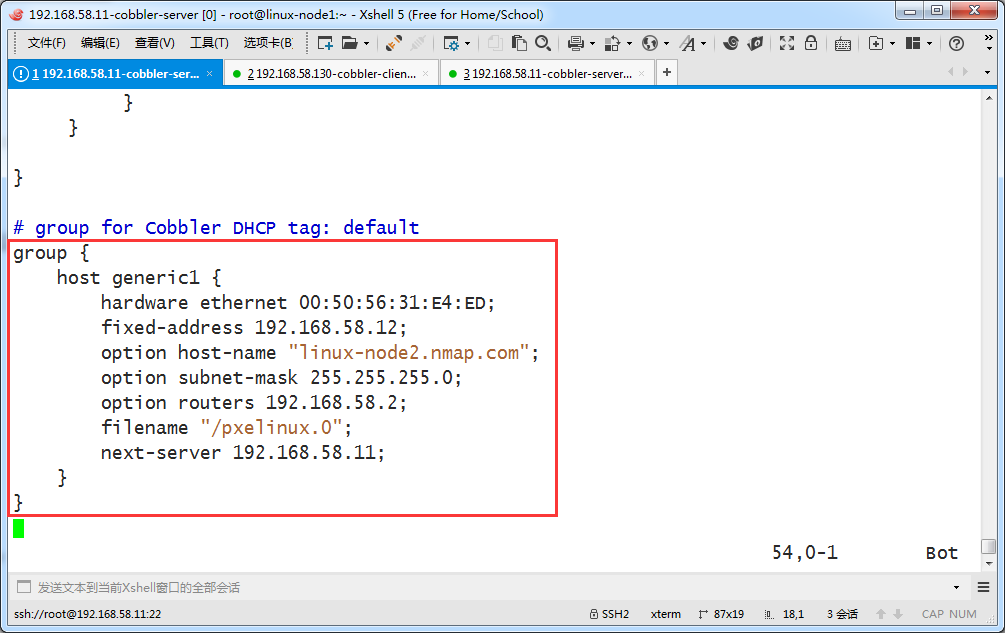
查看dhcp配置文件。末尾部分可以看到自定义的配置vim /etc/dhcp/dhcpd.conf
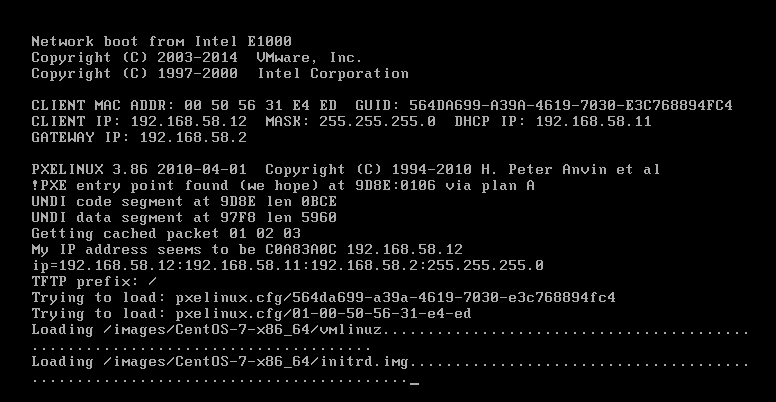
新建一个客户机并启动
都不经过选择系统,它自动安装了,没手工干预
下面还可以看到它的IP地址是192.168.58.12
查看安装完毕的系统

cobbler-api
相关一些python脚本
[root@linux-node1 ~]# mkdir /scripts -p
[root@linux-node1 ~]# cd /scripts/
[root@linux-node1 scripts]# vim cobbler_list.py
新建一个cobbler_list.py 的脚本
[root@linux-node1 scripts]# cat cobbler_list.py
#!/usr/bin/python
import xmlrpclib
server = xmlrpclib.Server("http://192.168.58.11/cobbler_api")
print server.get_distros()
print server.get_profiles()
print server.get_systems()
print server.get_images()
print server.get_repos()
[root@linux-node1 scripts]#
它能通过调用cobbler的api输出一些当前信息。格式是列表


生成一个mac地址
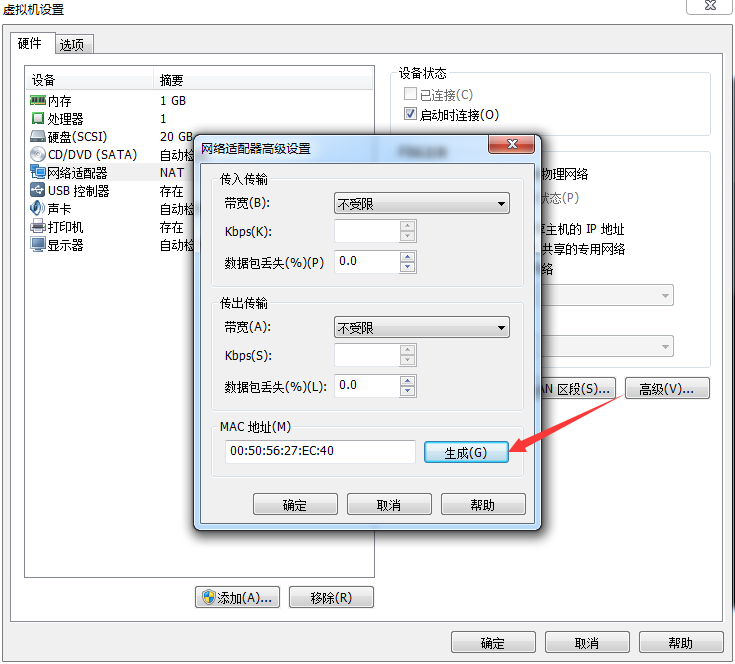
脚本内容如下
注意mac地址是取上面的,规划给这个mac地址的主机分配IP是192.168.58.111,主机名是cobbler-api-test
注意cobbler-api的用户名和密码和网页登录的一致
#!/usr/bin/env python
# -*- coding: utf-8 -*-
import xmlrpclib
class CobblerAPI(object):
    def __init__(self,url,user,password):
        self.cobbler_user= user
        self.cobbler_pass = password
        self.cobbler_url = url
    def add_system(self,hostname,ip_add,mac_add,profile):
        '''
        Add Cobbler System Infomation
        '''
        ret = {
            "result": True,
            "comment": [],
        }
        #get token
        remote = xmlrpclib.Server(self.cobbler_url)
        token = remote.login(self.cobbler_user,self.cobbler_pass)
        #add system
        system_id = remote.new_system(token)
        remote.modify_system(system_id,"name",hostname,token)
        remote.modify_system(system_id,"hostname",hostname,token)
        remote.modify_system(system_id,'modify_interface', {
            "macaddress-eth0" : mac_add,
            "ipaddress-eth0" : ip_add,
            "dnsname-eth0" : hostname,
        }, token)
        remote.modify_system(system_id,"profile",profile,token)
        remote.save_system(system_id, token)
        try:
            remote.sync(token)
        except Exception as e:
            ret['result'] = False
            ret['comment'].append(str(e))
        return ret
def main():
    cobbler = CobblerAPI("http://192.168.58.11/cobbler_api","cobbler","123123")
    ret = cobbler.add_system(hostname='cobbler-api-test',ip_add='192.168.58.111',mac_add='00:50:56:27:EC:40',profile='CentOS-7-x86_64')
    print ret
if __name__ == '__main__':
    main()
通过执行上面脚本,在cobber在自己系统里加入一条记录,关于此mac地址的主机配置要求
[root@linux-node1 scripts]# vim cobbler_system_api.py
[root@linux-node1 scripts]# pwd
/scripts
[root@linux-node1 scripts]# ll
total 8
-rw-r--r-- 1 root root  234 Apr  3 23:51 cobbler_list.py
-rw-r--r-- 1 root root 1533 Apr  4 00:01 cobbler_system_api.py
[root@linux-node1 scripts]#
添加成功,这个mac地址的机器启动之后就自动装机了
[root@linux-node1 scripts]# cobbler system list
   linux-node2.nmap.com
[root@linux-node1 scripts]# python cobbler_system_api.py
{'comment': [], 'result': True}
[root@linux-node1 scripts]# cobbler system list
   cobbler-api-test
   linux-node2.nmap.com
[root@linux-node1 scripts]#
启动此新建的机器。看到自动装机了,获取的IP地址就是上面指定的
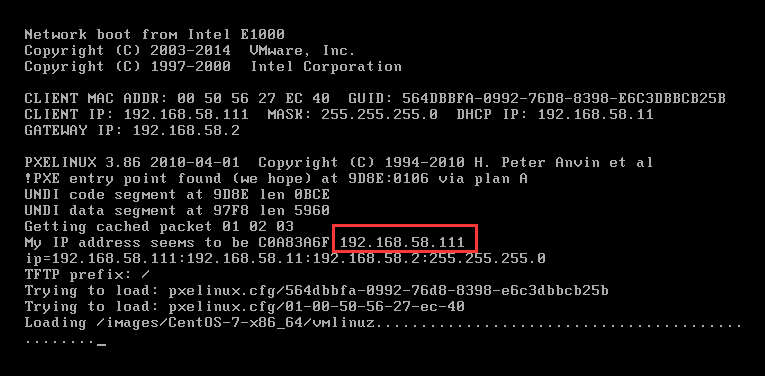
安装完毕,登录检查
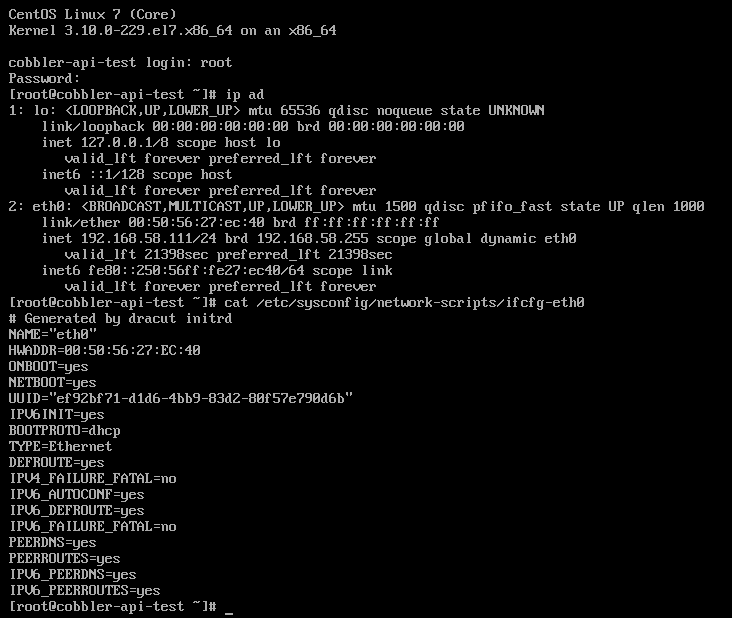
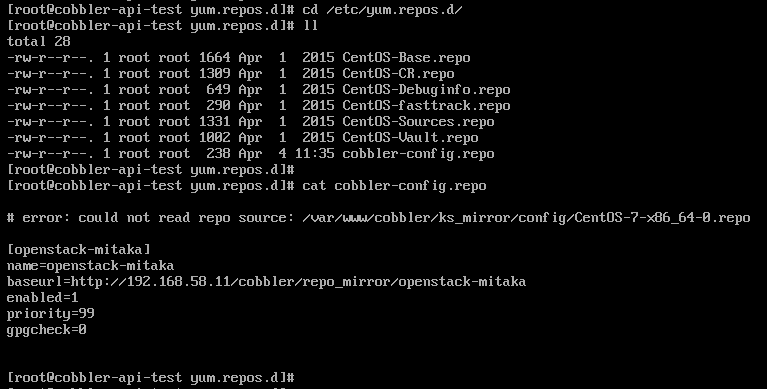
安装完的系统,yum源也会多出之前定义的Openstack-mitaka的源
[root@linux-node1 scripts]# cd /var/lib/cobbler/snippets/
[root@linux-node1 snippets]# ll post_install_network_config
-rw-r--r-- 1 root root 16281 Nov 17 03:09 post_install_network_config
[root@linux-node1 snippets]# ls
cobbler_register           networking.xml
download_config_files      partition_select
download_config_files_deb  post_anamon
func_install_if_enabled    post_install_kernel_options
func_register_if_enabled   post_install_network_config
hosts.xml                  post_install_network_config_deb
kdump.xml                  post_koan_add_reinstall_entry
keep_cfengine_keys         post_run_deb
keep_files                 post_s390_reboot
keep_rhn_keys              pre_anamon
keep_ssh_host_keys         pre_install_network_config
kickstart_done             pre_partition_select
kickstart_start            preseed_apt_repo_config
koan_environment           proxy.xml
late_apt_repo_config       puppet_install_if_enabled
log_ks_post                puppet_register_if_enabled
log_ks_post_nochroot       redhat_register
log_ks_pre                 restore_boot_device
main_partition_select      rhn_certificate_based_register
network_config             save_boot_device
network_config_esx         suse_scriptwrapper.xml
network_config_esxi
[root@linux-node1 snippets]#
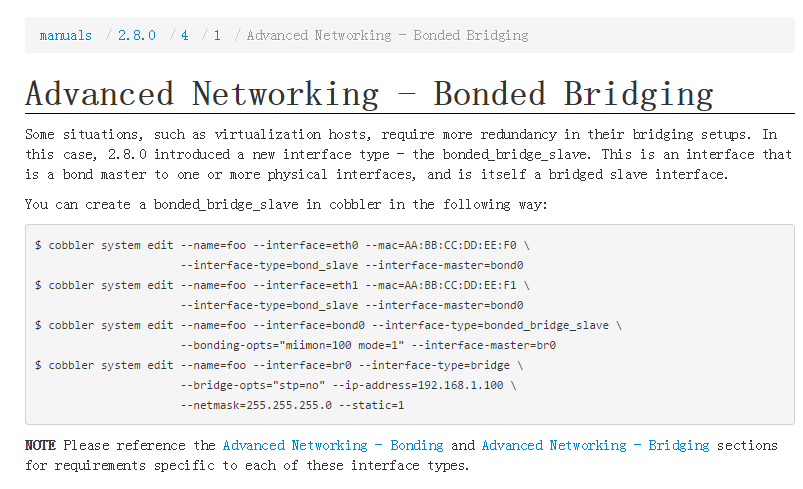
查看官方文档,网卡绑定部分
http://cobbler.github.io/manuals/2.8.0/

Cobbler目录详细介绍
1、Cobbler配置文件目录:/etc/cobbler
/etc/cobbler/settings #cobbler主配置文件
/etc/cobbler/dhcp.template #DHCP服务的配置模板
/etc/cobbler/tftpd.template #tftp服务的配置模板
/etc/cobbler/rsync.template #rsync服务的配置模板
/etc/cobbler/iso #iso模板配置文件
/etc/cobbler/pxe #pxe模板文件
/etc/cobbler/power #电源的配置文件
/etc/cobbler/users.conf #Web服务授权配置文件
/etc/cobbler/users.digest #用于web访问的用户名密码配置文件
/etc/cobbler/dnsmasq.template #DNS服务的配置模板
/etc/cobbler/modules.conf #Cobbler模块配置文件
2、Cobbler数据目录:/var/lib/cobbler
/var/lib/cobbler/config #配置文件
/var/lib/cobbler/triggers #Cobbler命令
/var/lib/cobbler/kickstarts #默认存放kickstart文件
/var/lib/cobbler/loaders #存放的各种引导程序
3、系统安装镜像目录:/var/www/cobbler
/var/www/cobbler/ks_mirror #导入的系统镜像列表
/var/www/cobbler/images #导入的系统镜像启动文件
/var/www/cobbler/repo_mirror #yum源存储目录
4、日志目录:/var/log/cobbler
/var/log/cobbler/install.log #客户端系统安装日志
/var/log/cobbler/cobbler.log #cobbler日志