前言:
要了解rocketMq 需要知道 数据在 rocketMq 中 是如何进行传输,在底层的结构到底是一个什么亚子,这个需要我们对Netty 对字符编解码有一些了解。
开始:
我们从生产者发送消息,broker 接收消息 为例,来开展底层消息结构。
消息发送流程:
1. 如下是一段生产者发送消息的代码,这里我们进去第5步看发送消息的流程。
     //1. 初始化 mq producer
        DefaultMQProducer mqProducer =new DefaultMQProducer("iscys-test");
        //2.设置nameServer 地址
        mqProducer.setNamesrvAddr("localhost:9876");
        //3. 开启mq producer,这一步是必须的,会做一些连接初始化检测工作
        mqProducer.start();
        //4.创建 Message
        Message msg = new Message("test-topis", "iscys-test".getBytes());
        //5.发送消息
        mqProducer.send(msg, new SendCallback() {

            @Override
            public void onSuccess(SendResult sendResult) {
                //在消息发送成功之后,我们收到broker的响应通知后,会进行回调
                System.out.println("send success");
            }

            @Override
            public void onException(Throwable e) {
                System.out.println("send fail");

            }
        });
2.消息发送必须经过如下代码,将消息组装成 RemotingCommand 对象,无论是发送还是服务端返回消息,都会封装成这个对象。
public SendResult sendMessage(
        final String addr,
        final String brokerName,
        final Message msg,
        final SendMessageRequestHeader requestHeader,
        final long timeoutMillis,
        final CommunicationMode communicationMode,
        final SendCallback sendCallback,
        final TopicPublishInfo topicPublishInfo,
        final MQClientInstance instance,
        final int retryTimesWhenSendFailed,
        final SendMessageContext context,
        final DefaultMQProducerImpl producer
    ) throws RemotingException, MQBrokerException, InterruptedException {
     //1. 初始化RemotingCommand 对象
        RemotingCommand request = null;
     //2.设置消息头
        if (sendSmartMsg || msg instanceof MessageBatch) {
      //多条message
            SendMessageRequestHeaderV2 requestHeaderV2 = SendMessageRequestHeaderV2.createSendMessageRequestHeaderV2(requestHeader);
            request = RemotingCommand.createRequestCommand(msg instanceof MessageBatch ? RequestCode.SEND_BATCH_MESSAGE : RequestCode.SEND_MESSAGE_V2, requestHeaderV2);
        } else {
      //单条message
            request = RemotingCommand.createRequestCommand(RequestCode.SEND_MESSAGE, requestHeader);
        }
      // 3.将 message 内容放入request 中
        request.setBody(msg.getBody());
      //4.发送消息
        switch (communicationMode) {
            case ONEWAY:
                this.remotingClient.invokeOneway(addr, request, timeoutMillis);
                return null;
            case ASYNC:
                final AtomicInteger times = new AtomicInteger();
                this.sendMessageAsync(addr, brokerName, msg, timeoutMillis, request, sendCallback, topicPublishInfo, instance,
                    retryTimesWhenSendFailed, times, context, producer);
                return null;
            case SYNC:
                return this.sendMessageSync(addr, brokerName, msg, timeoutMillis, request);
            default:
                assert false;
                break;
        }

        return null;
    }
3. 关于 RemotingCommand 远程命令 对象,我们看一下它的组成与结构
   // 业务code  对应的是 RequestCode 这个常量池的code ,基本每一种业务类型都会对应一个code码,接收端通过code 进行做不同的处理
   private int code;
  //Java 语言版本
  private LanguageCode language = LanguageCode.JAVA;
  //version 版本信息
   private int version = 0;
  // 消息唯一id ,这个id 会关联 response
  private int opaque = requestId.getAndIncrement();
  //用来标记这个消息是发送消息的消息还是返回的消息,
    private int flag = 0;
  //备注的信息,比如一些错误注意信息等
    private String remark;
  //附带额外的信息
    private HashMap<String, String> extFields;
  //请求头信息,基本每一种业务类型都会对应一个请求头类
    private transient CommandCustomHeader customHeader;
  //json
  private SerializeType serializeTypeCurrentRPC = serializeTypeConfigInThisServer;
  //msg body 信息
  private transient byte[] body;
从这个消息体中,基本上关于消息的所有信息,都知道了。
4.接下来就是发送消息了:
   public void invokeAsync(String addr, RemotingCommand request, long timeoutMillis, InvokeCallback invokeCallback)
        throws InterruptedException, RemotingConnectException, RemotingTooMuchRequestException, RemotingTimeoutException,
        RemotingSendRequestException {
        //1.获取与broker的连接channel ,没有的话则创建
        final Channel channel = this.getAndCreateChannel(addr);
        if (channel != null && channel.isActive()) {
            try {
                if (this.rpcHook != null) {
                    //2.hook 前置钩子函数调用
                    this.rpcHook.doBeforeRequest(addr, request);
                }
                //3.发送消息(channel 连接对象,RemotingCommand 对象,超时时间,回调函数)
                this.invokeAsyncImpl(channel, request, timeoutMillis, invokeCallback);
            } catch (RemotingSendRequestException e) {
                log.warn("invokeAsync: send request exception, so close the channel[{}]", addr);
                this.closeChannel(addr, channel);
                throw e;
            }
        } else {
            this.closeChannel(addr, channel);
            throw new RemotingConnectException(addr);
        }
    }
5.设置response 对象设置,方便进行发送成功后的回调,进行真实发送
 public void invokeAsyncImpl(final Channel channel, final RemotingCommand request, final long timeoutMillis,
        final InvokeCallback invokeCallback)
        throws InterruptedException, RemotingTooMuchRequestException, RemotingTimeoutException, RemotingSendRequestException {
        //1.获取消息id
        final int opaque = request.getOpaque();
        boolean acquired = this.semaphoreAsync.tryAcquire(timeoutMillis, TimeUnit.MILLISECONDS);
        if (acquired) {
            final SemaphoreReleaseOnlyOnce once = new SemaphoreReleaseOnlyOnce(this.semaphoreAsync);
            //2.创建response对象
            final ResponseFuture responseFuture = new ResponseFuture(opaque, timeoutMillis, invokeCallback, once);
            //3.一个消息id 一个response 对象,放入responseTable中
            this.responseTable.put(opaque, responseFuture);
            try {
                //4.Netty API 将消息发送至服务端,并设置发送监听
                channel.writeAndFlush(request).addListener(new ChannelFutureListener() {
                    @Override
                    public void operationComplete(ChannelFuture f) throws Exception {
                        if (f.isSuccess()) {
                            responseFuture.setSendRequestOK(true);
                            return;
                        } else {
                            responseFuture.setSendRequestOK(false);
                        }

                        responseFuture.putResponse(null);
                        responseTable.remove(opaque);
                        try {
                            executeInvokeCallback(responseFuture);
                        } catch (Throwable e) {
                            log.warn("excute callback in writeAndFlush addListener, and callback throw", e);
                        } finally {
                            responseFuture.release();
                        }

                        log.warn("send a request command to channel <{}> failed.", RemotingHelper.parseChannelRemoteAddr(channel));
                    }
                });
            } catch (Exception e) {
                responseFuture.release();
                log.warn("send a request command to channel <" + RemotingHelper.parseChannelRemoteAddr(channel) + "> Exception", e);
                throw new RemotingSendRequestException(RemotingHelper.parseChannelRemoteAddr(channel), e);
            }
        } else {
            if (timeoutMillis <= 0) {
                throw new RemotingTooMuchRequestException("invokeAsyncImpl invoke too fast");
            } else {
                String info =
                    String.format("invokeAsyncImpl tryAcquire semaphore timeout, %dms, waiting thread nums: %d semaphoreAsyncValue: %d",
                        timeoutMillis,
                        this.semaphoreAsync.getQueueLength(),
                        this.semaphoreAsync.availablePermits()
                    );
                log.warn(info);
                throw new RemotingTimeoutException(info);
            }
        }
    }
消息编码:
从第一步消息发送流程中,我们已经得知RocketMq 在发送消息的时候,都会把消息封装成RemotingCommand 对象,我们都知道TCP 网络传输会出现拆包与粘包的现象,那么在RocketMq 是怎么解决这一个问题的呢?
关于拆包粘包的问题,常用的4 种解决方案如下:
1.消息定长:一条消息发送我设置固定的长度,长度不够就行空行补全。
2.消息分隔符:通过设置标志符,进行消息的解析。
3.换行分割
4.自定义消息长度:设置消息头,来解析消息的长度。
RocketMq 采用的是第4种解决方案,也是很容易操控的一种解决方案,具体实现我们看RocketMq Netty Client bootstrap 初始化的pipeline ;
代码地址:org.apache.rocketmq.remoting.netty.NettyRemotingClient#start
 @Override
    public void start() {
        this.defaultEventExecutorGroup = new DefaultEventExecutorGroup(
            nettyClientConfig.getClientWorkerThreads(),
            new ThreadFactory() {

                private AtomicInteger threadIndex = new AtomicInteger(0);

                @Override
                public Thread newThread(Runnable r) {
                    return new Thread(r, "NettyClientWorkerThread_" + this.threadIndex.incrementAndGet());
                }
            });

        Bootstrap handler = this.bootstrap.group(this.eventLoopGroupWorker).channel(NioSocketChannel.class)
            .option(ChannelOption.TCP_NODELAY, true)
            .option(ChannelOption.SO_KEEPALIVE, false)
            .option(ChannelOption.CONNECT_TIMEOUT_MILLIS, nettyClientConfig.getConnectTimeoutMillis())
            .option(ChannelOption.SO_SNDBUF, nettyClientConfig.getClientSocketSndBufSize())
            .option(ChannelOption.SO_RCVBUF, nettyClientConfig.getClientSocketRcvBufSize())
            .handler(new ChannelInitializer<SocketChannel>() {
                @Override
                public void initChannel(SocketChannel ch) throws Exception {
                    ChannelPipeline pipeline = ch.pipeline();
                    if (nettyClientConfig.isUseTLS()) {
                        if (null != sslContext) {
                            pipeline.addFirst(defaultEventExecutorGroup, "sslHandler", sslContext.newHandler(ch.alloc()));
                            log.info("Prepend SSL handler");
                        } else {
                            log.warn("Connections are insecure as SSLContext is null!");
                        }
                    }
                    //1. 主要看这里,我们的RemotingCommand 对象会经过如下的处理器
                    pipeline.addLast(
                        defaultEventExecutorGroup,
                        //1.OutBound编码处理器,用于将我们的 RemotingCommand对象转换成底层ByteBuffer,对应编码方法是remotingCommand 的 encode 方法
                        new NettyEncoder(),
                        //2.InBound 解码处理器,将网络传输字节转换微RemotingCommand ,采用了消息头指定消息长度进行处理拆包粘包
                        new NettyDecoder(),
                        //3/心跳检测
                        new IdleStateHandler(0, 0, nettyClientConfig.getClientChannelMaxIdleTimeSeconds()),
                        new NettyConnectManageHandler(),
                        //4.Inbound 处理业务消息类型(业务消息逻辑在这里)
                        new NettyClientHandler());
                }
            });

        this.timer.scheduleAtFixedRate(new TimerTask() {
            @Override
            public void run() {
                try {
                    NettyRemotingClient.this.scanResponseTable();
                } catch (Throwable e) {
                    log.error("scanResponseTable exception", e);
                }
            }
        }, 1000 * 3, 1000);

        if (this.channelEventListener != null) {
            this.nettyEventExecutor.start();
        }
    }
我们先开始分析NettyEncoder 编码处理流程:
    @Override
    public void encode(ChannelHandlerContext ctx, RemotingCommand remotingCommand, ByteBuf out)
        throws Exception {
        try {
            //1.请求头 信息放入ByteBuffer,body[] 不会被json序列化,encodeHeader 不会放入body 信息
            ByteBuffer header = remotingCommand.encodeHeader();
            //2.头信息写入Netty 的ByteBuf
            out.writeBytes(header);
            byte[] body = remotingCommand.getBody();
            if (body != null) {
                //3.写入body
                out.writeBytes(body);
            }
        } catch (Exception e) {
            log.error("encode exception, " + RemotingHelper.parseChannelRemoteAddr(ctx.channel()), e);
            if (remotingCommand != null) {
                log.error(remotingCommand.toString());
            }
            RemotingUtil.closeChannel(ctx.channel());
        }
    }
我们看下如下 encodeHeader 逻辑 ,执行完之后,此时我们的消息结构是:
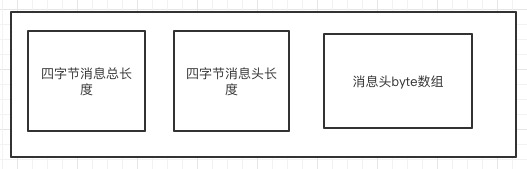
 public ByteBuffer encodeHeader(final int bodyLength) {
        // 1> header length size
        int length = 4;

        // 2> header data length
        byte[] headerData;
        //请求头 JSON 序列化请求头Byte信息
        headerData = this.headerEncode();

        length += headerData.length;

        // 3> body data length
        //此时length 的长度 = 4+headerLength+bodyLength
        length += bodyLength;
        //分配一个 【4个字节长度 Total Length】+【4个字节长度 header Length】+【headerLength】
        ByteBuffer result = ByteBuffer.allocate(4 + length - bodyLength);

        // length
        //前4个字节放消息的总长度
        result.putInt(length);

        // header length
        //然后放入4字节长度的消息头长度
        result.put(markProtocolType(headerData.length, serializeTypeCurrentRPC));

        // header data
        //放入消息头信息
        result.put(headerData);
    //flip 改变position 指针,后续进行写操作
        result.flip();

        return result;
    }
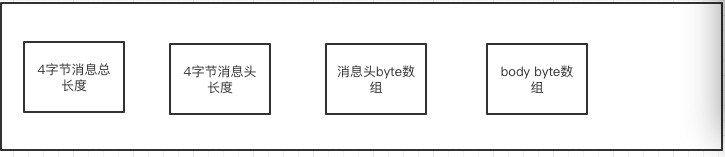
在 out.writeBytes(body) 后,写入body 消息后我们的消息结构是如下这个样子的:
消息解码:
需要看 NettyDecoder inbound 处理逻辑:
1.从类结构上看,RocketMq 解码器继承了netty 的 自定义长度解码器,来实现消息的解码
public class NettyDecoder extends LengthFieldBasedFrameDecoder {
2.定义一些长度偏移量,解决拆包粘包 ,定义了
1.消息的最大的长度。
2.消息长度字段的偏移量(从哪里开始读消息总长度)。
3.消息长度占几个字节(我应该读几个字节就可以读到消息长度)。
4.长度字段的补偿值,一些额外的字段。
5.最后的解码后结构我应该丢弃消息的前几个字节(比如解码后我不想要前4字字节的内容)。
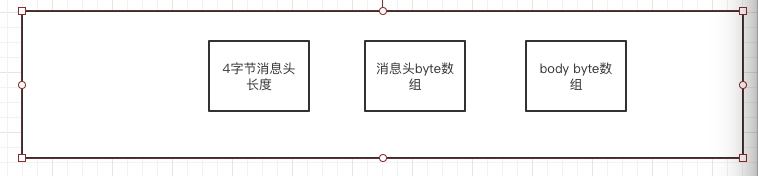
 public NettyDecoder() {
        super(FRAME_MAX_LENGTH, 0, 4, 0, 4);
    }
  public LengthFieldBasedFrameDecoder(
            int maxFrameLength,
            int lengthFieldOffset, int lengthFieldLength,
            int lengthAdjustment, int initialBytesToStrip) {
        this(
                maxFrameLength,
                lengthFieldOffset, lengthFieldLength, lengthAdjustment,
                initialBytesToStrip, true);
    }
3.从上面的定义中,我们可以得知,在解码完之后,由于丢弃了前4位的消息总长度(也没有作用的值看来),解码完之后消息格式 结构如下
4.然后进行RemotingDecoder:
  public static RemotingCommand decode(final ByteBuffer byteBuffer) {
        //1.得到ByteBuffer 的总长度
        int length = byteBuffer.limit();
        //2.消息头长度,因为丢弃了前4位的消息总长度,所以目前前4位是头长度
        int oriHeaderLen = byteBuffer.getInt();
        int headerLength = getHeaderLength(oriHeaderLen);
        //3.取出消息头的消息信息
        byte[] headerData = new byte[headerLength];
        byteBuffer.get(headerData);
        //4.json 序列化成对象
        RemotingCommand cmd = headerDecode(headerData, getProtocolType(oriHeaderLen));
        //5.得出body 的长度  【total - 4 -header】
        int bodyLength = length - 4 - headerLength;
        byte[] bodyData = null;
        if (bodyLength > 0) {
            bodyData = new byte[bodyLength];
            //6.buffer 取出body 信息
            byteBuffer.get(bodyData);
        }
        //7.设置body
        cmd.body = bodyData;

        return cmd;
    }
over