a、上传安装时需要的文件
①:FastDFS_v5.05.tar.gz
②:fastdfs-nginx-module_v1.16.tar.gz
③:libfastcommon-1.0.7.tar.gz
④:nginx-1.8.0.tar.gz
b、安装FastDFS之前,先安装libevent
[root@localhost /]# yum -y install libevent
c、安装 libfastcommon-1.0.7.tar.gz 工具包
①:[root@localhost ~]# tar -zxvf libfastcommon-1.0.7
②:[root@localhost libfastcommon-1.0.7]# ./make.sh
③:[root@localhost libfastcommon-1.0.7]# ./make.sh install
④:把/usr/lib64/libfastcommon.so文件向/usr/lib/下复制一份
   [root@localhost lib64]# cp /user/lib64/libfastcommon.so /user/lib
d、安装Tracker服务
①:[root@localhost ~]# tar -zxvf FastDFS_v5.05.tar.gz ②:[root@localhost FastDFS]# ./make.sh ③:[root@localhost FastDFS]# ./make.sh install 安装后在/usr/bin/目录下有以fdfs开头的文件都是编译出来的,配置文件都放到/etc/fdfs文件夹 ④:把/root/FastDFS/conf目录下的所有的配置文件都复制到/etc/fdfs下 [root@localhost ~]# cp /root/FastDFS/conf /etc/fdfs -r
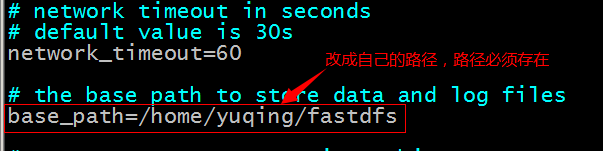
⑤:配置tracker服务。修改/etc/fdfs/tracker.conf文件。
⑥:启动tracker:/usr/bin/fdfs_trackerd /etc/fdfs/tracker.conf
  重启使用命令:/usr/bin/fdfs_trackerd /etc/fdfs/tracker.conf restart
e、安装storage服务
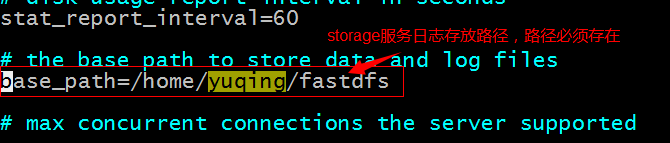
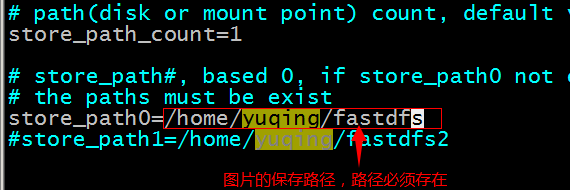
①:如果是在不同的服务器安装,第四步的1~4需要重新执行
②:配置storage服务。修改/etc/fdfs/storage.conf文件

f、测试服务
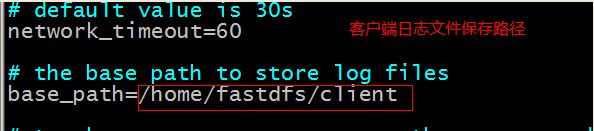
①:修改配置文件/etc/fdfs/client.conf

②:测试
[root@localhost FastDFS]# /usr/bin/fdfs_test /etc/fdfs/client.conf upload anti-steal.jpg
g、搭建nginx提供http服务
①:[root@localhost ~]# tar -zxvf fastdfs-nginx-module_v1.16.tar.gz
②:[root@localhost ~]# tar -zxvf nginx-1.8.0.tar.gz
③:修改/root/fastdfs-nginx-module/src/config文件,把其中的local去掉

④:对nginx重新config
[root@localhost nginx-1.8.0]#
./configure
--prefix=/usr/local/nginx
--pid-path=/var/run/nginx/nginx.pid
--lock-path=/var/lock/nginx.lock
--error-log-path=/var/log/nginx/error.log
--http-log-path=/var/log/nginx/access.log
--with-http_gzip_static_module
--http-client-body-temp-path=/var/temp/nginx/client
--http-proxy-temp-path=/var/temp/nginx/proxy
--http-fastcgi-temp-path=/var/temp/nginx/fastcgi
--http-uwsgi-temp-path=/var/temp/nginx/uwsgi
--http-scgi-temp-path=/var/temp/nginx/scgi
--add-module=/root/fastdfs-nginx-module/src

⑤:[root@localhost nginx-1.8.0]# make
   [root@localhost nginx-1.8.0]# make install
⑥:把/root/fastdfs-nginx-module/src/mod_fastdfs.conf文件复制到/etc/fdfs目录下


⑦:nginx的配置
  在nginx的配置文件中添加一个Server:
  server {
          listen       80;
          server_name  192.168.0.11;

          location /group1/M00/{
                  #root /home/FastDFS/fdfs_storage/data;
                  ngx_fastdfs_module;
          }
  }
⑧:将libfdfsclient.so拷贝至/usr/lib下
[root@localhost sbin]# cp /usr/lib64/libfdfsclient.so /usr/lib/
⑨:启动nginx
[root@localhost sbin]# ./nginx
h、启动FastDFS
①:启动tracker:  /usr/bin/fdfs_trackerd /etc/fdfs/tracker.conf
②:启动storage: /usr/bin/fdfs_storaged /etc/fdfs/storage.conf
致此结束……

关注我的公众号,精彩内容不能错过