课程要点:
- 创建一个iOS工程
- AppDelegate类
- UIKit框架以及UIWindow
- 在window上添加第一个试图UIView
- NSTimer(定时器)
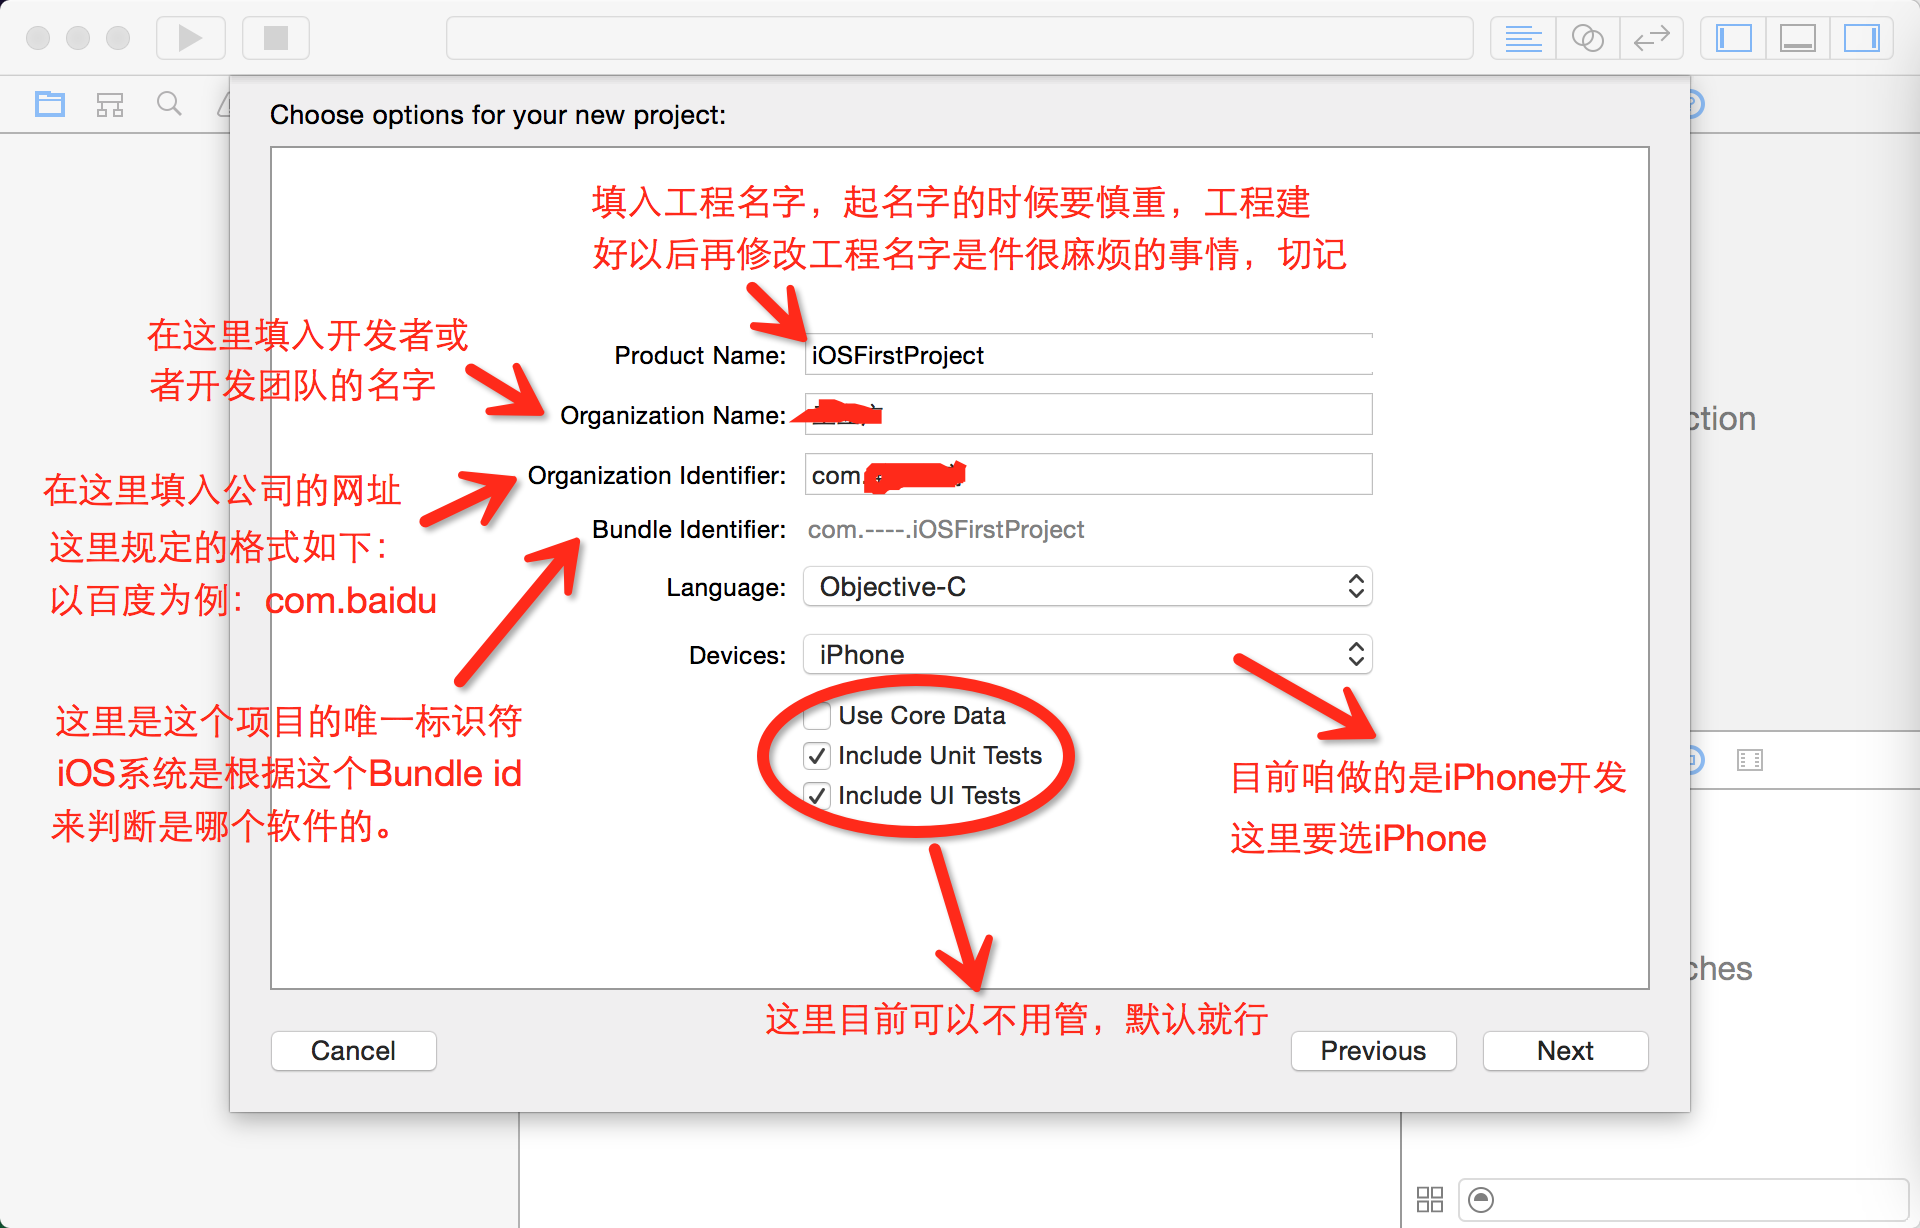
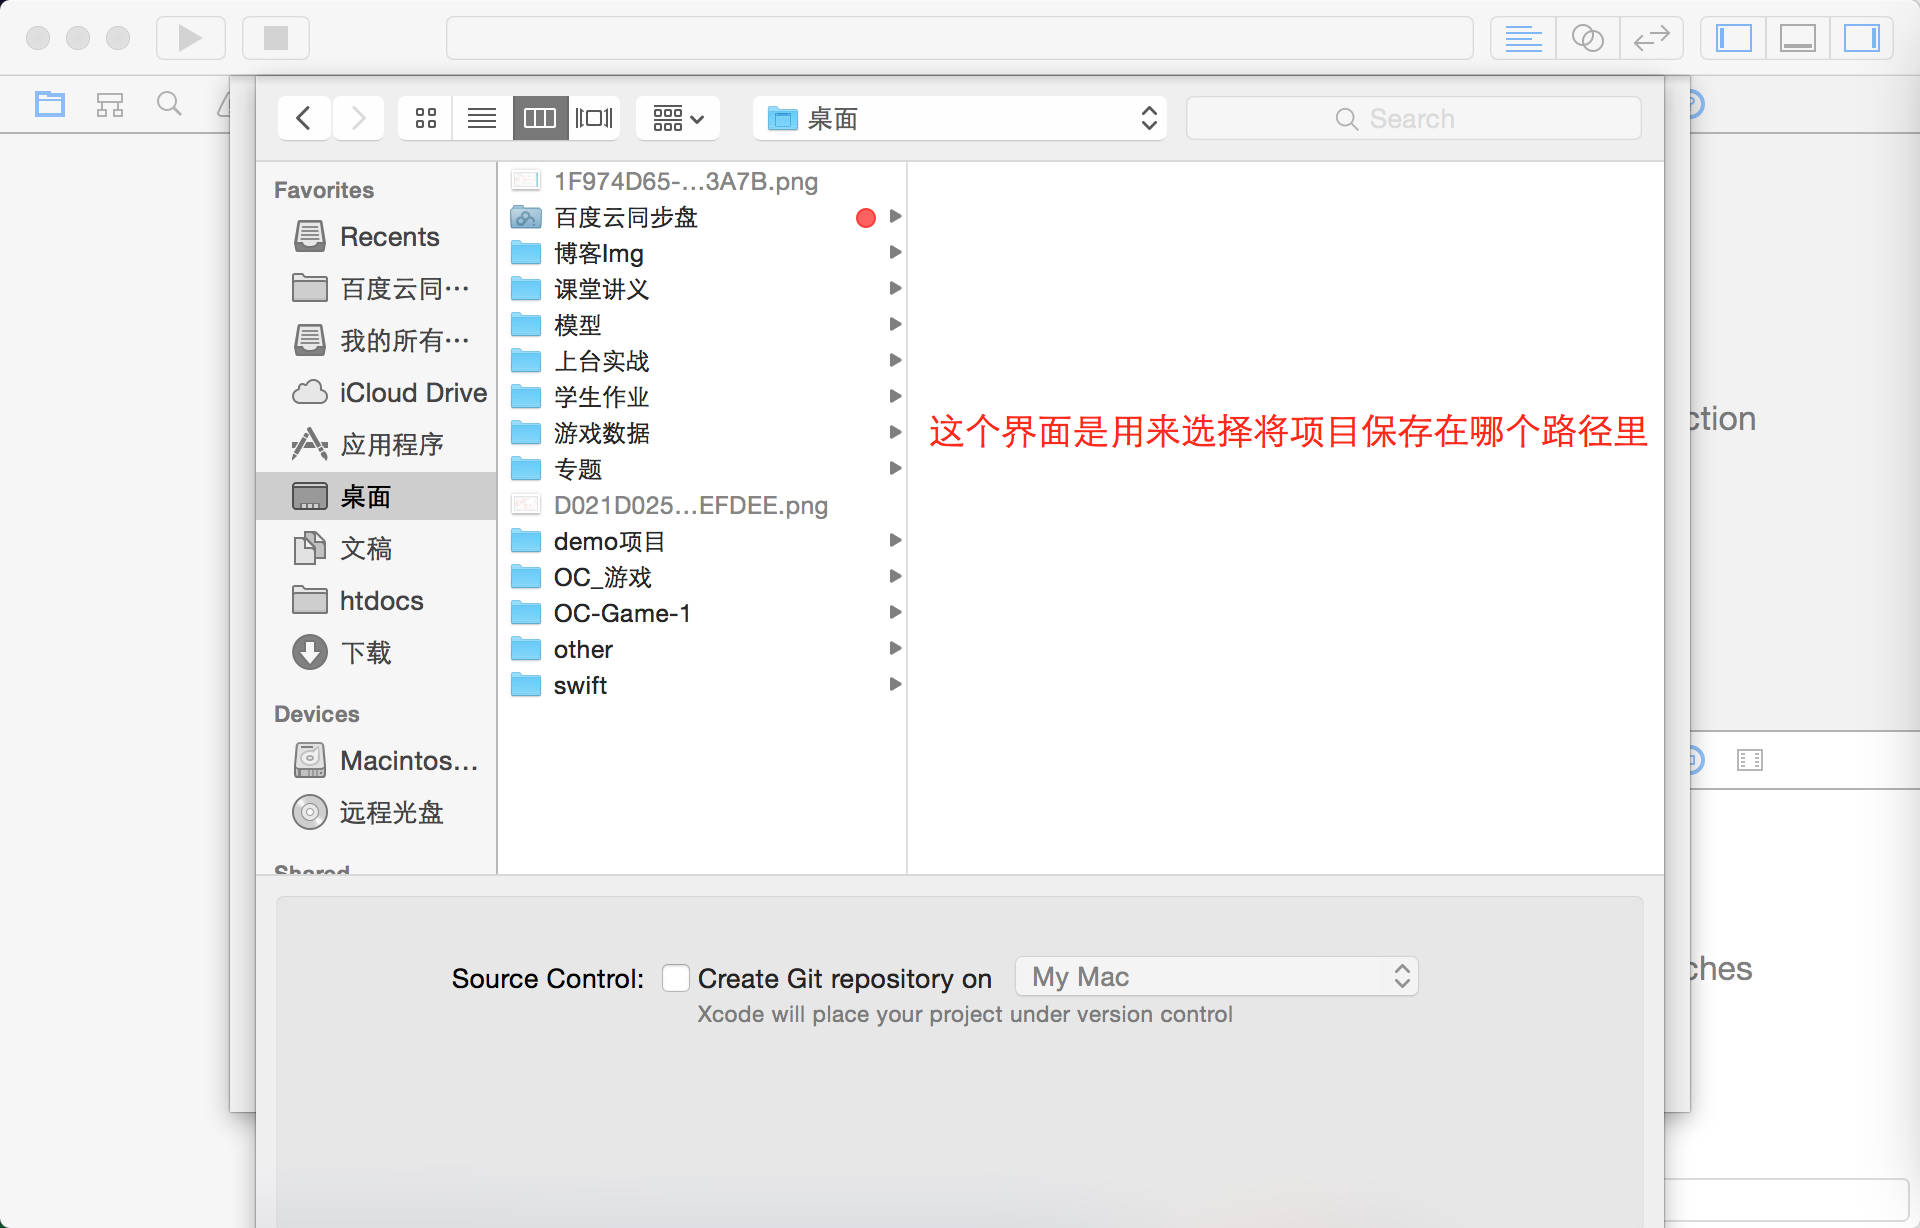
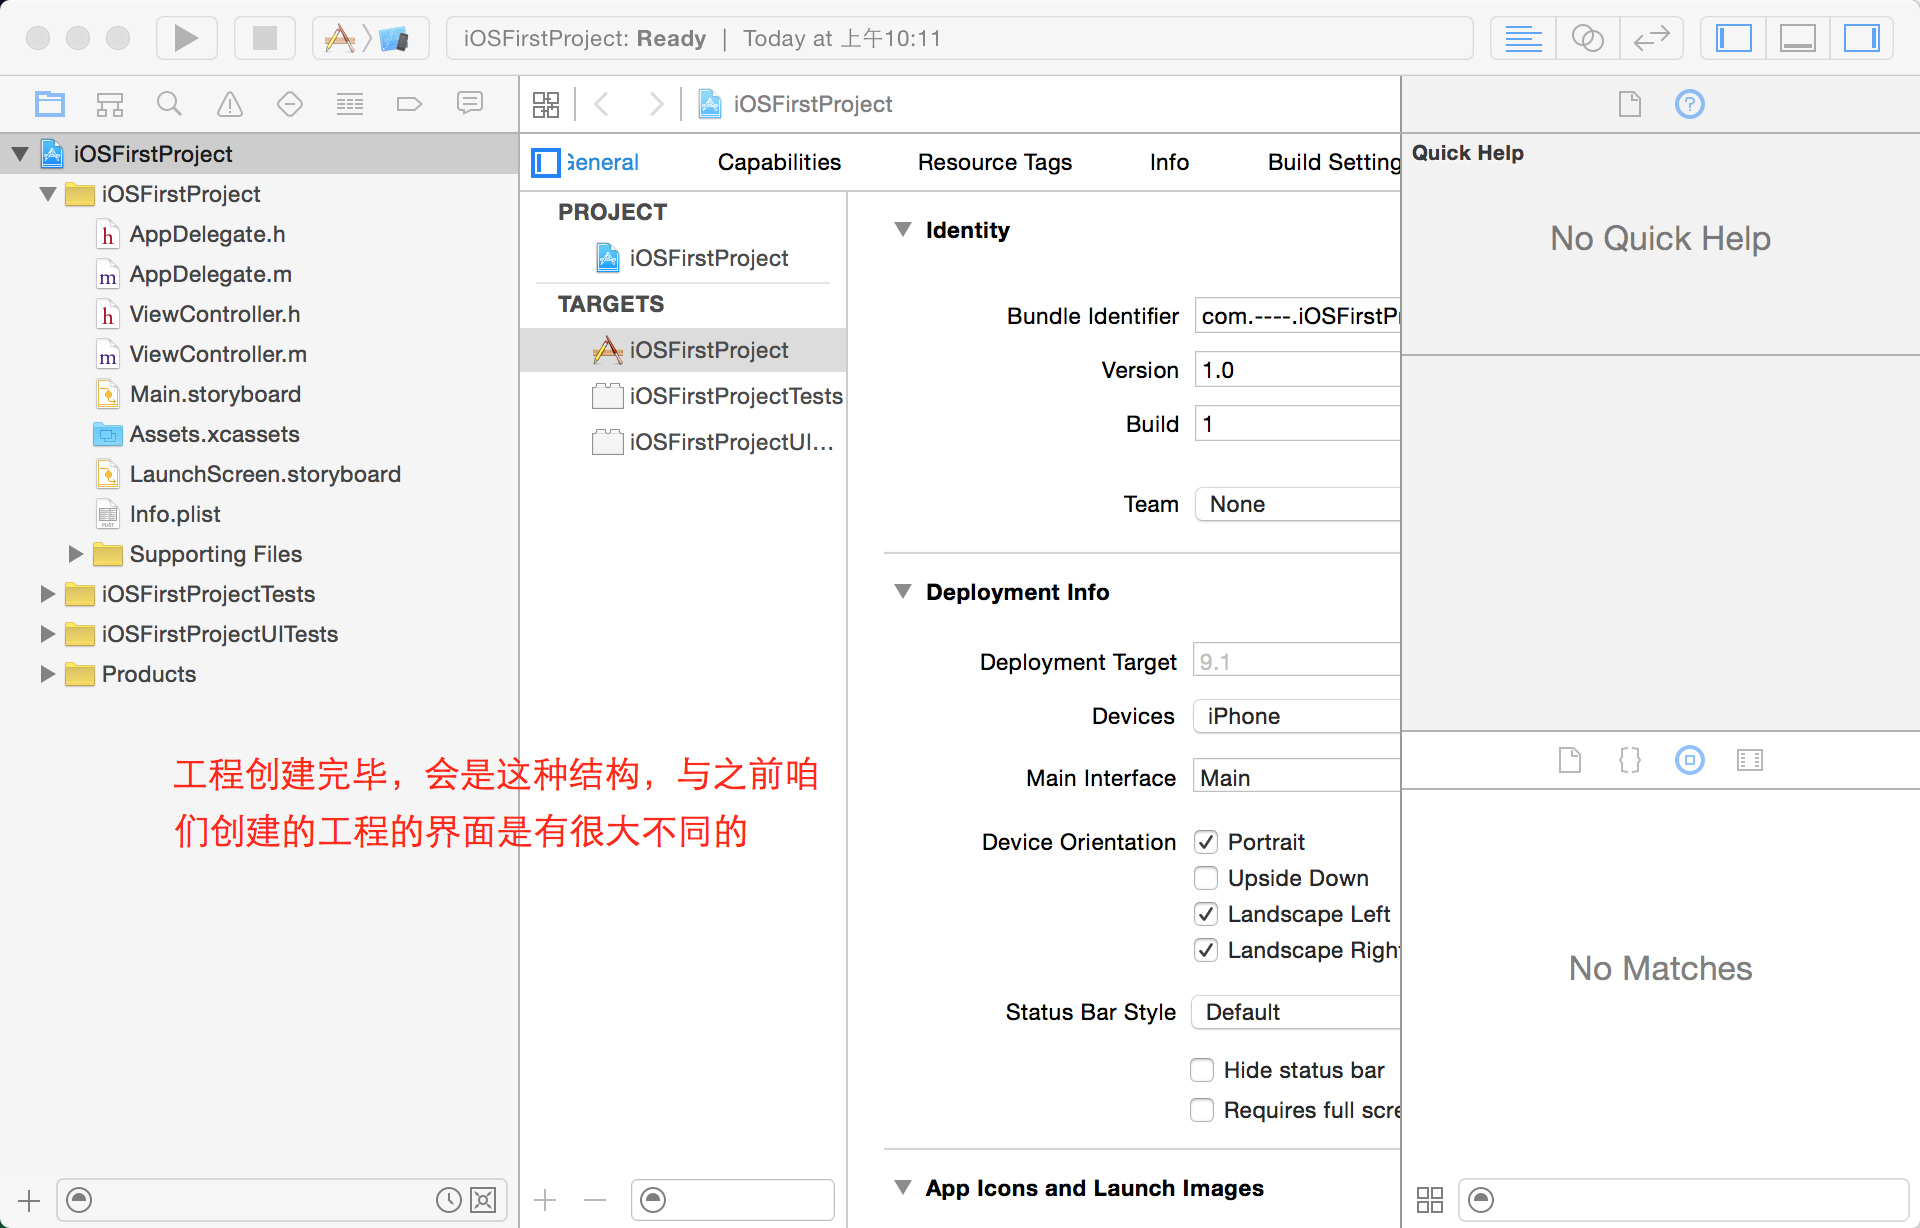
创建一个iOS工程

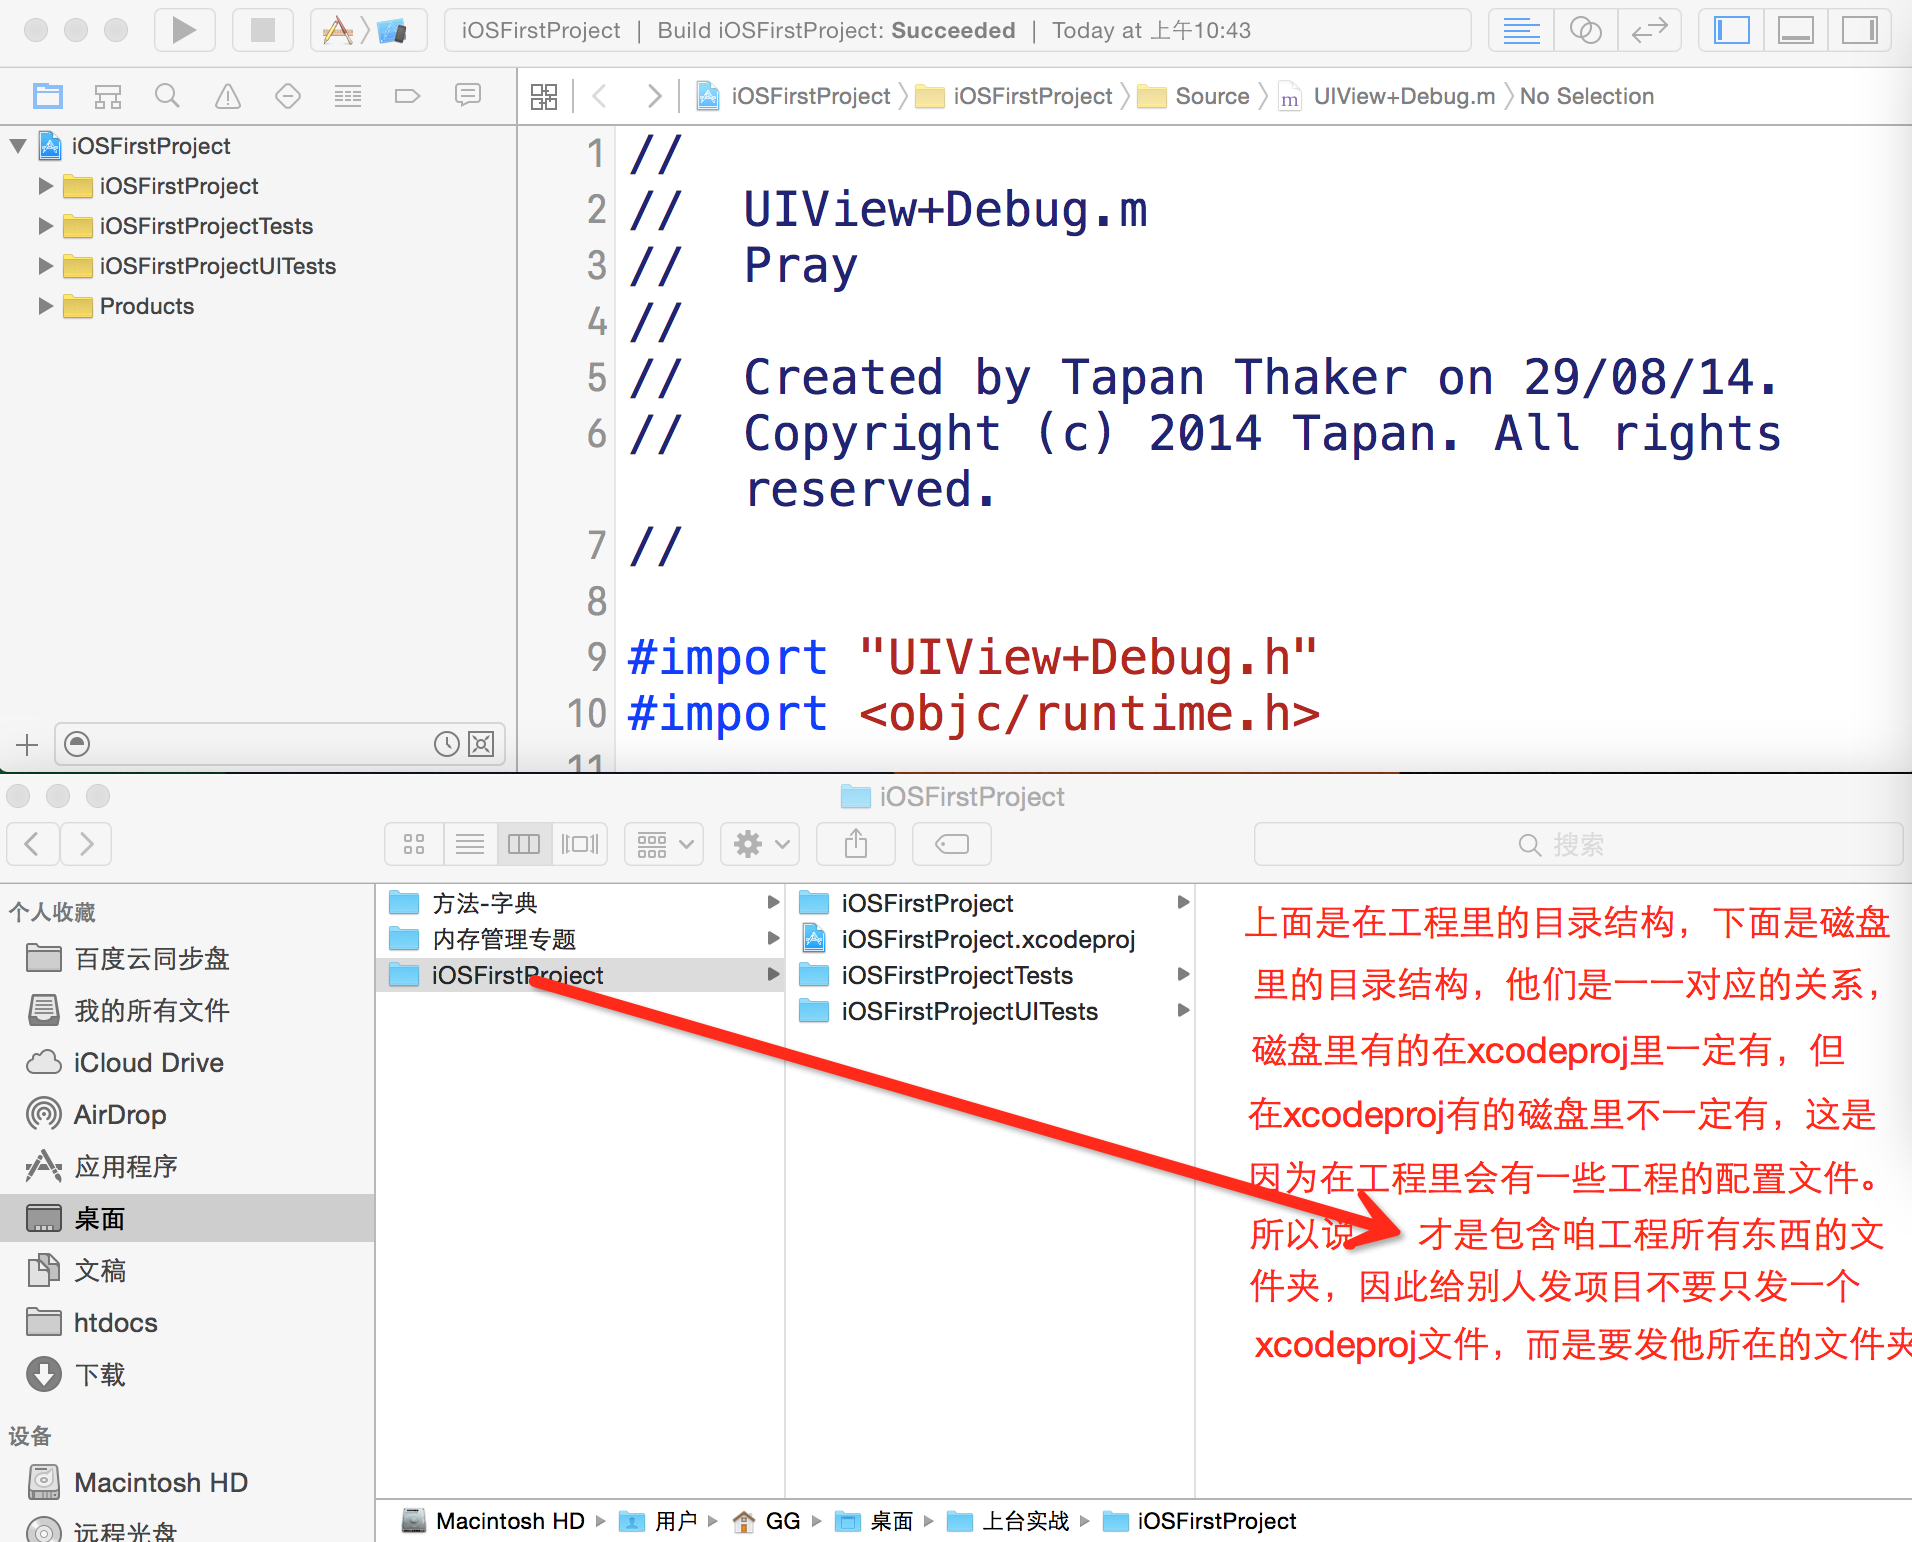
PS:接下来简单介绍一下工程里的文件与磁盘里文件的对应关系
AppDelegate类
创建工程过后咱们可以看到系统给咱们创建了很多之前咱们没有接触过的类,但近一段时间咱们只会用到AppDelegate类,其他类以及文件大家目前不需要了解。以后会慢慢的告诉大家。
AppDelegate类在工程里的作用至关重要,因为他管理着软件的整个生命周期(例如这个软件的启动,结束,进入后台,进入前台等等)。每次软件做不同的动作,就会调用AppDelegate.m相应的方法,咱们在这些方法内做咱们想做的操作就行。目前不需要理解AppDelegate里的东西为什么要这样写。只要搞明白怎么用就行。接下来是AppDelegate里相应方法的调用时间。就目前而言咱们常用的第一个- (BOOL)application:(UIApplication *)application didFinishLaunchingWithOptions:(NSDictionary *)launchOptions方法。其他的可做了解。
// AppDelegate里第一个进入系统的函数,应用程序完成初始化后调用。
- (BOOL)application:(UIApplication *)application didFinishLaunchingWithOptions:(NSDictionary *)launchOptions
{
    return YES;
}
// 即将进入后台
- (void)applicationWillResignActive:(UIApplication *)application
{
    // 应用程序即将从活跃状态切换到不活跃状态这个函数(消息)就会被调用。这也会在某些临时状态发生(比如来了电话,SMS短信,这个函数也会被调用)或者 当用户退出了应用程序,它开始切换到后台模式
    // 我们应该做什么?用这个方法我们要做暂停正常运行的任务。关闭定时器,降低OpenGL ES的分辨率。暂停游戏。
    // Sent when the application is about to move from active to inactive state. This can occur for certain types of temporary interruptions (such as an incoming phone call or SMS message) or when the user quits the application and it begins the transition to the background state.
    // Use this method to pause ongoing tasks, disable timers, and throttle down OpenGL ES frame rates. Games should use this method to pause the game.
    //从应用程序到前台(按Home后)或者锁屏等等
    NSLog(@"function %@ is calling",NSStringFromSelector(_cmd));
}
// 已经进入后台
- (void)applicationDidEnterBackground:(UIApplication *)application
{
    // 用这个方法来释放共享资源,保存用户数据,作废定时器,保存足够多用户状态信息以便程序被终止,我们下次还能恢复之前的状态信息
    // 如果你的应用程序支持后台调用,当用户退出应用程序(按Home键等)时这个方法就会被调用而不调用applicationWillTerminate消息
    // Use this method to release shared resources, save user data, invalidate timers, and store enough application state information to restore your application to its current state in case it is terminated later.
    // If your application supports background execution, this method is called instead of applicationWillTerminate: when the user quits.
    NSLog(@"function %@ is calling",NSStringFromSelector(_cmd));
}
// 即将切换到活跃状态(前台)
- (void)applicationWillEnterForeground:(UIApplication *)application
{
    // 如果从背景模式切换到不活跃状态(前台)时这个函数会被调用。在这里可以做一些和之前进入后台相反的操作。恢复之前进入后台保存的状态
    // Called as part of the transition from the background to the inactive state; here you can undo many of the changes made on entering the background.
    NSLog(@"function %@ is calling",NSStringFromSelector(_cmd));
}
// 已经进入活跃状态(前台)
- (void)applicationDidBecomeActive:(UIApplication *)application
{
    // 重新启动被暂停的任务。如果应用程序在后台,那么这里要刷新用户界面(UI)
    // Restart any tasks that were paused (or not yet started) while the application was inactive. If the application was previously in the background, optionally refresh the user interface.
    NSLog(@"function %@ is calling",NSStringFromSelector(_cmd));
}
//终止调用函数(ios4.0不支持多任务,按Home键会调用这个函数杀死应用程序;ios4.0后按Home键将挂起应用程序这个函数就不会调用,若想调用就必须在plist给Application does not run in background键赋值TRUE)
- (void)applicationWillTerminate:(UIApplication *)application
{
    // 当应用程序停止时会调用这个函数,在适当情况下保存数据。这个函数只有在<ios4.0时调用或者ios>4.0设置了不能后台模式时
    // Called when the application is about to terminate. Save data if appropriate. See also applicationDidEnterBackground:.
    NSLog(@"function %@ is calling",NSStringFromSelector(_cmd));
}
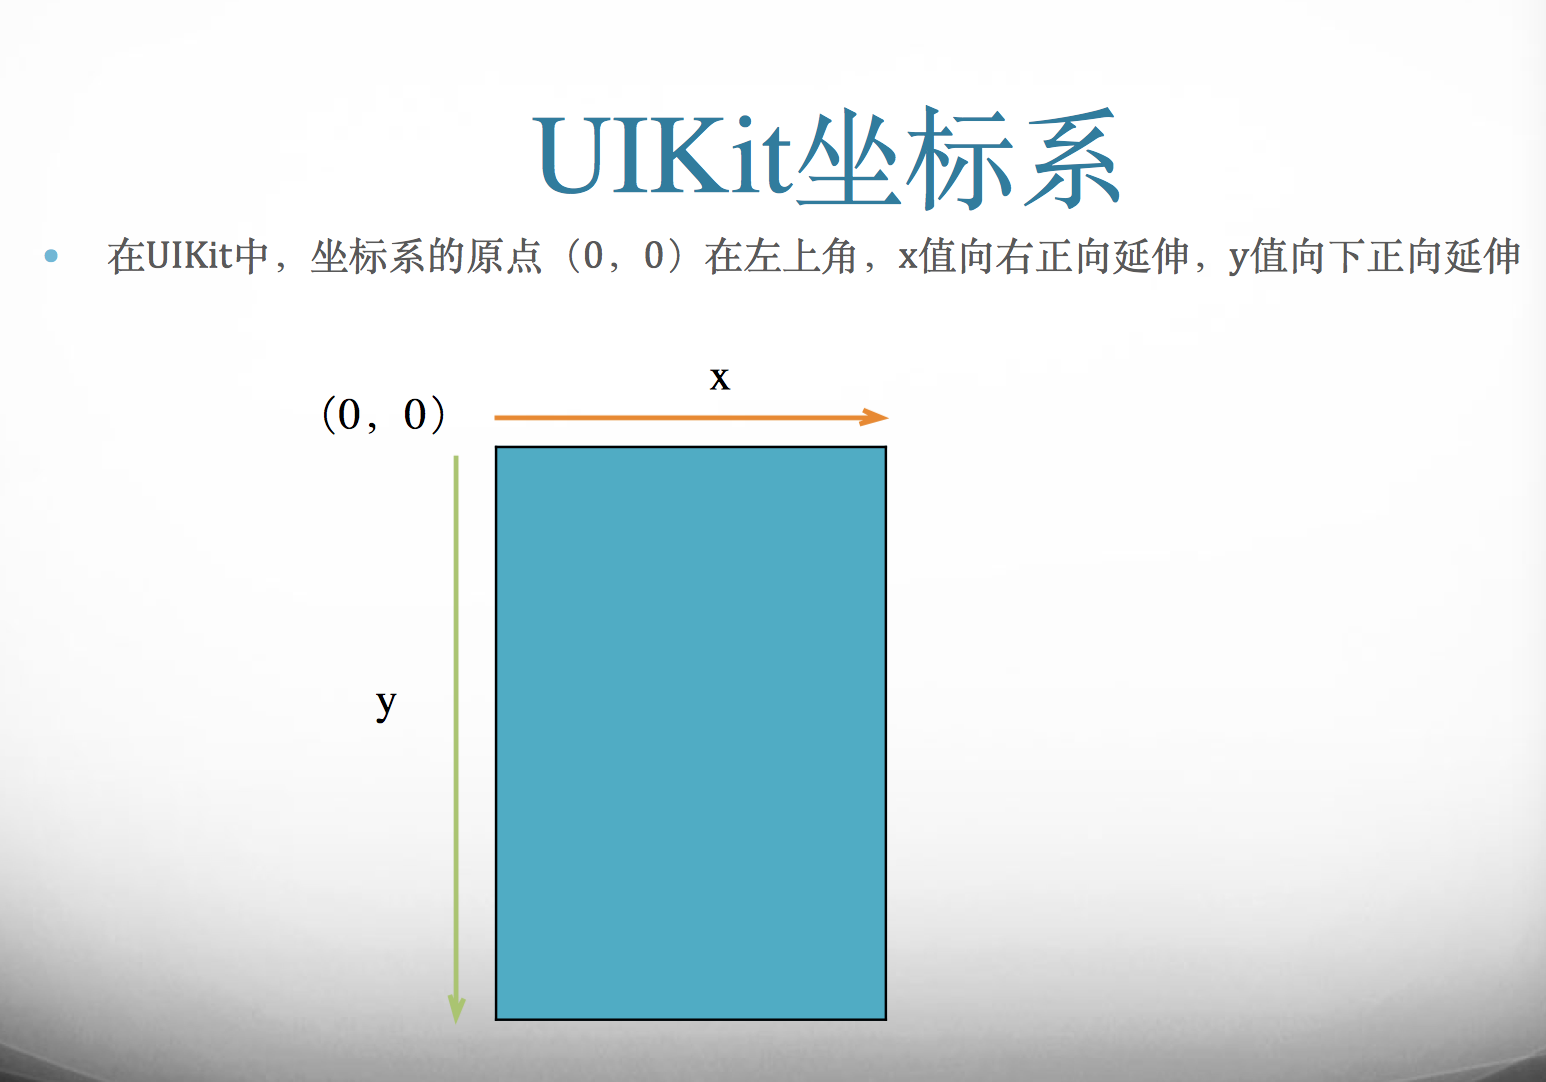
UIKit框架以及UIWindow
iOS:苹果移动设备的操作系统 OS是mac的操作系统
UIKit->里面包含了所有可以看的见得视图控件
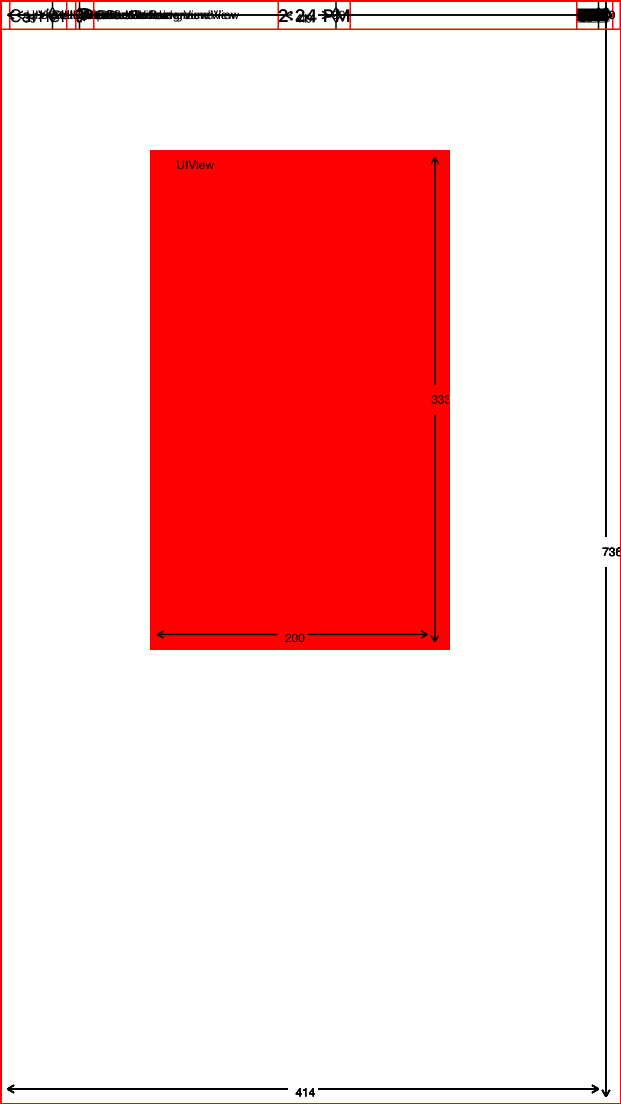
- (BOOL)application:(UIApplication *)application didFinishLaunchingWithOptions:(NSDictionary *)launchOptions {


    /*
     * window : 在软件内相当于一个平台或者载体,他承载着软件内所有的试图。一个应用程序通常只有一个窗口,但也有例外。

     * 作用:    它包含了应用程序的可视化的内容
                它为视图和其他应用程序对象在触摸事件中提供了关键性的作用
                它与视图控制器一起协作来呈现数据
    */

    //工程一创建完成,系统会自动会实例化一个window,只有设置了[self.window makeKeyAndVisible]; 才能在方法内给window添加试图。

    NSLog(@"自动创建的window=%@",self.window);  //在控制台可以看到输出的并不是空,由此可验证系统确实自动给生成了window对象

    [self.window makeKeyAndVisible];

    //以下三行代码是创建一个红色试图并把他放在window上
    UIView *view = [[UIView alloc]initWithFrame:CGRectMake(100, 100, 200, 333)];

    view.backgroundColor = [UIColor redColor];

    [self.window addSubview:view];


    return YES;
}
运行后,模拟器截图:
若我将 [self.window makeKeyAndVisible]; 给注释掉,运行后,模拟器截图:
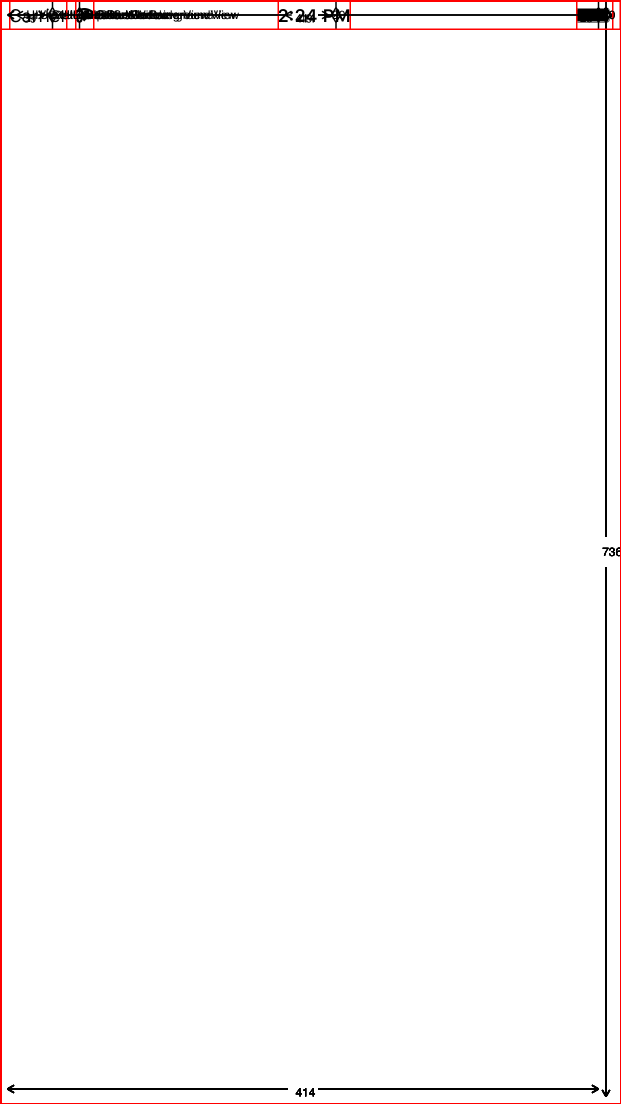
PS:这个证明了如果没有[self.window makeKeyAndVisible];,确实不能在AppDelegate.m中的- (BOOL)application:(UIApplication *)application didFinishLaunchingWithOptions:(NSDictionary *)launchOptions方法里给window添加试图。
在window上添加第一个试图UIView
/*
     * 创将一个试图并将试图放到window上的最基本三步走。
        1、创建一个试图对象
        2、告诉系统你要将这个试图对象放在父试图的哪个位置,以及这个试图对象的宽高
        3、告诉系统这个试图对象的父试图是谁。

     * PS:这三步是必不可少的。切记

     */

    //创建一个试图对象
    UIView *view = [[UIView alloc]init];

    //告诉系统你要将这个试图对象放在父试图的哪个位置,以及这个试图对象的宽高。
    /*
     * frame: 这个属性,用来确定试图对象的x,y,宽,高。frame他是CGRect类型,CGRect里存放在这四个元素。
     * CGRect: 这是一个结构体,内容如下:
struct CGRect {
CGPoint origin;
CGSize size;
};typedef struct CGRect CGRect;
* CGPoint:这也是一个结构体,用来确定试图对象的x,y,内容如下:
struct CGPoint {
CGFloat x;
CGFloat y;
};typedef struct CGPoint CGPoint;
* CGSize:同样是一个结构体,用来确实试图对象的宽和高,内容如下:
struct CGSize {
CGFloat width;
CGFloat height;
};typedef struct CGSize CGSize
*/
//除了有
view.frame = CGRectMake(100, 100, 200, 333);
 //告诉系统这个试图对象的父试图是谁。通过addSubView将view放到了self.window中
 [self.window addSubview:view];
/*
     * UIView的常用属性

     * backGroundColor:背景颜色

     * alpha:透明度

     * subViews:子试图集合   子试图:就是说放在view上面的试图就都叫做他的子试图,子试图可以有多个。人可以有多个子女。

     * hidden:是否隐藏

     * tag:标签值

     * superview:父试图     父试图:就是承载view的那个试图,一个试图只有一个父试图。人只有一个父亲。

     * multipleTouchEnabled:是否开启多点触摸

     * userInteractionEnabled:是否响应触摸事件

     * PS:目前前六种必须全部掌握,后两种,目前不常用,但必须知道是什么意思。
    */

    //backGroundColor
    view.backgroundColor = [UIColor redColor];

    //透明度 0是完全透明 1是完全不透明
    view.alpha = 0.5f;

    //子试图集合 由此获得放在view上的所有试图
    NSArray *viewArray = [view subviews];
    NSLog(@"放在view上的试图有%ld个",viewArray.count);
    NSArray *windowArray = [self.window subviews];
    NSLog(@"放在self.window上的试图有%ld个",windowArray.count);

    //PS:输出self.window的子试图时,会有两个,一个是咱们创建的试图,而另一个就是window上自带的一个试图,就好比桌子上的桌布。

    //hidden YES就隐藏,NO就不隐藏
    view.hidden = YES;
    view.hidden = NO;

    //tag 标签值,给一个试图设置标签值咱就可以通过标签值来寻找一个试图
    view.tag = 888;

    for (UIView *view in self.window.subviews) {

        if (view.tag == 888) {
            NSLog(@"找到了我标记的试图=%@",view);
        }
    }

    //superview 找到该试图的父试图

    NSLog(@"view的父试图是%@",[view superview]);
UIView的常用方法:
//将视图从父视图中移除
- (void)removeFromSuperview
[self.lblTest removeFromSuperview];

//插入一个视图到指定位置
- (void)insertSubview:(UIView *)view atIndex:(NSInteger)index

NSInteger myIndex = 0;
if(self.myView1.subviews.count>0)
{
    myIndex = self.myView1.subviews.count;
}

[self.myView1 insertSubview:self.lblTest atIndex:myIndex];

//将index1和index2位置的两个视图互换位置
- (void)exchangeSubviewAtIndex:(NSInteger)index1 withSubviewAtIndex:(NSInteger)index2

NSInteger index1 = [self.view.subviews indexOfObject:self.lblTest1];

NSInteger index2 = [self.view.subviews indexOfObject:self.lblTest2];

[self.view exchangeSubviewAtIndex:index1 withSubviewAtIndex:index2];


//添加子视图
- (void)addSubview:(UIView *)view

[self.myView1 addSubview:self.lblTest];


//插入视图到指定位置
- (void)insertSubview:(UIView *)view atIndex:(NSInteger)index

[self.view insertSubview:self.lblTest atIndex:0];


//插入视图到指定视图的下面
- (void)insertSubview:(UIView *)view belowSubview:(UIView *)siblingSubview

[self.view insertSubview:self.lblTest1 belowSubview:self.lblTest2];


//插入视图到指定视图的上面
- (void)insertSubview:(UIView *)view aboveSubview:(UIView *)siblingSubview

[self.view insertSubview:self.lblTest1 aboveSubview:self.lblTest2];


//将指定子视图移到最顶层
- (void)bringSubviewToFront:(UIView *)view

[self.view bringSubviewToFront:self.lblTest];


//将指定子视图移到最底层
- (void)sendSubviewToBack:(UIView *)view

[self.view sendSubviewToBack:self.lblTest];


//根据视图的tag查找视图
- (UIView *)viewWithTag:(NSInteger)tag

[self.lblTest setTag:5];
[self.view viewWithTag:5].alpha = 0;


//取得视图下的所有子视图
@property(nonatomic, readonly, copy) NSArray *subviews

NSArray *arrView = [self.view subviews];

for (UIView *view1 in arrView)
{
    NSLog(@"%@",view1);
}
PS:之前咱们说过OC是一门面向对象的语言,为什么要面向对象呢,因为对象自己能够实现一些功能,比如现在我们学的试图,咱们给一个坐标就能自己找到位置,给什么个颜色就能自己把自己染成什么颜色。这便是面向对象的一种体现。
NSTimer(定时器)
- (BOOL)application:(UIApplication *)application didFinishLaunchingWithOptions:(NSDictionary *)launchOptions {

    /*
     * NSTimer:定时器

     * intervarl: 设置定时时间

     * target:接收时间到了谁来接收这个信号

     * selector: 时间到了要做什么

     * userInfor:要传入的参数,一般置nil

     * repeats: 是否重复 YES重复 NO不重复

     */

    // 如果此时@selector(start:),start后面有冒号(有冒号就代表这个方法有参数),实现的时候咱就用- (void)start:(NSTimer *)timer,否则- (void)start;
NSTimer *timer = [NSTimer scheduledTimerWithTimeInterval:5 target:self selector:@selector(start:) userInfo:@"时间到" repeats:YES]; //让定时器立即调用指定方法 // [timer fire]; // //释放这个定时器// [timer invalidate]; // // //开启定时器 // timer.fireDate = [NSDate distantPast]; // //关闭定时器 // timer.fireDate = [NSDate distantFuture]; return YES; }
//在设置定时器的时候,这个方法已经用@selector声明过了,如果此时你不把他实现,运行就会奔溃。

- (void)start:(NSTimer *)timer
{
   NSLog(@"%@",[timer userInfo]);
}
以上是个人见解,若有错误欢迎指正,在学习中若有不理解欢迎骚扰 QQ:2314858225