内容概述
我去年写过几篇关于在WPF和Silverlight中实现可复用的设计的文章,分别如下,如果有兴趣地可以先参考一下
-
可复用的WPF或者Silverlight应用程序和组件设计(1)——应用程序级别
-
可复用的WPF或者Silverlight应用程序和组件设计(2)——组件级别
-
可复用的WPF或者Silverlight应用程序和组件设计(3)——控件级别
-
可复用的WPF或者Silverlight应用程序和组件设计(4)——外观级别
今天要继续写第五篇的原因在于最近的一些思考,也是我被问到的一个问题:我们知道WPF中的布局控件有很多,例如Grid,StackPanel,Canvas等等,利用他们,编写一定的XAML定义,就可以设计出来足够灵活多样的界面。但这里会有一个问题,如果我们很多界面都很类似,例如有某种固定格式的布局要求,那么是否在每个界面上都应该去定义一次呢?
[备注]和前几篇文章不同的是,这一篇没有录制视频,因为我还是觉得文字的部分很重要。
本文源代码可以通过 https://files.cnblogs.com/chenxizhang/WpfApplicationSample.zip 下载
问题详细描述
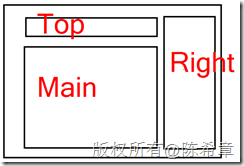
想象一下下面这样一个示意图
如果只有一个界面的话,那么我们可以很简单地实现,如下面所示
<Window x:Class="WpfApplicationSample.MainWindow"
        xmlns="http://schemas.microsoft.com/winfx/2006/xaml/presentation"
        xmlns:x="http://schemas.microsoft.com/winfx/2006/xaml"
        xmlns:extension="clr-namespace:System.Windows.Extensions;assembly=WPFExtension"
        Title="MainWindow"
        Height="350"
        Width="525">

    <Window.Resources>
        <Style TargetType="TextBlock">
            <Setter Property="FontSize"
                    Value="30"></Setter>
        </Style>
    </Window.Resources>

    <Grid extension:GridHelper.ShowBorder="True">
        <Grid.RowDefinitions>
            <RowDefinition Height="80"></RowDefinition>
            <RowDefinition Height="*"></RowDefinition>
        </Grid.RowDefinitions>

        <Grid.ColumnDefinitions>
            <ColumnDefinition Width="*"></ColumnDefinition>
            <ColumnDefinition Width="100"></ColumnDefinition>
        </Grid.ColumnDefinitions>


        <!--顶部控件-->
        <ContentControl>
            <ContentControl.Content>
                <TextBlock Text="Top"></TextBlock>
            </ContentControl.Content>
        </ContentControl>


        <!--主体控件-->
        <ContentControl Grid.Row="1">
            <ContentControl.Content>
                <TextBlock Text="Main"></TextBlock>
            </ContentControl.Content>
        </ContentControl>

        <!--右侧控件-->
        <ContentControl Grid.Column="1"
                        Grid.RowSpan="2">
            <ContentControl.Content>
                <TextBlock Text="Right"></TextBlock>
            </ContentControl.Content>
        </ContentControl>
    </Grid>
</Window>
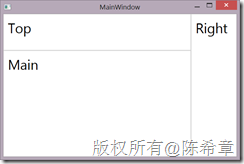
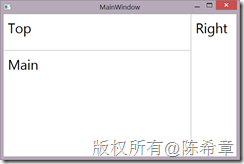
这个界面看起来是这样的:
所以,我们完全可以做得出来。但是问题的关键在于,如果有很多窗口都是这样的布局,那么我们是否应该每个窗口都去这样定义?还是说能否从一定意义上实现布局重用:能不能让这个Grid默认就有两行和两列呢?
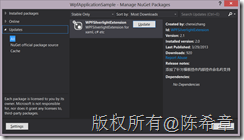
[备注] 上面的代码中,为了给Grid添加边框线,使用到了我以前写的一个扩展组件,可以通过这里了解如何使用:http://nuget.org/packages/WPFSilverlightExtension/
Windows Forms里面的做法
很久以前,那时候还没有WPF,我们都使用Windows Forms这个技术来做界面。那时候,对于上面提到的这种布局重用的问题,有一个很简单的解决方案:窗体继承。
对于这一种技术,本文并不打算对此进行展开讨论,有兴趣的朋友可以参考MSDN:http://msdn.microsoft.com/en-us/library/aa983613(v=VS.71).aspx
是否可以通过Style来实现对Grid行和列的定制
虽然确实有很多人怀念Windows Forms那种经典的界面开发,但时光之轮总是催我们向前。回到现在我们在用的WPF这个技术,对于控件和界面重用,WPF提供了很强大的Style功能。所以,基于上面这样的需求,我们会很自然地想到是否可以通过Style来实现。
        <Style TargetType="Grid">
            <Setter Property="ColumnDefinitions">
                <Setter.Value>
                    <ColumnDefinition Width="*"></ColumnDefinition>
                    <ColumnDefinition Width="100"></ColumnDefinition>
                </Setter.Value>
            </Setter>
            <Setter Property="RowDefinitions">
                <Setter.Value>
                    <RowDefinition Height="80"></RowDefinition>
                    <RowDefinition Height="*"></RowDefinition>
                </Setter.Value>
            </Setter>
        </Style>
如果能这样写,当然是很好的。但问题是,你不能这样写。错误如下
如果去查看Grid的类型定义,会发现这个属性确实只有get方法器
是否可以通过对Grid进行扩展来实现行和列的定制
一计不成,我们可以继续想办法。有着良好的面向对象素养的同学一定可以想到,那么要不就对Grid做一个扩展,默认提供行和列的定义,这样行不行呢?例如
using System.Windows.Controls;

namespace WpfApplicationSample
{
    class LayoutGrid:Grid
    {


        protected override void OnInitialized(System.EventArgs e)
        {
            base.OnInitialized(e);

            //默认提供两行两列的实现
            base.ColumnDefinitions.Add(new ColumnDefinition());
            base.ColumnDefinitions.Add(new ColumnDefinition() { Width = new System.Windows.GridLength(100) });

            base.RowDefinitions.Add(new RowDefinition() { Height = new System.Windows.GridLength(80) });
            base.RowDefinitions.Add(new RowDefinition());
        }
    }
}
然后,我们在界面上可以像下面这样使用。很明显,这样可以简化很多了。
<Window x:Class="WpfApplicationSample.MainWindow"
        xmlns="http://schemas.microsoft.com/winfx/2006/xaml/presentation"
        xmlns:x="http://schemas.microsoft.com/winfx/2006/xaml"
        xmlns:extension="clr-namespace:System.Windows.Extensions;assembly=WPFExtension"
        xmlns:local="clr-namespace:WpfApplicationSample"
        Title="MainWindow"
        Height="350"
        Width="525">

    <Window.Resources>
        <Style TargetType="TextBlock">
            <Setter Property="FontSize"
                    Value="30"></Setter>
        </Style>
    </Window.Resources>


    <local:LayoutGrid extension:GridHelper.ShowBorder="true">
        <!--顶部控件-->
        <ContentControl>
            <ContentControl.Content>
                <TextBlock Text="Top"></TextBlock>
            </ContentControl.Content>
        </ContentControl>


        <!--主体控件-->
        <ContentControl Grid.Row="1">
            <ContentControl.Content>
                <TextBlock Text="Main"></TextBlock>
            </ContentControl.Content>
        </ContentControl>

        <!--右侧控件-->
        <ContentControl Grid.Column="1"
                        Grid.RowSpan="2">
            <ContentControl.Content>
                <TextBlock Text="Right"></TextBlock>
            </ContentControl.Content>
        </ContentControl>

    </local:LayoutGrid>

</Window>
这个方案的美中不足,在于使用者还是需要记住要在具体的内容控件上面设置Grid.Row,Grid.Column等相关信息,而且,如果他忘记写,或者没有按照规范写,实际上就没有实现界面的统一,因为你没有办法强制他必须写,或者怎么写。
要想实现界面的统一,就必须把这种可能改变界面的属性,从使用者的身边移开。
使用用户控件实现PlaceHolder式的控件模板
既然直接扩展Grid并不能完整地实现我们的需求,我接下来想到是否可以使用用户控件来封装,而且为了让用户使用简单,同时也避免用户不按照规定使用,所以我借鉴了ASP.NET中的母版页(master page)这样的技术,使用类似PlaceHolder这样的方式来实现了一个控件模板。
<UserControl x:Class="WpfApplicationSample.TemplateLayout"
             xmlns="http://schemas.microsoft.com/winfx/2006/xaml/presentation"
             xmlns:x="http://schemas.microsoft.com/winfx/2006/xaml"
             xmlns:mc="http://schemas.openxmlformats.org/markup-compatibility/2006"
             xmlns:d="http://schemas.microsoft.com/expression/blend/2008"
             xmlns:extension="clr-namespace:System.Windows.Extensions;assembly=WPFExtension"
             mc:Ignorable="d"
             d:DesignHeight="300"
             d:DesignWidth="300"
             x:Name="root">
    <Grid extension:GridHelper.ShowBorder="True">
        <Grid.RowDefinitions>
            <RowDefinition Height="80"></RowDefinition>
            <RowDefinition Height="*"></RowDefinition>
        </Grid.RowDefinitions>

        <Grid.ColumnDefinitions>
            <ColumnDefinition Width="*"></ColumnDefinition>
            <ColumnDefinition Width="100"></ColumnDefinition>
        </Grid.ColumnDefinitions>

        <!--顶部控件-->
        <ContentControl Content="{Binding TopControl,ElementName=root}">
        </ContentControl>


        <!--主体控件-->
        <ContentControl Grid.Row="1"
                        Content="{Binding MainControl,ElementName=root}">
        </ContentControl>

        <!--右侧控件-->
        <ContentControl Grid.Column="1"
                        Grid.RowSpan="2"
                        Content="{Binding RightControl,ElementName=root}">
        </ContentControl>
    </Grid>
</UserControl>
需要注意的是,因为这里是定义一个控件模板,所以具体的内容控件是没有内容的,我们希望使用者可以后期再插入具体的内容。这里使用到了绑定的技术。为了支持绑定,我们在这个控件中添加了三个依赖属性,如下
using System.Windows;
using System.Windows.Controls;

namespace WpfApplicationSample
{
    /// <summary>
    /// Interaction logic for TemplateLayout.xaml
    /// </summary>
    public partial class TemplateLayout : UserControl
    {
        public TemplateLayout()
        {
            InitializeComponent();
        }


        public object TopControl
        {
            get { return (object)GetValue(TopControlProperty); }
            set { SetValue(TopControlProperty, value); }
        }

        // Using a DependencyProperty as the backing store for TopControl.  This enables animation, styling, binding, etc...
        public static readonly DependencyProperty TopControlProperty =
            DependencyProperty.Register("TopControl", typeof(object), typeof(TemplateLayout), new PropertyMetadata(null));


        public object MainControl
        {
            get { return (object)GetValue(MainControlProperty); }
            set { SetValue(MainControlProperty, value); }
        }

        // Using a DependencyProperty as the backing store for MainControl.  This enables animation, styling, binding, etc...
        public static readonly DependencyProperty MainControlProperty =
            DependencyProperty.Register("MainControl", typeof(object), typeof(TemplateLayout), new PropertyMetadata(null));


        public object RightControl
        {
            get { return (object)GetValue(RightControlProperty); }
            set { SetValue(RightControlProperty, value); }
        }

        // Using a DependencyProperty as the backing store for RightControl.  This enables animation, styling, binding, etc...
        public static readonly DependencyProperty RightControlProperty =
            DependencyProperty.Register("RightControl", typeof(object), typeof(TemplateLayout), new PropertyMetadata(null));


    }
}
那么,如何来使用这个模板控件呢?大致是下面这样的:
    <local:TemplateLayout>
        <local:TemplateLayout.TopControl>
            <TextBlock Text="Top"></TextBlock>
        </local:TemplateLayout.TopControl>
        <local:TemplateLayout.MainControl>
            <TextBlock Text="Main"></TextBlock>
        </local:TemplateLayout.MainControl>
        <local:TemplateLayout.RightControl>
            <TextBlock Text="Right"></TextBlock>
        </local:TemplateLayout.RightControl>
    </local:TemplateLayout>
很显然,这样使用起来更加简洁方便,而且使用者只能往我们预先定义好的三个内容区域中去填充内容,而不可能因为错误的设置属性(或者忘记设置属性)而导致界面布局不一致。
看起来相当不错,几乎已经完全实现了我们的要求。我以前也就一直这样用,直到最近发现一个问题。
如果我们出于一些目的,希望给这些内容控件添加名称,以便在后台代码中访问到它。例如下面这样:
    <local:TemplateLayout>
        <local:TemplateLayout.TopControl>
            <TextBlock Text="Top" x:Name="topTextBlock"></TextBlock>
        </local:TemplateLayout.TopControl>
        <local:TemplateLayout.MainControl>
            <TextBlock Text="Main"></TextBlock>
        </local:TemplateLayout.MainControl>
        <local:TemplateLayout.RightControl>
            <TextBlock Text="Right"></TextBlock>
        </local:TemplateLayout.RightControl>
    </local:TemplateLayout>
看起来是一个很平常的修改,但你立即会发现,这会导致无法编译通过。
Cannot set Name attribute value 'topTextBlock' on element 'TextBlock'. 'TextBlock' is under the scope of element 'TemplateLayout', which already had a name registered when it was defined in another scope.
这个错误实在是让人捉摸不透,目前也没有找到合理的解释。可能的解释是这样:因为我们的TextBlock其实是嵌入到TemplateLayout中,而TemplateLayout默认会为内部的控件生成一个名称,所以就不允许再定义名称。
为此,我也找了很多资料,一个最接近的讨论在这里
这个问题描述到了和本文比较接近的情况,而且也提到了如果假如名称,会出现错误。但是该文也没有可用的解决方案。
针对这个问题,我做了不少研究,同时也找了一些朋友进行讨论。其中和韦恩卑鄙 的讨论中,他给了我一个启发,打开了我另外一个思路:如果说定义名称是必须的,那么既然WPF内部的命名规范无法通过,那么是否可以通过自己的一种什么机制来定义名称呢?最终我确定使用附加属性来实现了该功能。荣誉属于韦恩卑鄙。
通过附加属性来为控件添加名称
我创建了如下这样一个类型,添加了一个附加属性,并且为控件查找提供了一个方法。
using System.Collections.Generic;
using System.Linq;
using System.Windows;

namespace WpfApplicationSample
{
    public class LayoutExtension
    {
        /// <summary>
        /// 这个方法用来获取控件
        /// </summary>
        /// <typeparam name="T">指定控件类型,例如TextBlock</typeparam>
        /// <param name="name">指定控件名称</param>
        /// <returns></returns>
        public static T GetControl<T>(string name)
            where T : class
        {
            return controls.FirstOrDefault(t => t.Key == name).Value as T;
        }


        private static Dictionary<string, DependencyObject> controls;
        static LayoutExtension()
        {
            controls = new Dictionary<string, DependencyObject>();
        }

        public static string GetName(DependencyObject obj)
        {
            return (string)obj.GetValue(NameProperty);
        }

        public static void SetName(DependencyObject obj, string value)
        {
            obj.SetValue(NameProperty, value);

        }

        // Using a DependencyProperty as the backing store for Name.  This enables animation, styling, binding, etc...
        public static readonly DependencyProperty NameProperty =
            DependencyProperty.RegisterAttached("Name", typeof(string), typeof(LayoutExtension), new PropertyMetadata(string.Empty, (d, e) =>
            {
                if (e.NewValue != null)
                {
                    var name = e.NewValue.ToString();

                    if (!controls.ContainsKey(name))
                        controls.Add(name, d);
                }
            }));

    }
}
如何使用这个扩展呢?
    <local:TemplateLayout>
        <local:TemplateLayout.TopControl>
            <TextBlock Text="Top"
                       local:LayoutExtension.Name="topTextBlock"></TextBlock>
        </local:TemplateLayout.TopControl>
        <local:TemplateLayout.MainControl>
            <TextBlock Text="Main"></TextBlock>
        </local:TemplateLayout.MainControl>
        <local:TemplateLayout.RightControl>
            <TextBlock Text="Right"></TextBlock>
        </local:TemplateLayout.RightControl>
    </local:TemplateLayout>
然后,如果需要在后台代码中访问这个控件,就可以大致像下面这样操作
using System.Windows;
using System.Windows.Controls;
using System.Windows.Media;

namespace WpfApplicationSample
{
    /// <summary>
    /// Interaction logic for MainWindow.xaml
    /// </summary>
    public partial class MainWindow : Window
    {
        public MainWindow()
        {
            InitializeComponent();

            Loaded += MainWindow_Loaded;
        }

        void MainWindow_Loaded(object sender, RoutedEventArgs e)
        {
            var txt = LayoutExtension.GetControl<TextBlock>("topTextBlock");
            txt.Foreground = new SolidColorBrush(Colors.Red);

        }
    }
}
如何更加方便地使用这个扩展?
为了使得大家更加方便地使用这个扩展,我将其合并到了我之前写过的针对WPF和Silverlight的扩展包中,大家可以通过nuget package manager搜索wpfsilverlightextension下载安装这个扩展包
目前这个扩展,既支持WPF,也支持Silverlight。可以免费使用。
如果是使用这个包的话,那么在导入名称空间的时候,我习惯用extension这个名称,所以在具体页面中用的时候,大致上是下面这样
    <local:TemplateLayout>
        <local:TemplateLayout.TopControl>
            <TextBlock Text="Top"
                       extension:LayoutExtension.Name="topTextBlock"></TextBlock>
        </local:TemplateLayout.TopControl>
        <local:TemplateLayout.MainControl>
            <TextBlock Text="Main"></TextBlock>
        </local:TemplateLayout.MainControl>
        <local:TemplateLayout.RightControl>
            <TextBlock Text="Right"></TextBlock>
        </local:TemplateLayout.RightControl>
    </local:TemplateLayout>
是否一定要使用这个扩展?
看起来还不错,但是是否一定要使用这个扩展呢?并不见得。因为我之前就说过,我以前没有意识到这个Name会出问题,是因为我几乎大部分时候都没有命名这种需要。为什么呢?因为我们大部分时候都会使用mvvm这种模式进行WPF应用程序的开发,在这种情况下,我们是不会在代码中去访问到控件的。例如下面是一个较为真实的例子:
<Page x:Class="EmployeePage"
      xmlns="http://schemas.microsoft.com/winfx/2006/xaml/presentation"
      xmlns:x="http://schemas.microsoft.com/winfx/2006/xaml"
      xmlns:mc="http://schemas.openxmlformats.org/markup-compatibility/2006"
      xmlns:d="http://schemas.microsoft.com/expression/blend/2008"
      xmlns:local="clr-namespace:SMSApplicationSample"
      xmlns:extension="clr-namespace:System.Windows.Extensions;assembly=WPFExtension"
      xmlns:tk="clr-namespace:Xceed.Wpf.Toolkit;assembly=WPFToolkit.Extended"
      mc:Ignorable="d"
      d:DesignHeight="300"
      d:DesignWidth="300"
      Title="EmployeePage">

    <Page.DataContext>
        <local:EmployeePageViewModel></local:EmployeePageViewModel>
    </Page.DataContext>

    <tk:BusyIndicator
        IsBusy="{Binding IsBusy}"
        BusyContent="Data loading,pls wait...">

        <local:TemplateLayout>
            <local:TemplateLayout.Condition>
                <!--加载所有员工-->
                <DataGrid ItemsSource="{Binding Employees}"
                          SelectedItem="{Binding CurrentEmployee,Mode=TwoWay}">
                    <!--通过前台的选择,TwoWay的方式可以将CurrentEmployee的更新告诉后台,并且去更新绑定了该属性的元素,这个机制就是所谓的依赖属性的通知功能-->
                </DataGrid>
            </local:TemplateLayout.Condition>
            <local:TemplateLayout.Result>
                <!--显示一个员工-->
                <ContentControl Content="{Binding CurrentEmployee}">
                    <ContentControl.ContentTemplate>
                        <DataTemplate>
                            <Grid extension:GridHelper.ShowBorder="True">
                                <Grid.RowDefinitions>
                                    <RowDefinition Height="auto"></RowDefinition>
                                    <RowDefinition Height="auto"></RowDefinition>
                                    <RowDefinition Height="auto"></RowDefinition>
                                    <RowDefinition Height="auto"></RowDefinition>
                                </Grid.RowDefinitions>
                                <Grid.ColumnDefinitions>
                                    <ColumnDefinition Width="100"></ColumnDefinition>
                                    <ColumnDefinition Width="*"></ColumnDefinition>
                                    <ColumnDefinition Width="100"></ColumnDefinition>
                                </Grid.ColumnDefinitions>

                                <Image Source="{Binding Photo}"
                                       Grid.Column="2"
                                       Grid.RowSpan="4"></Image>

                                <TextBlock Text="FirstName:"></TextBlock>
                                <TextBlock Text="{Binding FirstName}"
                                           Grid.Column="1"></TextBlock>

                                <TextBlock Text="LastName:"
                                           Grid.Row="1"></TextBlock>
                                <TextBlock Text="{Binding LastName}"
                                           Grid.Row="1"
                                           Grid.Column="1"></TextBlock>

                                <TextBlock Text="Title:"
                                           Grid.Row="2"></TextBlock>
                                <TextBlock Text="{Binding Title}"
                                           Grid.Row="2"
                                           Grid.Column="1"></TextBlock>

                                <TextBlock Text="Address:"
                                           Grid.Row="3"></TextBlock>
                                <TextBlock Text="{Binding Address}"
                                           Grid.Row="3"
                                           Grid.Column="1"></TextBlock>

                            </Grid>
                        </DataTemplate>
                    </ContentControl.ContentTemplate>

                </ContentControl>
            </local:TemplateLayout.Result>
            <local:TemplateLayout.Action>
                <!--显示一些按钮,可以添加,删除,修改员工-->
                <StackPanel>
                    <Button Content="New..."
                            Command="{Binding NewCommand}"></Button>
                    <Button Content="Update..."
                            Command="{Binding UpdateCommand}"
                            CommandParameter="{Binding CurrentEmployee}"></Button>
                    <Button Content="Delete..."
                            Command="{Binding DeleteCommand}"></Button>

                    <Button Content="Show Report..."
                            Command="{Binding ReportCommand}"></Button>
                </StackPanel>
            </local:TemplateLayout.Action>
        </local:TemplateLayout>
    </tk:BusyIndicator>

</Page>
本文源代码可以通过 https://files.cnblogs.com/chenxizhang/WpfApplicationSample.zip 下载


