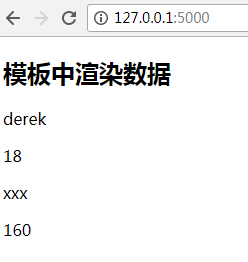
1.1.模板传参
(1)主程序
from flask import Flask,render_template

app = Flask(__name__)

@app.route('/')
def hello_world():

    context = {
        'username':'derek',
        'age':18,
        'gf':{
            'name':'xxx',
            'height':160
        }
    }
    return render_template('index.html',**context)    #加双下划綫,就可以直接获取key和value了

if __name__ == '__main__':

    app.run(debug=True)
(2)index.html
  <h2>模板中渲染数据</h2>
    <p>{{ username }}</p>
    <p>{{ age }}</p>
    <p>{{ gf.name }}</p>
    <p>{{ gf['height'] }}</p>
1.2.过滤器
常用的过滤器
- abs:绝对值
- default:如果当前变量没有值,则会使用参数中的值来替代
- escape:转义字符
- first:返回一个序列的第一个元素
- format:格式化字符串
- last:返回一个序列的最后一个元素
- length:返回一个序列的长度
- join:拼接字符串
- safe:关掉转义
- int:转为int类型
- float:转为浮点类型
- lower:转换为小写
- upper:转换为答谢
- replace:替换
- truncate:截取length长度的字符串
- striptags:删除字符串中所有的html标签,如果出现多个空格,将替换成一个空格
default过滤器的使用
主程序
from flask import Flask,render_template
app = Flask(__name__)

@app.route('/')
def hello_world():

    context = {
       'position':-9,
       'signature':None   #个性签名
    }
    return render_template('index.html',**context)

if __name__ == '__main__':
    app.run(debug=True)
index.html
  <h2>过滤器</h2>
    <p>{{ position|abs }}</p>
    <p>个性签名:{{ signature|default('此人很懒,没有留下任何说明',boolean=True) }}</p>
也可以用or的方式
 <h2>过滤器</h2>
    <p>{{ position|abs }}</p>
{#    <p>个性签名:{{ signature|default('此人很懒,没有留下任何说明',boolean=True) }}</p>#}
    <p>个性签名:{{ signature or '此人很懒,没有留下任何说明' }}</p>

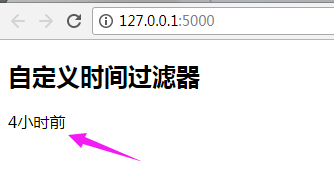
1.3.自定义过滤器
过滤器本质上就是一个函数,如果在模板中调用这个过滤器,那么就会将这个变量的值作为第一个参数传给过滤器这个函数,
然后函数的返回值会作为这个过滤器的返回值。需要使用一个装饰器:@app.template_filter('args')
实例:自定义时间处理过滤器
主程序
from flask import Flask,render_template
from datetime import datetime
app = Flask(__name__)

@app.route('/')
def hello_world():
    context = {
        'create_time':datetime(2018,5,25,17,52,10)
    }
    return render_template('index.html',**context)

@app.template_filter('handle_time')  #括号里面是自己给过滤器起的名字
def handle_time(time):
    '''
    1.如果时间间隔小与1分钟以内,就显示“刚刚”
    2.如果是1小时以内,显示“xx分钟”
    3.如果24h以内,显示“xx小时前”
    4.如果大于24小时小与30天,显示“xx天前”
    5.大于一个月,显示具体的时间
    :param time:
    :return:
    '''
    if isinstance(time,datetime):
        now = datetime.now()
        timestamp = (now-time).total_seconds()  #当前时间离创建时间的秒数
        if timestamp < 60:     #60s以内
            return "刚刚"
        elif timestamp >= 60 and timestamp < 60*60:
            minutes = timestamp / 60
            return "%s分钟前"%int(minutes)
        elif timestamp >= 60*60 and timestamp < 60*60*24:
            hours = timestamp / (60*60)
            return '%s小时前'%int(hours)
        elif timestamp >= 60*60*24 and timestamp < 60*60*24*30:
            days = timestamp / (60*60*24)
            return '%s天前'%int(days)
        else:
            return time.strftime('%Y/%m/%d %H:%M')
    else:
        return time

if __name__ == '__main__':
    app.run(debug=True)
index.html
 <h2>自定义时间过滤器</h2>
    {{ create_time|handle_time }}
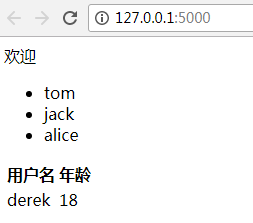
1.4.if和for的使用
for中包含以下变量,可以用来获取当前的遍历状态
- loop.index
- loop.index0
- loop.first
- loop.last
- loop.length
if和for简单用法
from flask import Flask,render_template

app = Flask(__name__)
app.config.update({
    'DEBUG':True,
    'TEMPLATES_AUTO_RELOAD':True
})

@app.route('/')
def hello_world():
    context = {
        'age':20,
        'users':['tom','jack','alice'],
        'person':{
            'name':'derek',
            'age':18
        }
    }
    return render_template('index.html',**context)

if __name__ == '__main__':
    app.run(debug=True)
index.html
<!DOCTYPE html>
<html lang="en">
<head>
    <meta charset="UTF-8">
    <title>Title</title>
</head>
<body>

    {% if age >= 18 %}
        欢迎
    {% else %}
        无权限
    {% endif %}

    <ul>
    {% for user in users %}
        <li>{{ user }}</li>
    {% endfor %}
    </ul>

    <table>
        <thead>
            <tr>
                <th>用户名</th>
                <th>年龄</th>
            </tr>
        </thead>
        <tbody>
            <tr>
                {% for key,value in person.items() %}
                    <td>{{ value }}</td>
                {% endfor %}
            </tr>
        </tbody>
    </table>

</body>
</html>
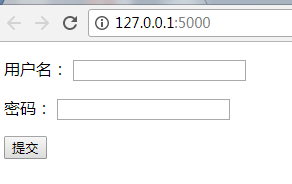
1.5.宏的使用和导入
模板的宏跟python中的函数类似,可以传递参数,但是不能有返回值,可以将一些经常用到的代码片段放到宏中,然后把一些
不固定的值抽取出来当成一个变量。
(1)简单使用实例
{#    定义一个宏,input是宏的名字,里面三个参数,可以指定默认参数值,也可以调用的传参#}
    {% macro input(name="",value="",type="text") %}
        <input name="{{ name }}" value="{{ value }}" type="{{ type }}">
    {% endmacro %}

    <form>
        <p>用户名:{{ input('username') }}</p>
        <p>密码:{{ input('password',type="password" )}}</p>
        <p> {{ input(value="提交",type="submit" )}}</p>

    </form>
(2)宏的两种导入方式
新建macros.html
 {% macro input(name="",value="",type="text") %}
        <input name="{{ name }}" value="{{ value }}" type="{{ type }}">
    {% endmacro %}
index.html中导入使用宏
{#第一种#}
{# with context可以把后端传到当前模板的变量传到定义的宏里面#}
{% import "macros.html" as macro with context %}
{#第二种#}
{% from "macros.html" import input as input_field %}


<!DOCTYPE html>
<html lang="en">
<head>
    <meta charset="UTF-8">
    <title>Title</title>
</head>
<body>
{#    第一种#}
    <form>
        <p>用户名:{{ macro.input('username') }}</p>
        <p>密码:{{ macro.input('password',type="password" )}}</p>
        <p> {{ macro.input(value="提交",type="submit" )}}</p>
    </form>

{#    第二种#}
     <form>
        <p>用户名:{{ input_field('username') }}</p>
        <p>密码:{{ input_field('password',type="password" )}}</p>
        <p> {{ input_field(value="提交",type="submit" )}}</p>
    </form>

</body>
</html>
1.6.set、with在模板中自定义变量
(1)set
在模板中可以使用set来定义变量,一旦定义了这个变量,在后面的代码中都可以使用,index.html
{% set usernmae='derek' %}

    <p>用户名:{{ usernmae }}</p>
(2)with
with语句定义的变量,只能在with语句代码块(endwith)里面使用,超过代码块,就不能再使用了,set语句没有end,全局使用
{% with age=18  %}
        <p>年龄:{{ age }}</p>
    {% endwith %}
1.7.蓝图的使用
目录如下:

(1)news.py
from flask import Blueprint


news_bp = Blueprint('new',__name__,url_prefix='/news')

@news_bp.route('/list/')
def news_list():
    return '新闻列表'
(2)user.py
from flask import Blueprint

# 1.定义一个蓝图,'user':蓝图的名字,url_prefix='/user':给url加一个前缀,注意后面不要加'/'
user_bp = Blueprint('user',__name__,url_prefix='/user')

@user_bp.route('/profile/')
def profile():
    return '个人中心'
(3)bluepoint_demo.py
from flask import Flask,url_for
# 2.导入
from blueprints.user import user_bp
from blueprints.news import news_bp

app = Flask(__name__)
# 3.注册蓝图
app.register_blueprint(user_bp)
app.register_blueprint(news_bp)

@app.route('/')
def hello_world():
    return 'Hello World!'

with app.test_request_context():
    print(url_for('new.news_list'))     # /news/list/   通过url_for反转url的时候要加蓝图的名字
    print(url_for('user.profile'))      # /user/profile/

if __name__ == '__main__':
    app.run(debug=True)

